
Appearance
Academics
Table Of Content
Registrars
The Academics -> Registrar section encompasses all aspects of the registrar's office. Here, you will find a comprehensive overview of the tools available to manage student records and academic processes.
The following articles aim to provide detailed explanations of each of the features located in this section, including bulk registration, course management, SAP, and much more.
Click one of the following knowledgebase articles you are trying to find:
- How to Create and Update Assignments as a Registrar
- How to takes Grades as Registrar
- How to take Attendance as Registrar
Bulk
Registration
Bulk Registration is a feature that allows schools to easily register multiple students for one or more courses at the same time. Here is an overview of how Bulk Registration works:
Accessing Students and Courses: Within the system, you'll find two main sections: "Students" and "Courses." Under the "Students" section, you'll choose the group of students that need to be registered. You can utilize various filters to narrow down your selection. Please note that only the "campus" field is a required filter.
- Filter Options: You can filter students based on various criteria, such as their campus, program, or enrollment status, etc. These filters help you precisely target the students you intend to register.
- Direct Entry: Alternatively, you can manually input the names/IDs of students if you prefer to add them individually.
Submitting Student Selection: After selecting your group of students, click "Submit," and the system will generate a list of the chosen students for your review.
Selecting Students: Review the list of students and check the boxes next to the names of the students you want to register.
Choosing Courses: In the "Courses" section, you'll need to specify the "Start Date" and "Campus" for the courses you want to register the selected students in. Ensure that these fields are correctly filled out.
Submitting Course Selection: Click "Submit" to proceed to the next step.
Selecting Courses: In this step, you'll see a list of available courses. Check the box next to each course you want the selected students to be registered in.
Final Submission: Once you've chosen the courses, click "Submit" to complete the bulk registration process.
Unschedule
Bulk Unschedule is a valuable feature that enables schools to efficiently remove multiple students from a course(s) all at once. This functionality can be especially handy in scenarios where a course is canceled, rescheduled, or when a large group of students needs to be withdrawn from a course for various reasons. Here's an overview of how Bulk Unschedule works:
Accessing Bulk Unschedule: To begin, navigate to the Bulk Unschedule feature within your system. Filtering Students: In the Bulk Unschedule interface, you have the option to filter students based on various criteria to identify the specific group of students you want to remove from a course. The "Campus" filter is the only required field, but you can use additional filters such as "Start date," "Status," "Program," or "Session current course" to further refine your search.
- Campus Filter: The Campus field is only required here.
- Additional Filters: If needed, you can use other filters like the course's start date, the student's enrollment status, the program they are enrolled in, or their current course session to pinpoint the desired students.
- Manual Search: Alternatively, you can directly enter the name or ID of specific students into the search bar if you have their information readily available.
Submitting Student Selection: After configuring your filter criteria, click "Submit." The system will generate a list of students who meet your specified criteria.
Selecting Students: Review the list of students and use checkboxes to select all students you wish to unschedule or only those who need to be removed from the course.
Performing the Unschedule: Once you have made your selections, click the "Unschedule" button to initiate the bulk unscheduling process.
Drop Courses
Bulk Drop Courses is a feature that allows schools to quickly drop multiple courses for one or more students at the same time. This can be useful in cases where students are no longer able to attend courses for various reasons or need to make changes to their schedules. Here is an overview of how Bulk Drop Courses works:
Accessing Bulk Drop Courses: Begin by accessing the Bulk Drop Courses feature within your system.
Selecting the Scheduled Term or Scheduled Term Group: In this step, you will specify the "Scheduled Term" or "Scheduled Term Group" for which you want to drop courses. This is the only required field to proceed.
- Scheduled Term: Choose the specific term for which you want to drop courses.
- Scheduled Term Group: Alternatively, you can select a term group if your institution organizes terms in this manner.
Applying Filters: While the "Scheduled Term" or "Scheduled Term Group" is mandatory, you have the option to apply additional filters to refine your list of students. These filters can include criteria such as program, status, or other relevant factors.
Retrieving Student List: After configuring your filter criteria, click "Get Students." The system will generate a list of students based on your selections.
Selecting Courses: For each student, you will see a list of their enrolled courses. You can individually select specific courses for each student by clicking on the down arrow next to their name. Alternatively, you have the option to select all courses for all student if necessary.
Dropping Courses: Once you have made your course selections, click the "Drop Courses" button to execute the bulk course drop process. This action will remove and drop the students from the selected courses with an F grade.
Status Change by Start Date
Bulk Status Change by Start Date, is a feature that allows schools to quickly change the enrollment status of multiple students based on the start date of their enrollment. This tool can be used for example, to move current students to either a pending graduate or graduate status based on their start date.
This can be especially helpful for schools with a large number of graduating students, as it allows for efficient management of student statuses in preparation for graduation. Here is an overview of how Bulk Status Change by Start Date works:
Selecting Criteria: To begin, you will specify the following criteria:
- Campus
- Program
- Start Date
- End Date
- Current Status: Choose the current enrollment status that you want to change.
- New Status: Select the desired new enrollment status.
Search and Review: After configuring the criteria, the system will return a list of students who meet the specified conditions. This list allows you to review the students who are eligible for the status change.
Individual Student Access: By clicking on a student's name from the list, the system will open that student's information in a new tab. Here, you can make any necessary edits to the student's transcript or other relevant data.
Selecting Students: Using checkboxes next to each student's name, you can indicate which students should have the status change applied to them.
Entering Details: Enter the Date of Decision (DOD), Last Date of Attendance (LDA), and any relevant comments associated with the status change.
Saving Changes: Click "Save," and the system will apply the specified status change to all the selected students.
Status Change by Expected Grad. Date
Bulk Status Change by Expected Graduation Date is a feature that allows schools to change the enrollment status of a group of students based on their expected graduation date. This feature simplifies the process of managing student statuses as they progress toward their expected graduation. Here's an overview of how Bulk Status Change by Expected Graduation Date operates:
Required Information: To begin, you must provide the following required information:
- Campus: Select the campus to which the students are affiliated.
- Program: Specify the program in which the students are enrolled.
- Expected Graduation Date: Indicate the expected graduation date for the students.
- Current Status: Define the current enrollment status of the students.
- New Status: Set the desired new enrollment status to which the selected students will transition.
Proceed to Next Step: After entering the mandatory information and selecting the new status, click "Next" to continue.
Student List: The system will generate a list of students who meet the specified criteria based on their expected graduation date, campus, program, current status.
Selecting Students: From the generated list, you can choose to update the enrollment statuses for students collectively by selecting all or individually by checking the box next to each student's name.
Status Change Criteria: Down below, provide the specific criteria for the status change. This includes the new enrollment status and any other relevant details required for the status change.
Saving Changes: Once you've configured the status change criteria, click "Save." The system will then proceed to apply the specified status changes to the selected students based on their expected graduation date.
Status Change by Course Start Date
Bulk Status Change by Course Start Date is a feature that allows schools to change the enrollment status of a group of students based on the start date of their courses.
This feature can be used to identify students who have not completed any coursework within a certain period of time and move them to a Pending Withdrawal or Withdrawal status. Here is an overview of how Bulk Status Change by Course Start Date works:
Filter Criteria: To begin, you can utilize the filters provided to narrow down and specify the list of students you are interested in.
- Status and Exclude Course Start Dates: These are required fields for the operation. You need to define the current enrollment status and specify whether you want to exclude students with course start dates within a particular range.
- Exclude Course Start Date: By specifying a date range in this field, you can exclude students from the list who have any course work within that defined date range.
- Exclude Future Course Start Dates: Optionally, you can choose to exclude students who have course start dates in the future by checking the corresponding box.
Submitting Filters: After configuring the filter criteria to your needs, click "Submit." The system will generate a list of students based on your specified criteria.
Selecting Students: From the generated list, you can select the students who should undergo a status change. Check the boxes next to their names to indicate your selection.
Status Change Criteria: Under the "Change Status" section, you will provide the criteria for the status change. This includes specifying the new enrollment status and other relevant fields necessary for the status change operation.
Status Change by Hold
Bulk Status Change by Hold is a feature that allows schools to change the enrollment status of a group of students based on the type of hold they have on their accounts. Here is an overview of how Bulk Status Change by hold works:
Required Fields: To initiate the process, you must complete the following required fields:
- Hold: Specify the type of hold that you want to use as the basis for the status change.
- Current Status: Indicate the current enrollment status of the students you are targeting.
- New Status: Define the desired new enrollment status that the selected students will transition to.
Optional Filters: Optionally, you can further refine your student selection using filters related to the "On hold" and "Off hold" dates.
Proceed to Next Step: After entering the necessary information and applying any optional filters, click "Next" to continue.
Student List: The system will then display a list of students who meet the specified criteria based on their hold type and current status. You can select students either individually or collectively.
Status Change Criteria: Down below you will provide the specific criteria needed for the status change.
Saving Changes: Once you've configured the status change criteria, click "Save" to execute the bulk status change. The system will apply the specified status change to the selected students.
Status Change by Applications
Status Change by Applications is a straightforward feature that allows you to modify the application status of students based on their application details. This process simplifies the management of student application statuses. Here's how Status Change by Applications works:
Required Fields: To initiate the status change process, you need to provide the following required information:
- Application Date: Specify the date when the application was submitted.
- Current Status: Indicate the current application status of the students whose statuses you intend to modify.
- New Status: Define the desired new application status that you want the selected students to transition to. This can include options such as "Pending Application," "Approved Application," "Rejected Application," "Withdrawn Application," "Canceled Application," or "Cancel-Reject Application."
Search and Review: After entering the necessary information, the system will return a list of students who meet the specified criteria based on their application details. You can review this list to ensure it accurately includes the students you intend to modify.
Select Students: From the generated list, you can select students either individually or collectively. You can do this by using the "Select All" option or manually checking the box next to each student's name.
Saving Changes: At the bottom, provide the specific criteria for the status change.
Execute Status Change: Once you've configured the status change criteria, click "Save" to execute the bulk status change. The system will apply the specified status change to the selected students' applications.
Attendance
To manage attendance, head over to Registrars > Attendance in your system.
As a Registrar, you have the ability to view and enter attendance records for all classes across the school.
Faculty members access attendance differently! They use Academics > Faculty > Attendance — but don’t worry — the layout and functionality are exactly the same. The only difference? Faculty can only see their own classes, while you (as a Registrar) get the full view!
When you enter this feature, you’ll see a calendar view displaying the attendance status for each class day.
Color Codes
Stay informed with these handy calendar color indicators:
| Color | Meaning |
|---|---|
| 🔴 Red | Attendance has NOT been taken. |
| 🟢 Green | Attendance HAS been taken. |
| 🟡 Yellow | Today’s date — that’s today! 🕒 |
| 🔵 Blue | Future class — attendance not yet possible. |
Taking Attendance
Click on any Red Course to open the class roster.
You’ll see a full list of students for that session.
For each student, mark as:
- Present
- Absent
- (Or any other statuses your school uses!)
Use these extra options for convenience:
- Reschedule the class
- Print the attendance list
- Send SMS notifications to students directly!
💡 Tip: Need more details on a student? Just click their name to open their full record in a new browser tab — quick and easy!
🎯 Done taking attendance? Your calendar will update its color codes so you always know which sessions are complete!
Attendance Sign-In
As a Registrar, you have the ability to view and enter attendance records for all classes across the school.
Faculty members access attendance differently! They use Academics > Faculty > Attendance — but don’t worry — the layout and functionality are exactly the same. The only difference? Faculty can only see their own classes, while you (as a Registrar) get the full view!
Taking attendance through sign-in is a convenient option within Campus Cloud. Here's a brief overview of how to use the Attendance Sign-In feature:
Taking Attendance by Sign-In:
Navigate to either "Academics" -> "Registrar" -> "Attendance Sign-In." or "Academics" -> "Faculty" -> "Attendance Sign-In." - depending on your role.
Select the course for which you want to take attendance.
In the selected course, students will be able to find their names listed.
Students can simply click on their name to sign in for attendance.
This method allows for a straightforward and efficient way for students to mark their attendance within Campus Cloud.
Semester Template Registration
To simplify the process of registering multiple students for courses within a specific term, our platform offers the Registrar -> Semester Template Registration feature.
Set Up Semester Templates: Before initiating the bulk registration, ensure that you have already set up your group of courses using the Semester Template feature. This can be accessed through the Academics section under Academics -> Setup -> Terms -> Semester Template.
Select Registration Criteria: To begin the bulk registration process, specify the following criteria:
- Start Date Range
- Student Status
- Program
- Campus
- Session
These fields are not mandatory but can help filter the list of eligible students.
Retrieve Eligible Students: After submitting the criteria, the system will generate a list of students who meet the specified conditions.
Select Term and Template: From the "Terms" ribbon, choose the relevant term and template (course) in which you want to register the students. You can select multiple templates if necessary, and the system will automatically display all courses that match your criteria.
Select Courses and Students: Check the box next to the course(s) and student(s) you wish to register. If needed, you can use the "check all" option to select all students or courses.
Initiate Registration: Once you've made your selections, click on the "Schedule" button to initiate the registration process.
⚠️ Warning: Be cautious as students cannot be registered for a course if their start date is after the course's start date. It's recommended to review each student's start date before scheduling their registration.
- Verification of Registration: At the end of the process, the system will provide the status of the registration, allowing you to easily verify that all selected students have been successfully registered in their chosen courses.
SAP
Prerequisite Check
Graduation Processing
Graduation Processing is a feature designed to facilitate the efficient processing of student records for graduation. Here's a step-by-step overview of how Graduation Processing works:
Required Fields: To initiate the graduation processing, you need to provide the following required information:
- Campus: Select the campus relevant to the graduation processing.
- Status: Specify the current enrollment status of the students you want to process.
- Term: Indicate the term for which you are processing graduation records.
Retrieve Student List: After entering the mandatory criteria, the system will generate a list of students who meet the specified conditions within your filter criteria.
View Student Details: You can view various student details, including their email, status, term, degree, campus, program, program credits, credits earned, and GPA. This information helps you make informed decisions during the graduation processing.
Access Student Transcript: By clicking on an individual student's name, you can access that student's specific transcript, allowing you to review their academic record in detail.
Select Students for Graduation: To move students to a Graduate Status, check the box next to the names of the students who should graduate. You can use the first checkbox to select all students if needed.
Change Status: After making your selections, click on the "Change Status" button located at the bottom of the screen.
Enter Graduation Details: In the subsequent window, you'll need to provide the following details for the selected students:
- Graduation Date (Grad Date): Specify the date on which these students are graduating.
- Date of Decision (DOD): Indicate the Date of Decision.
- Last Date of Attendance (LDA): Provide the Last Date of Attendance, if applicable.
- Comments: Include any necessary comments or notes related to the status change.
Confirm Status Change: After filling out the required details, click "Post." The system may display a warning message to confirm the status change and inform you if any records will be deleted due to this change.
Status Update: As a result of the status change:
- All Current Students: Will be moved to a Pending Grad Status.
- All Pending Grad Students: Will be moved to a Graduate Status.
Articulation and Transfer Clearinghouse
Faculty
Under Academics -> Faculty, you can access a range of tools and features designed to support faculty members and streamline their academic workflows.
This section includes resources for managing courses, assignments, and student grades, as well as tools for scheduling and communicating with students.
The following articles provide detailed explanations of each of the features located in this section, offering guidance and support to faculty members at all levels of experience.
Click one of the following knowledgebase articles you are trying to find:
- How to Create and Update Assignments as a Faculty member
- How to takes Grades as Faculty
- How to take Attendance as Faculty
Assignments
To create and up update your assigments navigate to:
- If you are Faculty navigate to Academics > Faculty > Assigments.
- If you are not Faculty, and have permission to edit system setups, you can setup the Master Assigments under Academics > Setup > Courses > Course List.
Easily manage your course assignments in Campus Cloud by understanding two key components: Assignment Groups and Assignments.
🗂️ What are Assignment Groups?
Assignment Groups help you organize similar types of work like Tests, Quizzes, Lab Work, or Homework.
They also control how much each group contributes to the final grade (via weight %).
✅ Example: Create an Assignment Group called "Lab", assign it 50% of the total course grade, and add all related lab assignments under it.
The system will automatically use these groups and weights to calculate in-progress and final grades.
✏️ What are Assignments?
Assignments are the specific tasks you give to students. Each assignment sits inside an Assignment Group and has its own points, name, and due date.
✅ Example: Within the "Lab" Assignment Group, you can add multiple individual labs, each worth a set number of points.
⚙️ How to Create & Update Assignments
Go to Academics → Faculty → Assignments.
Select the course you wish to manage. You’ll see any existing Assignment Groups and Assignments.
To add a new Assignment Group:
- Click the pencil icon next to any group (e.g., "Other").
- Adjust its weight % to make room for your new group.
- Click Save.
Click Add to create a brand-new Assignment Group.
- Enter its name (e.g., "Final Exam") and weight %.
- Click Save.
To add an Assignment to a group:
- Click Add next to "Assignments."
- Fill in the name, points, and due date.
- Click Save.
Repeat as needed to build out your course grading structure.
Need to remove something? Click the trashcan icon 🗑️ to delete any Assignment or Assignment Group.
Want to reuse setup from another course?
Use Copy From, pick the course, and click Copy to bring over assignments.
🏗️ Setting Up Master Assignments
For courses you offer regularly, set up Master Assignments under: Academics → Setup → Course List → Assignments this lets you save time and apply the same structure each term.
👉 Click here to read more about setting up the Master Assignments
Gradebook
When you navigate to Academics > Faculty, you’ll find your Gradebook, where you can enter and manage student grades efficiently.
You can view the gradebook by Date or by Terms — using Terms is usually the easiest way.
If no courses appear, simply click ALL and select the course you want to grade.
If you see your course listed, click on it to open the gradebook with all enrolled students displayed.
Enter grades directly into the fields, and remember to click Save when you’re done to keep your work.
Once all grades are entered and the course is complete, click the Finalize Course button.
A confirmation prompt will appear — check the confirmation box and then click Finalize Course to lock in the grades.
After finalizing, the course completion and grades will be visible on each student's transcript under their record.
Attendance
Campus Cloud offers three ways for attendance to be taken, depending on the school's policies and procedures.
The first way is for faculty members to take attendance manually through the system. The second way is for students to sign in to a course to indicate their attendance. Lastly, the third option is to use a scan-in system to take attendance.
Please refer to the following articles for more detailed information on each method.
Processing Attendance
Managing attendance within the Campus Cloud system involves several steps. Here's a guide on how to navigate to the attendance feature, record attendance, reschedule classes, and send SMS messages to the class:
Accessing Attendance:
Begin by navigating to "Academics" -> "Faculty" -> "Attendance."
Please note that instructors can only view attendance information for the courses they are currently teaching.
Attendance Color Codes:
- 🔴 RED - past due
- 🟡 YELLOW - today
- 🔵 BLUE - future
- 🟢 GREEN - entered attendance
Recording Attendance:
Select the course for which you want to record attendance. A screen will pop up displaying the list of students enrolled in that class.
For each student, choose their attendance status from the drop-down menu. Options typically include "Present," "Absent," "Excused," "Make Up," or "Field Trip."
After entering attendance for all students, scroll to the bottom of the page and click "Save" to record the attendance data.
Rescheduling Classes:
- If necessary, you have the option to reschedule classes. Select the date you want to reschedule the class to and click the "Reschedule" button.
Sending SMS Messages:
Instructors also have the ability to send SMS messages to the entire class or select students.
On the left-hand side, check the students you wish to send an SMS to.
Write your message in the text box provided below.
Press the "Send SMS" button to send the message to the selected students.
Attendance Sign-In
Taking attendance through sign-in is a convenient option within Campus Cloud. Here's a brief overview of how to use the Attendance Sign-In feature:
Taking Attendance by Sign-In:
Navigate to "Academics" -> "Faculty" -> "Attendance Sign-In."
Select the course for which you want to take attendance.
In the selected course, students will be able to find their names listed.
Students can simply click on their name to sign in for attendance.
This method allows for a straightforward and efficient way for students to mark their attendance within Campus Cloud.
Attendance Scan-In
The Attendance Scan-In feature provides faculty with an efficient way to track student attendance using barcode scanning technology, eliminating manual entry and ensuring precise time records.
📋 Requirements
| Requirement | Details |
|---|---|
| Barcode Scanner | Standard USB barcode scanner (most affordable models are compatible) |
| Student ID Cards | Printed ID cards issued through Campus Cloud (CC) |
| Badge Templates | Four template options available in CC |
🚀 How to Use
- Access the Tool
- Navigate to: Academics → Faculty → Attendance Scan In
- Select the course you are taking attendance for.
- Record Attendance
- Option 1: Scan Student IDs - Have students scan their ID cards—the system will automatically log their attendance.
- Option 2: Manual Entry - Type student IDs directly into the text field if scanning is unavailable.
Finalize Attendance - Once all students are logged, click the Finalize button to confirm attendance.
Scan Out (End of Class) - At the end of the session, students should scan out using their ID cards. The system will automatically calculate their total attendance duration (hours/minutes).
‼️ Need Help? Contact IT Support for further assistance.
Student IDs
Printing student IDs within Campus Cloud can be done by following these steps:
To Print Student IDs:
Navigate to "Academics" -> "Student IDs".
Start by selecting the desired campus and start date for which you wish to print student IDs.
After selecting the campus and start date, click the "Submit" button.
A PDF file containing the student IDs will open in a new tab. You can then print this PDF document to generate the physical student ID cards.
Printing Individual IDs:
Alternatively, you can print individual student IDs directly from the Student Enrollments tab. To do this:
Go to the Student record and locate the Enrollments tab.
Locate the student for whom you want to print an ID.
Click the "Print ID" button associated with the specific student. This will generate and print an individual ID card for that student.
These steps allow you to efficiently print student IDs either for a group of students based on campus and start date or for individual students as needed.
Merge Students
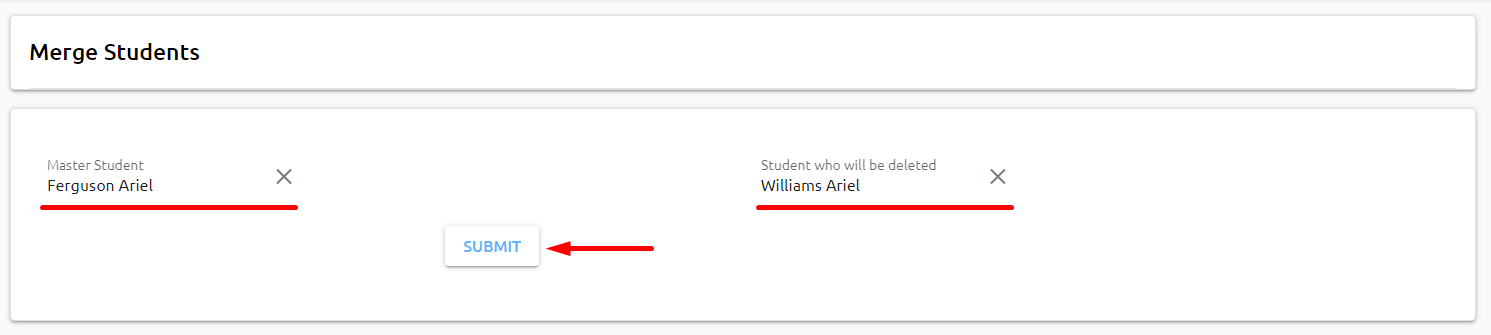
Navigate to "Academics" -> "Merge Students".
At the top search for the students you want to merge. You can search by name, ID, or other relevant criteria. Locate the master student record on the left side of the screen and student record that will be deleted on the right-hand side. Click the "Submit" button to proceed with the merge.
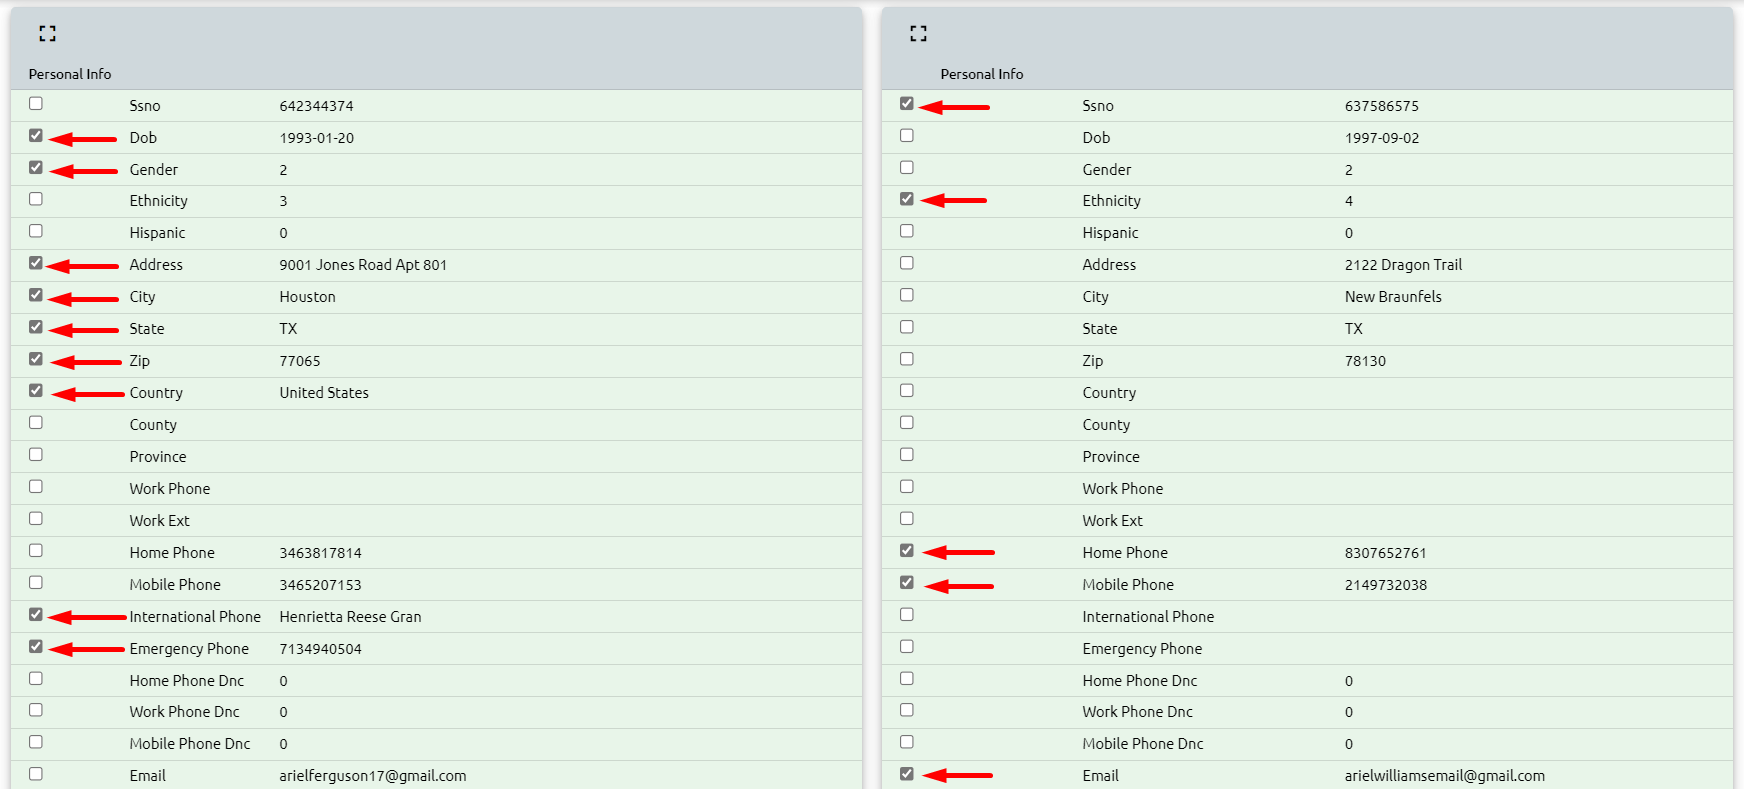
The system will display a screen with options for merging the records.
Under the "Personal Info" tab, pick and choose which fields should be retained from both records. You can select the information you want to keep.
The system will also list all enrollments. You can select which enrollment (if any) should be moved over to the master record.
Additionally, you can choose to bring over information related to AR (Accounts Receivable), FA (Financial Aid), Placement, and Activities.

Once you've reviewed and made your selections, click "MERGE." The system will initiate the merge process.

The system will then merge the two records, consolidating the selected information into the master record.
Front Desk Clock In
Term and Graduation Honors
Term and graduation honors are academic distinctions awarded to students based on their academic performance and achievements. These honors are typically recognized at the end of a term or upon graduation. Your honors can be setup under Academics -> Setup -> Honors.
Assigning Term and Graduation Honors:
Begin by selecting the desired filters to narrow down the list of students who are eligible to receive honors. The required fields typically include:
- Program list
- Term Group List
- Term
- Minimum credits earned
- Honor
The "Honor" and "Term Group List" or "Term" fields are required.
After applying the filters, the system will generate a list of students who meet your specified criteria.
On the left-hand side, click on the checkboxes next to the names of the students who should receive the honor. Alternatively, click the "Check All" option to select all students in the list.
Once you've selected the students, click the "Post" button located at the bottom of the screen to assign the honors to the chosen students.
By following these steps, you can efficiently filter and assign term and graduation honors to eligible students within the Campus Cloud system, recognizing their academic achievements appropriately.
Room Scheduler
This calendar can be filtered by:
Building
Room
Equipment
Scheduled events / courses in that room and be viewed.
By clicking on any of the events / courses additional details will appear:
By clicking on a day you are able to schedule outside events:
Conflict reminder for events / courses:
🔴 Red: indicates there is a schedule conflict/overlap.
🔵 Blue: no students are scheduled in that course.
🟢 Green: there are students scheduled in that course.
🟡 Yellow: indicates a scheduled event.
Import
Enrollment
Transferring an enrollment from one campus to another
Select the student and open the Enrollments tab and click on the pencil in the top right corner to edit.
Click on the Status drop-down and select Transfer.
![]()
The system will open the transfer popup window. Complete the info and click save.
![]()
The system moves the enrollment to the new campus and adds the comment:
The system adds the transfer to activities:
Taking a Student on/off LOA
When placing a student on Leave of Absence (LOA), it is crucial to check their transcript to determine whether any courses need to be scheduled or [graded]. If required, register or schedule the student accordingly. Alternatively, if all courses are up-to-date, you can unschedule the courses from the bottom of the transcript window. Once all necessary updates are made, return to the Enrollment window to process the LOA. To do this, change the student's status to LOA.
When taking a student off LOA, navigate to the Enrollment window and change their status to "Current Student". The system will automatically calculate the number of days the student was on LOA.
👉 Click here to learn how to change a student's status.
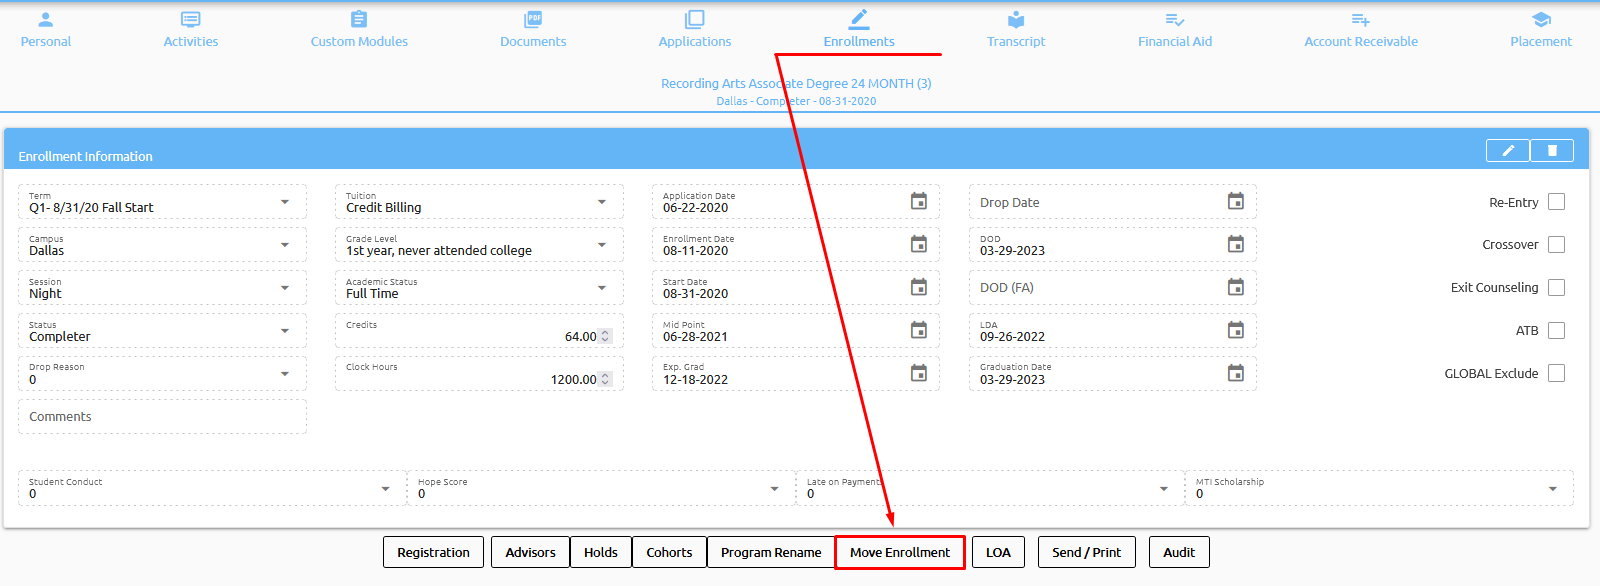
How to Move an Enrollment/Transcript
The Transcript Move feature allows you to transfer specific courses from one enrollment to another. Simply select the courses you wish to move by checking them off and click on the 'Move Courses' button located at the bottom of a students transcript. A pop-up window will appear, and you will need to press the 'Save' button to complete the move.
On the other hand, the Enrollment Move button, which is located at the bottom of the Enrollments tab, allows you to move courses, schedules, and ledgers from one enrollment to another, effectively deleting the original enrollment.
Program Rename vs Program Transfer
The difference between Program Rename and Program Transfer is that Program Rename changes the name of the current program while keeping the same enrollment and transcript intact. In contrast, Program Transfer moves the student to a new program entirely and creates a new enrollment and transcript reflecting the courses taken in the new program.
Program Rename is useful when the student is still in the same program but the program name has changed. This could be due to a program update or a change in the program's name. In this case, the student's academic progress remains unchanged, and only the name of the program is updated.
On the other hand, Program Transfer is used when the student has switched to a new program. This could be due to a change in the student's academic interests or career goals. In this case, a new enrollment and transcript are created to reflect the courses taken in the new program, and the previous enrollment is updated to reflect the transfer.
Student Status
Change Student Status
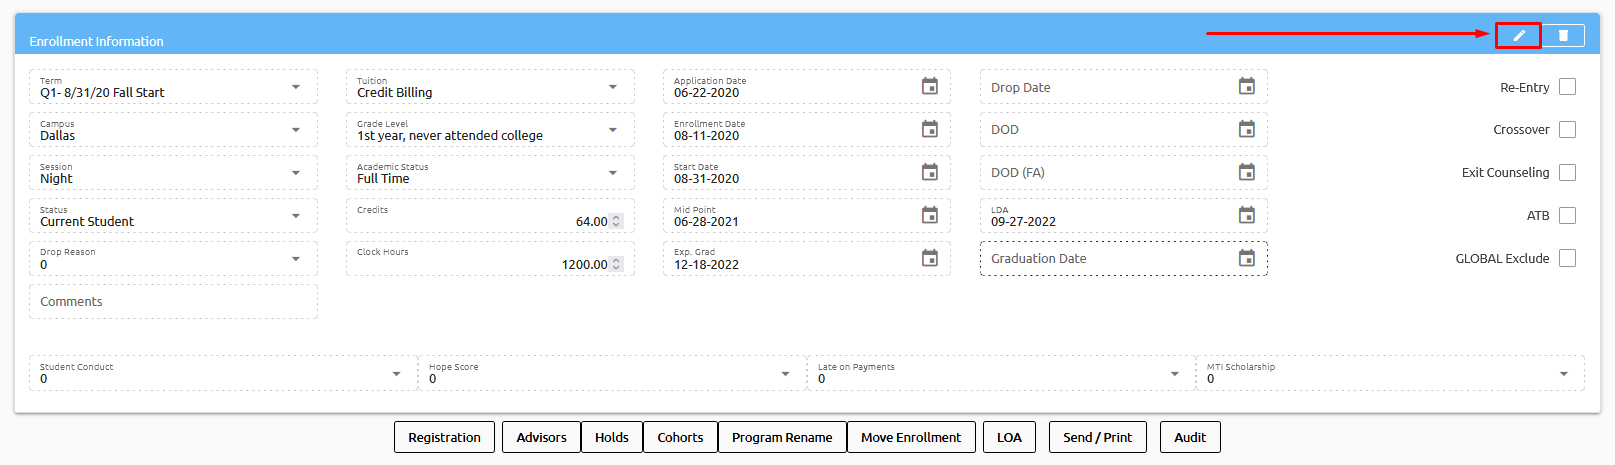
To modify a student's status, access their student record and proceed to the Enrollments tab.

Next, locate and click on the pencil icon situated in the top right corner.
Following this, select the Status drop-down and choose the most suitable status option.
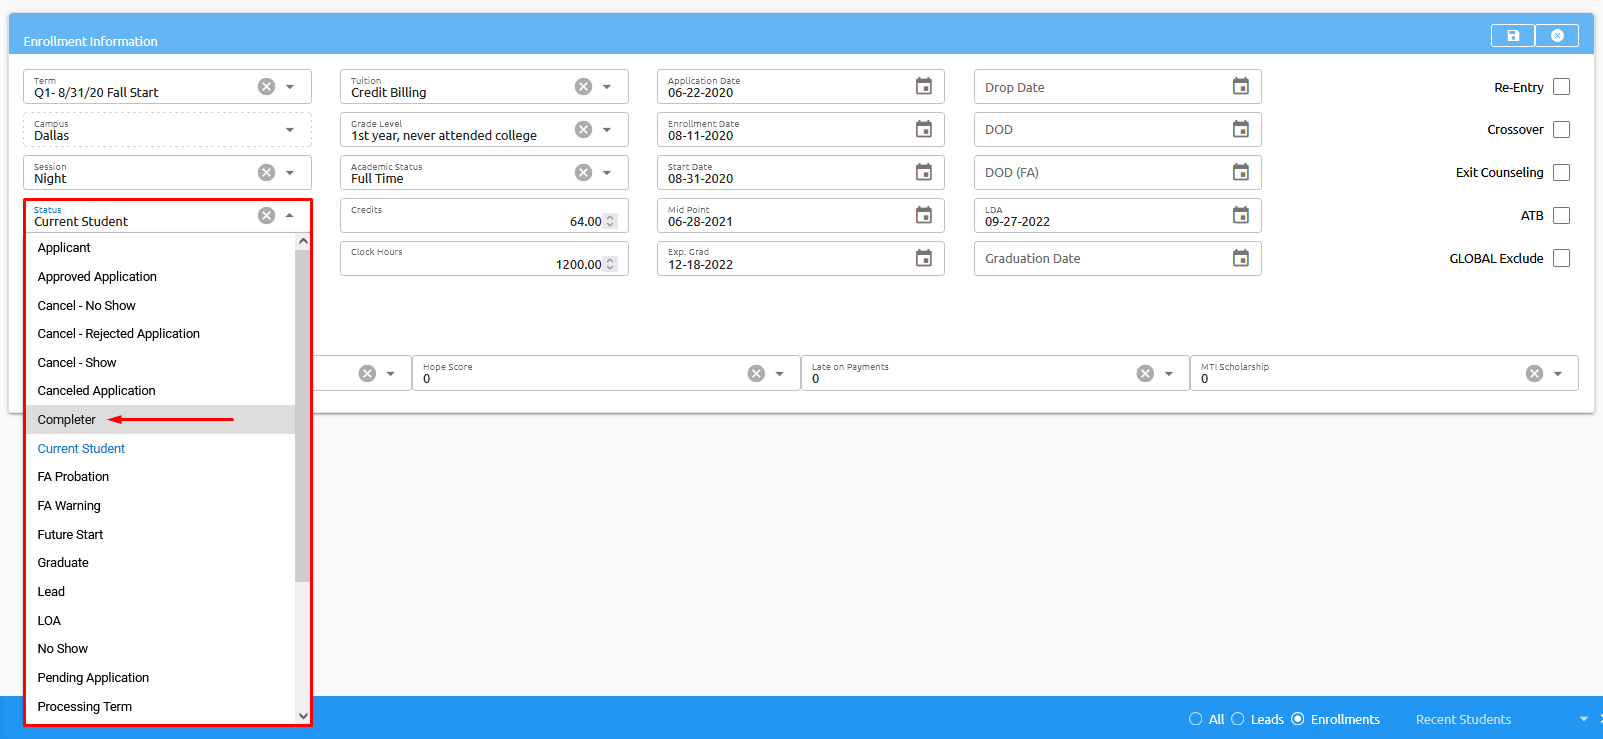
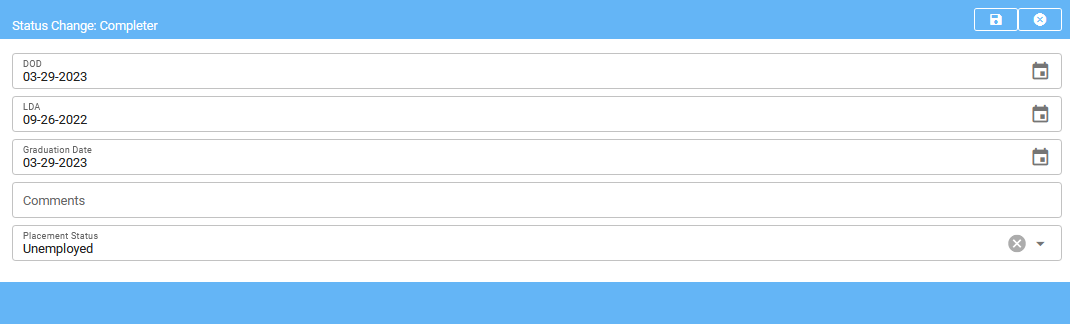
Upon selecting the desired student status, the system will prompt you for any additional information necessary to complete the status change process. For instance, if you are changing the student status to Completer, you will be required to input the following details:
- DOD (Date of Determination): The date on which the student was determined to have completed their program.
- LDA (Last Day of Attendance): The final date on which the student attended the program.
- Graduation Date: The date on which the student will officially graduate from the program.
- Additional Comments: Any remarks or notes you would like to add regarding the student's completion.
- Placement Status: The student's current employment or job placement status, if applicable.
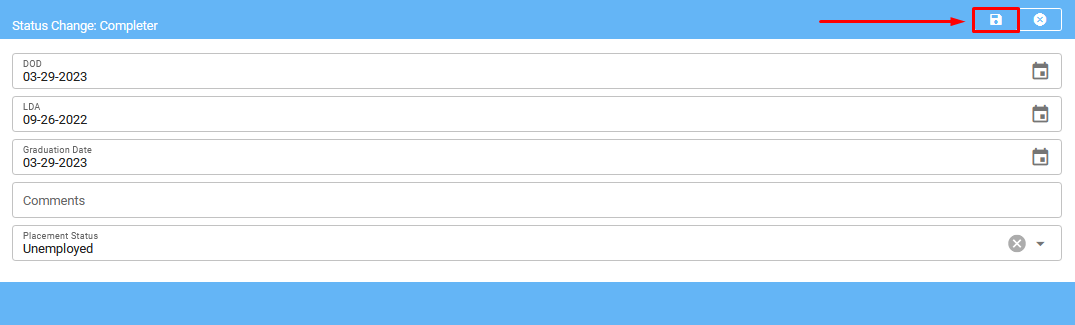
Lastly, save your changes by clicking the Save button.
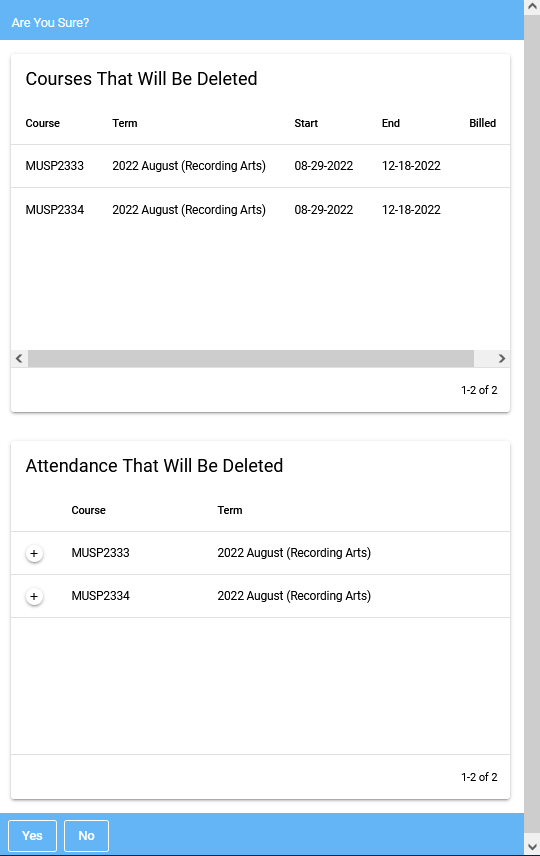
The system will generate a summary of any courses or attendance that will be affected by the status change. In the case of a Completer status change, as in my example, any ungraded courses and unattended classes will be removed from the student's transcript.
It is vital to review the student's transcript before initiating any status change to ensure that the changes made accurately reflect the student's academic progress and history. This will help to avoid any unintended consequences or errors in the student's academic record.
Revert Student Status
If Student Status changes to either “Cancel – No Show”, “Cancel - Show”, or “No Show” - The Revert button at the bottom appears:
Which can be used (only for Cancel – No Show, Cancel - Show, and No Show statuses) to move them back to a Future status:
Transcript
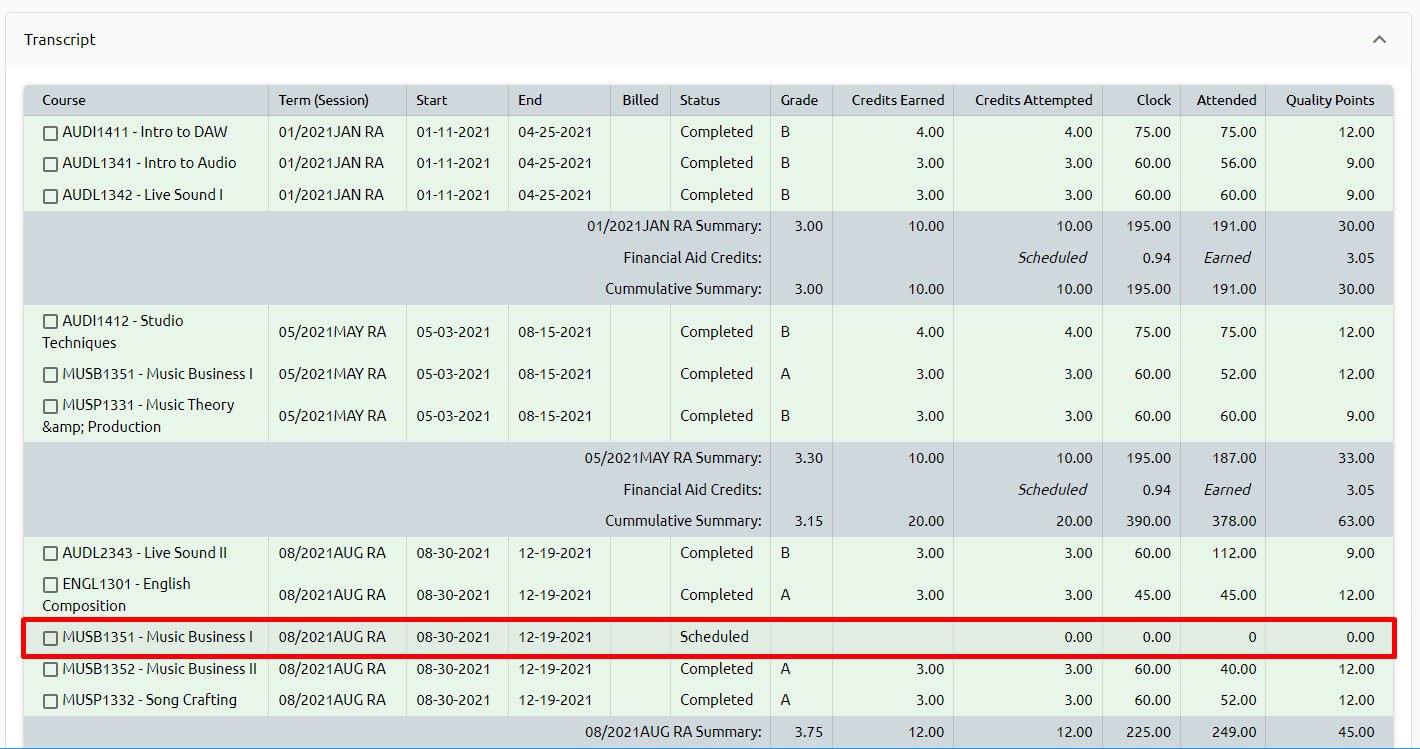
Displayed here is the student's transcript, which provides a detailed overview of the courses taken by the student, along with their status. The status of each course can be classified as one of the following:
- Future - indicating that the course has not been taken by the student yet, and needs to be registered for.
- Scheduled - indicating that the course is scheduled for the student, and they will be taking it in the near future.
- Current - indicating that the student is currently enrolled in the course, and the present date falls between the start and end date of the registered course.
- Completed - indicating that the student has completed the course.
The billed column indicates if this student has been auto-billed. If so, you will see a green checkmark.
In addition detailed information can be viewed, about the student's academic performance, including their Grade, Credits Earned, Clock Hours, Attended, and Quality Points.
💡 Tip: If there are any discrepancies in these metrics, it is recommended to review the Grade Scale setup to ensure that the correct checkboxes are checked.
This will ensure that the grades are being calculated correctly and accurately reflect the student's academic progress, including whether the grade should be counted towards credits earned, GPA, MTF, or other relevant metrics.
At the bottom of the Transcript tab, you will find several useful buttons that provide additional functionality to the platform:
Show Course Details: This button enables users to access detailed information about specific courses. By checking off the boxes next to the courses of interest and clicking the button, the system will display the relevant details.
Move Courses: This button allows users to move courses from one enrollment to another. By checking off the boxes next to the courses they want to move and clicking the button, users can easily transfer courses to a new enrollment.
Change Course: This button enables users to replace a course with another. By selecting the course they wish to change and choosing a replacement course, users can make quick and easy updates to a student's transcript.
Unschedule: This button allows users to remove courses from a student's schedule. By checking off the boxes next to the courses they wish to unschedule and clicking the button, users can quickly update a student's schedule.
Add Course: This button enables users to add a course to a student's transcript. Once a course is added, it will be automatically scheduled.
Print Transcript: This button allows users to print a student's transcript. The system offers three pre-built transcript options to choose from, including Standard, Standard Letterhead 1, and Standard Letterhead 2. Institutions can also create custom transcripts to meet their unique needs.
Print Overall Transcript: This button enables users to print all transcripts associated with a student's account. If a student has multiple enrollments, all transcripts will be printed here.
Print Progress Card: This button enables users to print a student's progress card, which provides an overview of their academic progress.
Print Granted Hours: This button allows users to print the credit granted hours for completed courses.
Print Schedule: This button enables users to print a student's schedule. Users can choose to print all terms or a specific term, depending on their needs.
Additionally, there are several other buttons available:
Registration: The Registration button offers the ability to register students into their classes. This button works in the same manner as the Registration button found on the enrollments tab.
Re-add Courses: This button automatically adds all courses from the catalog that are not already on the student's transcript.
Honors: This button allows for the application of term or graduation honors to students. Click here to read more.
Attendance Calendar: This button provides a convenient calendar view of the student's attendance records.
20% Calculation: This refers to a policy that allows students to miss up to 20% of the scheduled course hours without penalty.
Adding & Deleting Courses
Open your students record, navigate to the transcript tab, and select the course in question.
![]()
To delete it, click on the trashcan in the top right corner.
To add a course to the students transcript. click on the Add Course button.
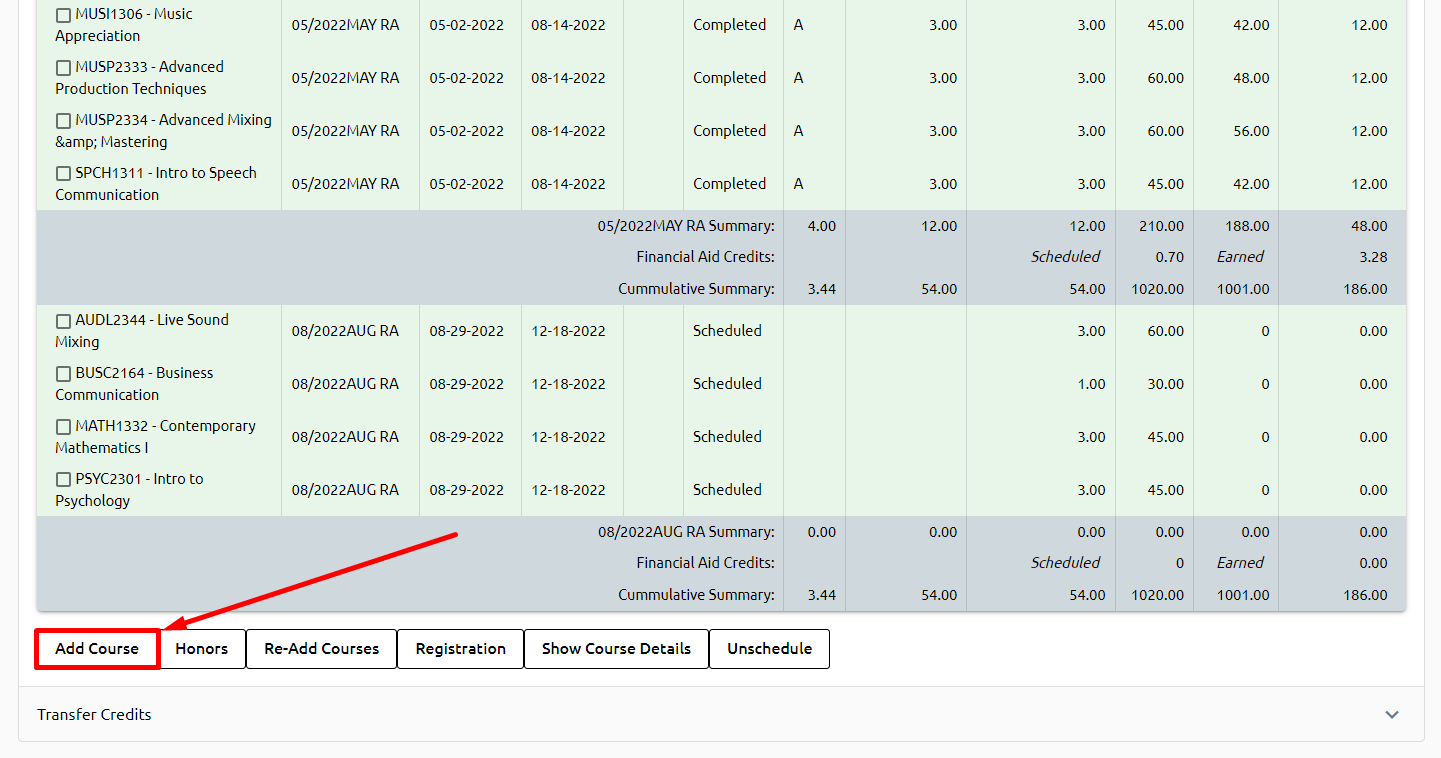
The system will pop open a window that will allow you to search for the course. Enter the term, course name/number, and the system will display those that match.
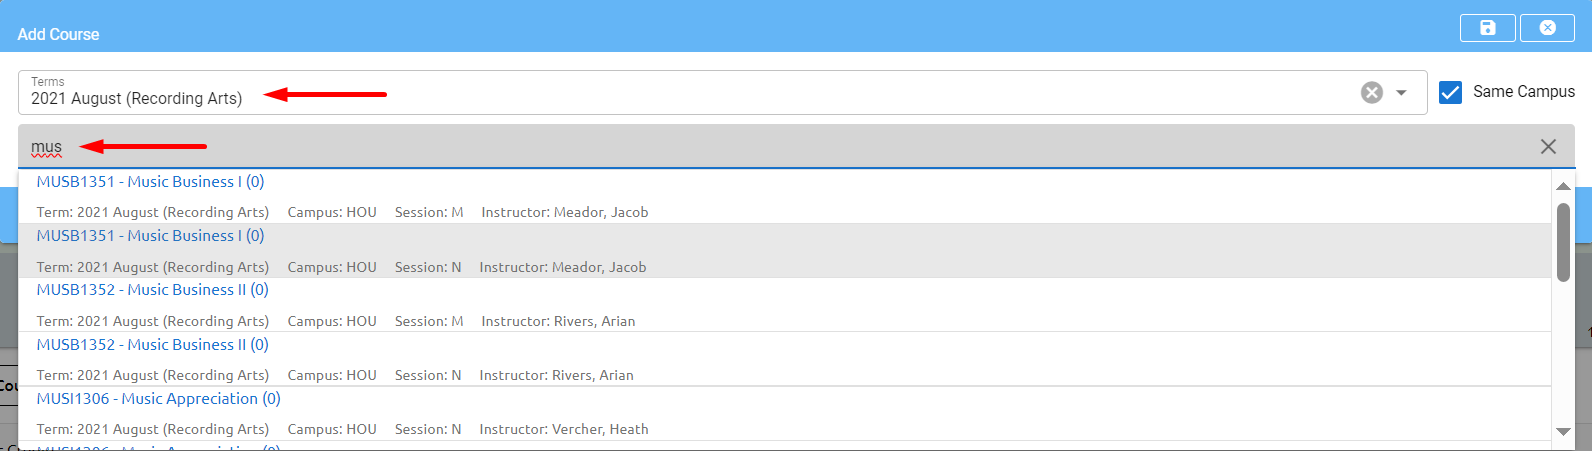
Select the course to add, remember to look for the correct campus, session and instructor and click save.
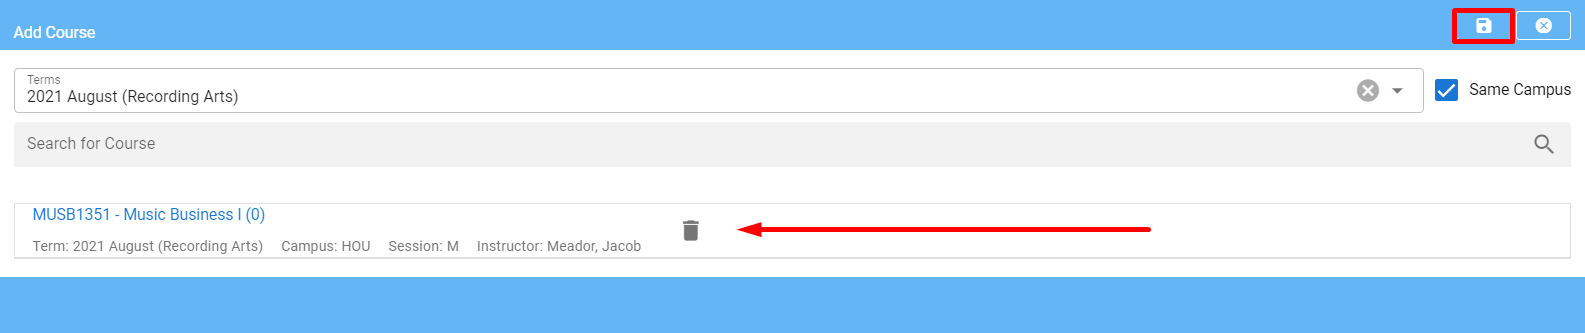
Click Save and the course will be added to the transcript and scheduled.
📝 Note: If the student is changing sessions, remember to change their session on the Enrollments window first.
Applying Transfer Credits
⚠️ Warning: Before applying transfer credits to a students transcript, the transfer credit policy must be setup first. Click here to learn how to setup the Transfer Credit policy.
To add the transfer credit to the students transcript, search for your student and go to the transfer credit window at the bottom of the transcript tab.
![]()
Open the window and click on add course.
![]()
To transfer credit from another institution, you would first need to search for the institution in the system.
Once you have identified the institution, you can select the course you wish to transfer and enter the course relationship with it's corresponding start and end dates, as well as the grade received.
After entering this information, you can save the record and the transfer credit will be reflected in the student's academic record.
![]()
![]()
Internal Transfer
![]()
An Internal Transfer check box will be on the far right.
![]()
Click on the pencil in the top right corner to edit.
![]()
This means when a program transfer is done, courses that the student passed in the "old" program need to be accounted in the new program because, of the credits they earned (so they doesn't have to take the courses they already passed).
This part is done automatically by the CC system.
However, when the catalog for the new program has the same courses but, are called differently (just different names) the system is not able to "see" them as transfers (thus it won't account their credits). To prevent this, they would check that "Internal Transfer" and the system would treat them as they were transferred even though naming in both catalogs are off.
For instance - in the previous program that was taken and English 1 was completed. Now, transferring to the new program, English 5 is required. But, since English 1 and English 5 are equivalent to each other - Internal Transfer is a quick way to make English 5 completed.
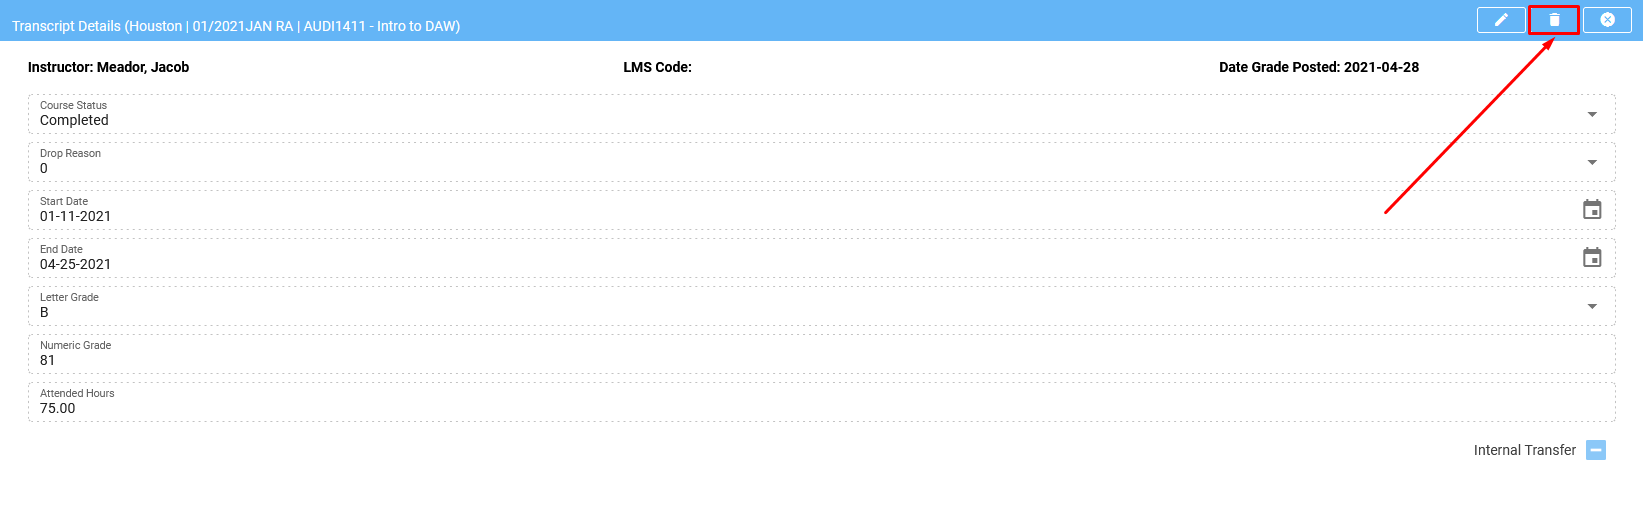
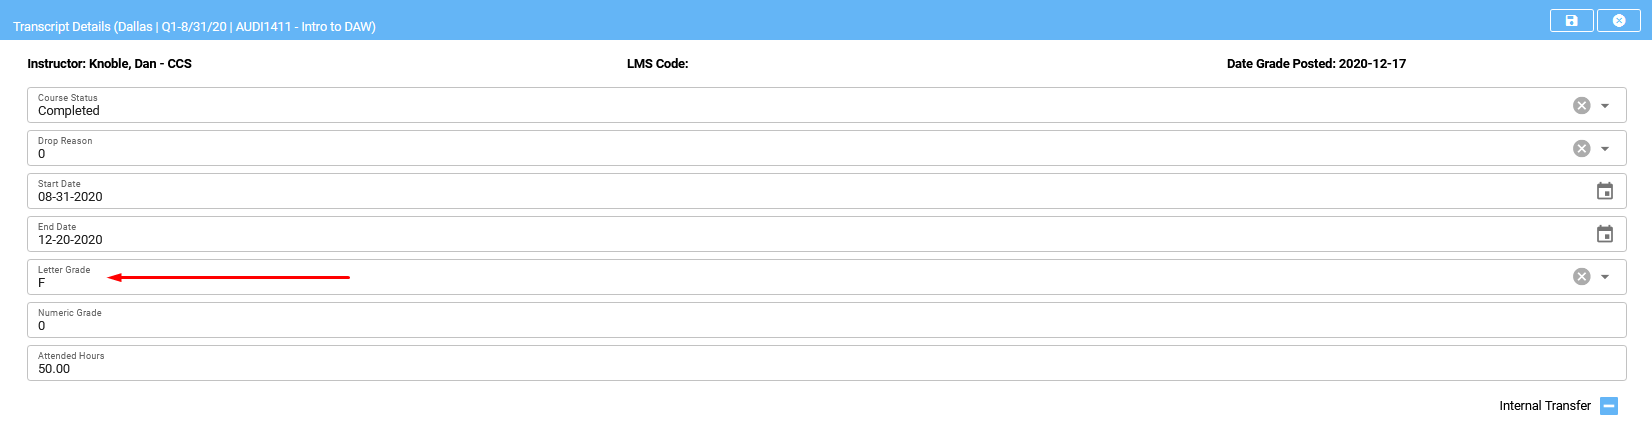
Edit / Grade Course
To make changes to a course, locate the relevant course and select it by clicking on it.
![]()
Click on the pencil to edit.
![]()
Enter the course status and grade and click on save.
![]()
The system will update the course.
![]()
Unscheduling Individual Courses
To unschedule individual courses for a single student within the Campus Cloud system, follow these steps:
Unscheduling Courses for a Single Student:
Navigate to the student's transcript.
In the transcript view, you will see a list of the student's enrolled courses.
On the far left, select the course(s) that you wish to unschedule for the student.
After selecting the courses, look for the 'Unschedule' button located at the bottom of the transcript view.
Click the 'Unschedule' button to initiate the unscheduling process.
The selected course(s) will now be unscheduled and placed in a "Future" status.
📝 Important Note: You can only unschedule courses that are in a "Scheduled" course status. You cannot unschedule courses that are currently in a "Current" status.
Viewing a students attendance and grades on the transcript
To view a student's attendance and grades on their transcript, follow these steps:
Open the student's transcript. This transcript displays a list of all the courses the student is enrolled in, completed, or still needs to take.
Scroll down the transcript until you find the specific course for which you want to view attendance and grades.
Click on the course name or course entry. The system will open detailed information for that course, including attendance and grade book details.
![]()
Manually entering attendance for an individual student by course
Open the students transcript, scroll down to find the course, and click on it.
![]()
Click on the pencil to edit.
![]()
Enter the attendance for this course and click save.
![]()
The system will update the course attendance and return you to the Transcript.
Rescheduling an individual students course and entering makeup time
Navigate to the student's profile and select the "Transcript Window."
At the bottom of the transcript window, locate and select the "Attendance Calendar."
Click on the desired course and meeting time. A new dialog box will appear.
To reschedule the meeting time, click on "Reschedule." The system will open a calendar.
Select the new meeting date and time, and then click "Save."
The system will update and "move" the meeting time to the new schedule.
To enter makeup time, click on the "Makeup" button.
The system will open the calendar. Select the date and time for the makeup session, and then click "Save."
The system will schedule the makeup session accordingly.
To delete a scheduled meeting time, select the meeting you want to remove and click on "Delete."
The system will remove the selected meeting time from the schedule.
Processing a Retake
Find your student and go to transcripts. Edit the selected course by clicking on it and selecting the pencil in the top right corner, to edit it.
Mark the grade with an "F".
Click "save" and now the student has an "F".

Click on the course again and a new "Retake" option:
Click on retake and the system asks for a confirmation:
Click "OK".
The system creates an "unscheduled" course:
Now, your course can be scheduled by Clicking on the "Registration" button at the bottom of the transcript window:
Or by going to the Enrollments window:
Please ensure that the proper charges for the retake have been added to the Account Ledger!
Program Attendance
To calculate and view the attendance percentage for a student, follow these steps:
Calculating and Viewing Attendance Percentage:
Search for the student you want to check and navigate to the student's transcript window.
Scroll to the bottom of the transcript and select "Progress Card."
The program attendance percentage will be displayed on the student's progress card.
Additionally, Program Attendance can be found on each enrollment title bar for the student, providing a quick reference to their attendance status.
If you want to generate a report on Program Attendance, the system typically offers reporting capabilities to help you gather and analyze attendance data as needed.
👉 Click here to read more about the Program Attendance Report.
Degree Plan
Rebuild/Update Degree Plan
Next to the 'Rebuild' button there is an 'Update' button.
Rebuild - deletes everything and creates a fresh new degree plan following the catalog.
Update - does not delete any customization you have made to the degree plan and only updates statuses.
Registration
The Registration button can be located on a student's record in multiple places, including under the Enrollment tab.
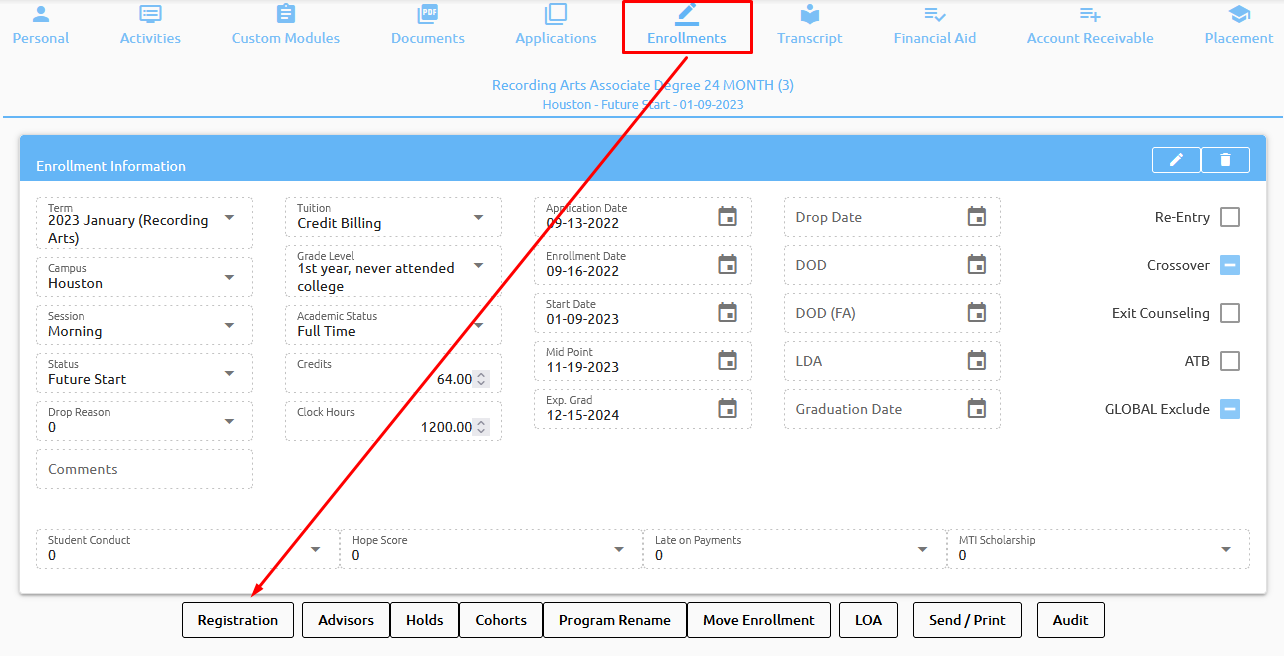
The Registration button may also be found at the bottom of the Transcript tab in a student's record.
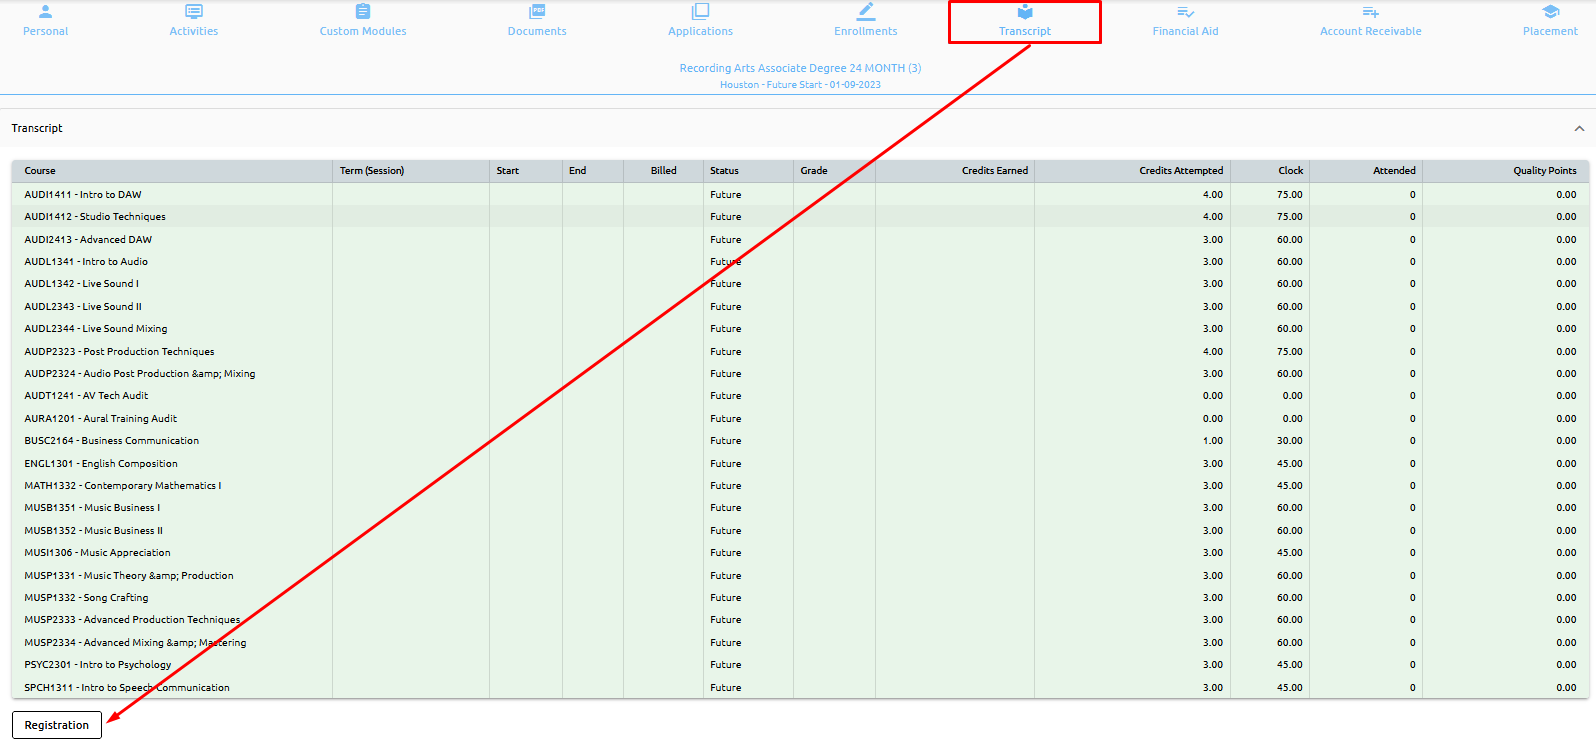
Closing Registration will return you to transcript. In case there are no classes to be scheduled (classes in Future status), Registration button will be DISABLED.
Continue reading to learn how to register students into classes....
Scheduling Students
Find your student, open their record and verify that the Session, Start Term, and other Academic information is correct.
Under the Transcript tab ensure that the courses are available for scheduling.
![]()
If so, click on the registration button at the bottom of the transcript and select the program.


Select the term that the student will be attending and system will return the students schedule of classes.

Either click 'Add all Courses' and the system returns all the classes to be scheduled in the lower window. You can remove any course(s) just by clicking on them.
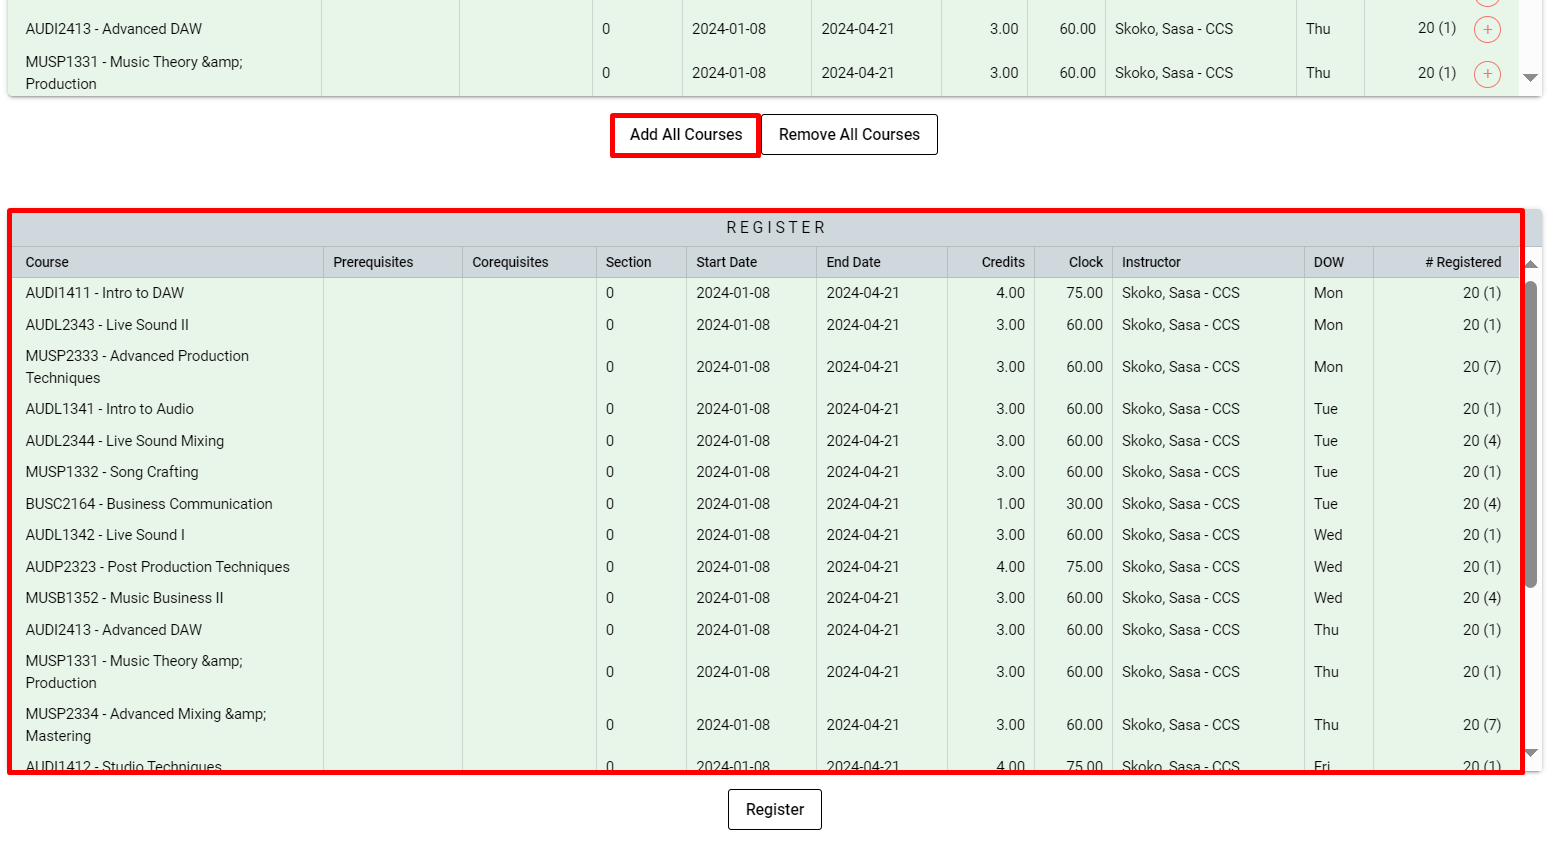
Or click on the courses one by one manually adding them in the lower window.
⚠️ Warning: Students cannot be registered into a course if the students start date is after the courses start date.
If everything is correct, click “save”:
Then, ensure all courses have been scheduled:
What Can Impact Registration
Make sure the terms and schedules are setup under Academic -> Setup -> Term -> Term List -> Schedules and Open Registration is checked off:
Double check that all the courses are added to the schedules:
Students cannot be registered into a course if the students start date is after the courses start date.
For example,
The course starts on 09/06/2021:
The students Start Date is 09/07/2021:
The students Start Date is 1 day after the course begins and the reason you cannot register them into that course.
If we moved the course Start Date to be 09/07/2021:
We are able to successfully register her for that course.
Update Instructor Grades and Assignments
To update grades and assignments for instructor’s go to:
Select the term your course you wish to maintain is in, make sure it shows in the lower window, and click “schedules” Scroll for your course, click on it and make sure it appears in the lower window:
To update the gradebook, click on “Gradebook”:
Final grades can be entered, by clicking on the drop down. Hitting save will save your grades, and then go back and edit them later. Finalize will post the grades to the Transcript and maintenance will no longer be available thru this menu, remember to finalize the course again so the transcript is updated when ever going back and editing.
To post assignments follow the steps above but, click the “assignments” instead of “Grades”:
From here, add assignment groups and assignments within those groups, or copy from the master if one has been created:
To “Grade” the assignments once the assignment groups and assignments have been created. Hit the back button and reselect the course, make sure it appears in the lower window:
Click on Gradebook, you will now see the Gradebook with the assignments:
As scores are entered for the assignments, the system will calculate the final grade:
Save the course or finalize as we did in Grades above.
To revert courses back to the Scheduled status and remove letter and numeric grades click the Un-Finalize button:
📝 Note: The Un-Finalize Course button only appears when a course is finalized.
FERPA Module
Search for your student and navigate to the Personal Info tab and click on FERPA button at the bottom of the window:
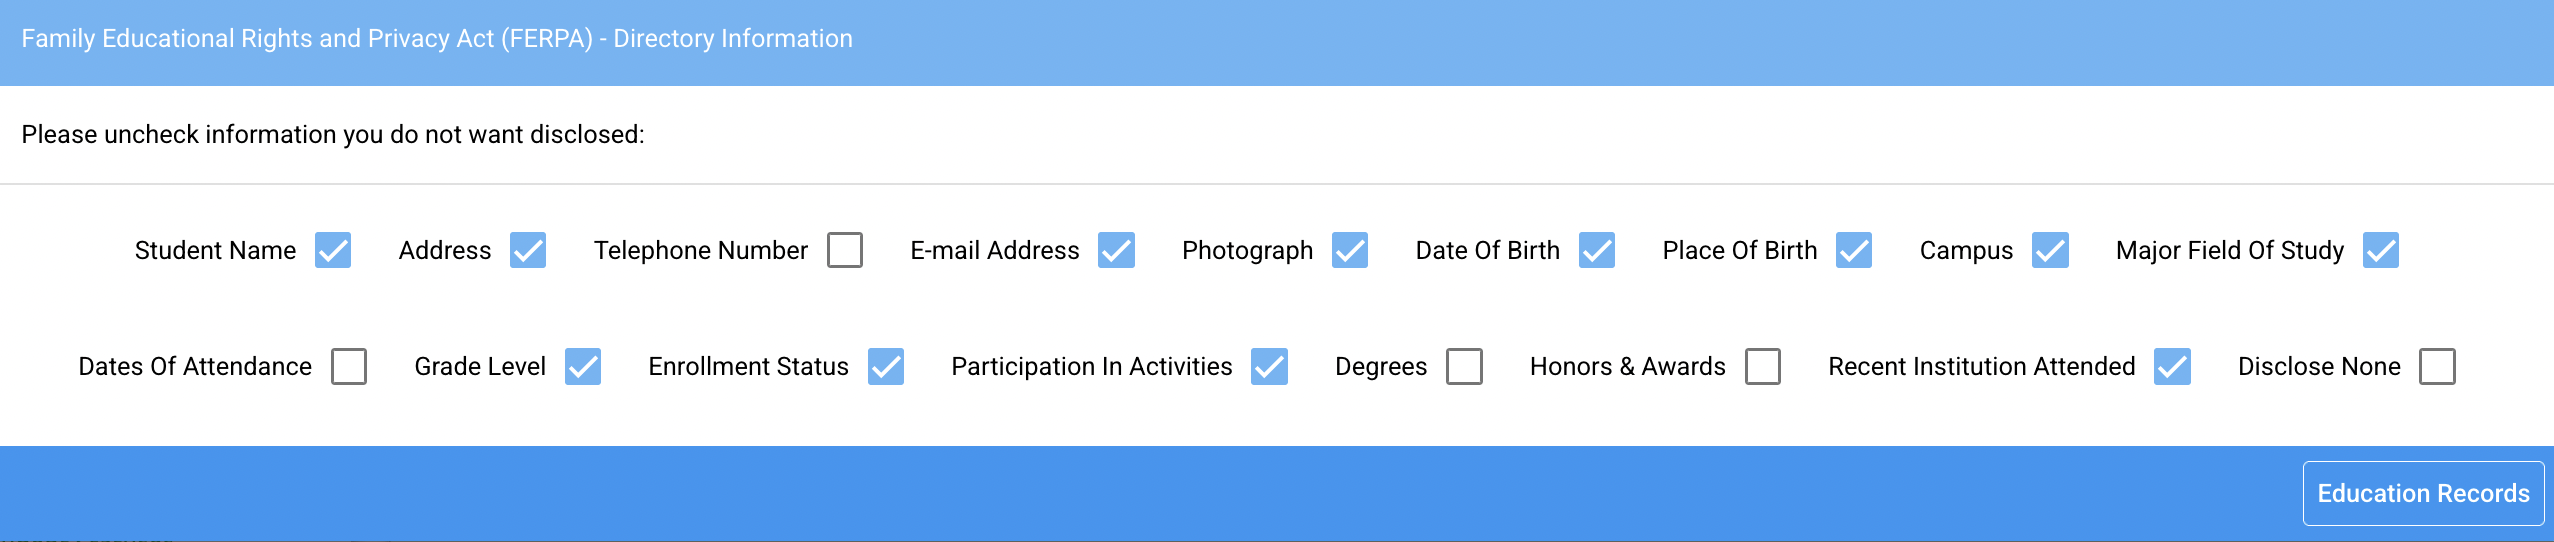
The system will popup a window that allows you to select the directory information the student will allow to be released:
The first selection "Disclose None" is selected, meaning that the student does not want any directory information released. If the student will release some information, select the fields to be released as in the example below, click Save and the system will update the info.
To add a person that the student says can receive information about his education, click on the Education button and the system will open the FERPA person information screen:
Complete the information on this window as in the example below:
Make sure the correct information release buttons are clicked and hit save, the system will save the record and allow you to edit if you want to make any changes:
If you have multiple release info the system displayed a summary at of existing relationships at the top of the screen. You can select any of them to maintain the relationships.
👉 Click here to learn how to setup the FERPA.
LMS
This is an intro on how you can start using LMS trough CC; these are some basic functionalities that you need to follow.
Make sure student exists on LMS:
If the student is already created in LMS, you can synchronize LMS and CC (this would make a key (connection) between user on LMS and CC). The system will use the ExternalEmail field on LMS provided by Brightspace and First Email in CC to try and match them together:
In order for a student to be enrolled in a course on LMS, it should first be pushed:
If a course is being created on LMS and then pulled to CC, make sure that LMS and CC codes are equal. This is how the system will tie and match this course on both platforms:
Once that is done correctly, course can be registered to a student:
To enroll a student in a course open details dialog for that course and click on Enroll (same process is used for UnEnroll):
Once the student is enrolled in the course, you can pull the students submissions which is also displayed on the course details page, explained above (in order to place the submissions - the assignments must be pulled first which will be explain later in this manual).
Finally, all student's final grades, for all the courses he/she is enrolled in, can be pulled on the Personal Info->LMS accordion:
These were functionalities within single student context. When in need of processing a batch or multiple actions between LMS and CC different tools would be used, such as:
These tools will provide a list of all the scheduled classes in which student can be enrolled and unenrolled in LMS.
When you want to manually feed CC with LMS data, you will do it from Maintenance -> System -> System Settings -> LMS tab:
Of course the logical order must be taken into consideration. For example you won't be pulling the Assignments unless you didn't pull Enrollments first because in that situation the system could not know where to place those Assignments. Same is for Submissions and Grades.
Once this is tested and we actually put the LMS usage on production server, this Pull process will happen automatically in certain time frames. Manual pull is there as an option for all eventual actions happened on LMS in between the pulls.
Canvas
Processes
Under Academics>Canvas there is a submenu with four options: Unenroll from LMS, Add Students, Enrollments Extract, and Canvas Non-Attendance:
'Add Students'subtab:
Simply pick a Term from the dropdown:
And the system will show all students without an account in Canvas that have courses scheduled in that Term:
Once completed - the system will return a blank screen with Reload option:
In case there was an error, the system will return all students affected and error message from Canvas:
In the example above, Gregory was added to Canvas manually (this shouldn’t be done) and morning sync still didn’t pick that change.
'Unenroll From LMS' subtab:
This module will remove Canvas enrollments for any Student that was Dropped or Withdrawn from the course in Campus Cloud:
Both modules can be executed multiple times during the day, week etc.
'Canvas Non-Attendance' subtab:
Select the semester and as of date and submit:
A list will return – check the appropriate students and click 'Drop' to drop them from their course:
Maintaining in Term Schedules
Select the proper LMS Master code under Academics->Setup->Course List. Do not change the LMS Code, LMS Name and SIS Code templates:
Now, when creating new Term Schedules:
As soon as a Course is chosen, the system will generate all LMS related codes including LMS Master:
Once the section has been entered, the system will recalculate LMS SIS section portion:
This is dynamic on all changes, for example if we change sections to 999, as soon as we leave the section field, the system will recalculate again:
Also, there is a trick on how to quickly add a new section. Let's say for example we want to add ART104 section 506. We click on Add Record:
Then, we click on the previous section, 505 for example, and the system populates a new record with section 505 data:
All that is left to do is to change the SECTION from 505 to 506:
And the system will adjust LMS code values. Hit Save and a new section has been created with just 4 clicks.
Course Enrollments
When there is a discrepancy between Campus Cloud and Canvas, such as a student is enrolled in the wrong section, or showing in Campus Cloud but not in Canvas.
Click on a course:
Click on UnEnroll:
System will remove this enrollment from Canvas.
To add it back, click on a course again and this time the Enroll option will be available:
And now, the student is enrolled in Canvas in proper course:
Also, this tool now can be used to enroll individual students. For example, student just got added to Canvas and you don’t want to wait for CRON to pick up new enrollments, you can simply use this “Enroll” functionality to enroll him in a course.
Grade Push in Canvas
Navigate to Academic>Canvas>Grades:
Pick a term for grades:
A list of all the courses with the number of students grades for each course appears:
The Export button - exports the selected courses and provides a CSV of the selected courses:
The Post button - will send the grades to the student’s record:
If a course is a repeated course the pushing of the grade will mark prior course as an R (transfers, W and R grades are ignored) and grade is less = current grade:
Everything is also recorded - the user who posted the grade, the grade posted, and the entry action, in this case it is a Final grade action:
Pulling from Canvas
Update Teachers - This one compares Teachers in Campus Cloud with Teachers in Canvas and updates accordingly. In case a teacher doesn’t exist in Canvas, this function will add him automatically.
Email will be generated upon completion:
Currently, there is nothing to update, but in case it does, it will list full details, what course, what teacher has been changed… You can run this as needed; when an instructor is changed in Term Scheduler.
Enroll Teachers - Enrolling Teachers is also available through UI:
Upon completion, email will be generated:
This functionality will mostly be used at a stage when courses are being generated (week before term start).
Enroll Students - Enrolling students into Canvas can be done through UI
System will generate email upon execution:
Email will report total records ready to be enrolled and errors if any. In the example above, all the errors are due to students not being in Canvas yet.
Simply add new students to Canvas:
And re-run “Enroll Students” module. Upon completion, new email will be generated, this time with no errors:
Sometime, Canvas might reject enrollment in which case error details will be provided in the email.
Sync Courses & Users
The system will automatically sync all records at @3AM. Use this feature to update Campus Cloud with any Canvas updates that have occurred when waiting till the next day is not an option.
For example, a new Blueprint is created in Canvas and you need it in Campus Cloud to update the LMS Masters in Term Schedules right away. Maintenance->System->LMS:
When executed, this process will Sync right away Courses or Users on the server side and an email will be generated once sync is completed:
For the system to send the email out, you need to enter a valid email address, which can be done under Emails -> CRON Email:
⚠️ Warning: Be aware that while Courses are syncing quickly, under two minutes, for users it can take over an hour.
Moodle
Processes
Moodle Integration Step 1: Client supplies URL Step 2: Client needs to decide course naming convention/Contact programmer to coordinate things Step 3: Update Setups Step 4: Push Courses to LMS Step 5: Push Users to LMS
Step 1 – Client Supplies URL
In system settings, we set it up on our end. All you need to do on your end is supply the URL.
For going Live with Moodle - “dev” should be removed from LMS URL.
Also, a Token should be supplied on your end.
LMS Attendance/Gradebook –(Please do not fill in this field until you have talked to CC) if there is a 1 in that value field, the system is going to try to connect everything that we pulled from Moodle and try to match the courses and etc. in CC. We are not ready to move to this step.
Step 2 – Client identifies what they want to send over
LMS Code: $campus $cname $session $term $course $section $start LMS Name: $campus $cname $session $term $course $section $start SIS Code: $campus $cname $session $term $course $section $start LMS Master: $campus $cname $session $term $course $section $start
Academics>Setups>Courses>Course List:
You can use any divider you want, except NO spaces (/ vertical line, - dash, _ underscore, etc.), and it CAN be in any order you want.
LMS Code must be unique.
Academics>Setups>Terms>Term List:
LMS Master – CC will create 1 Master on your Moodle account. In your Moodle account, we need to create a course and call it “Master”. If it is going to be the same for every course, client does not need to worry about adding additional Masters. You can always add other Master ones if they need, you can have multiple Master courses for each Category. Then, in the System Settings, when you “Pull courses from Moodle” it is going to Pull ALL Master Categories.
LMS Master does not need to be called “Master” it just needs to have the word “Master” in its name because that’s how our system knows how to recognize it, for example it can be:
- Master/English
- Master/Languages
- Master_Something
- English_Master
- Courses_Master
It is looking for the word “Master” in its name and that is how it is going to populate that dropdown.
LMS Category – Needs to be exactly the same as your Category in Moodle.
Master is like a blueprint for entire category and/or entire group of alike courses.
Use Pull Courses button to update the Master List if you have more than one Master.
Maintenance -> System -> System Settings -> LMS Tab:
Step 3 – Update Setups
Academics>Setup>Courses>Course List
Academics>Setup>Terms>Term List> Schedules The information from the course list updates to the Term Schedules and defaults to RED
You must “Save”
It will turn BLACK indicating that this record has been updated
Step 4 – Pushing Courses to LMS
Campus Cloud – Term List
- Select LMS Master and type in the LMS Category - Miscellaneous is the Moodle default
- Save
- Press Push to LMS
Moodle
- Go to “Site Administration”
- In the Search box type “Course”
- Scroll down and find “Manage courses and categories” – this is where you can see all the categories
- Click on Miscellaneous (this is the default course category on a new Moodle site - although this can be renamed) – these are all the courses that were pushed from CC
Step 5 - Pushing Student to LMS
Campus Cloud
- Find Current Student
- Go to Personal Info tab
- Click LMS – Moodle
- When you see an “Add student to LMS” – this indicates CC does not know this students Moodle ID
- Press “Add student to LMS” (must be done for each student to obtain a Moodle Account)
- Create Username
- Create Password – it needs to have letters, numbers, lowercase and uppercase, and a symbol
- Description can provide additional information
Moodle
- Go to “Site Administration”
- In the Search box type “Users”
- Scroll down and find “Browse list of users” – here you can find students that were pushed to Moodle
- By clicking on a student – you can view their profile
- When pressing “Edit Profile”, scrolling to the bottom to “Optional”, you can find the Students ID number (which is their ID from Campus Cloud)
- Once your student is Pushed to LMS you will have the option to “Disable” them from Moodle (some clients might want to use this for those students that have holds, withdrew, etc.)
General Information from Moodle Documentation
Category in Moodle The default course category on a new Moodle site is "Miscellaneous" (although this can be renamed) A Course creator, Administrator or Manager can put all courses in the Miscellaneous category. However, teachers and students will find it easier to find their classes if they are organized in descriptive categories
What are Moodle categories? Course categories organize courses for all Moodle site participants. Miscellaneous is the default course category on a new Moodle site. A course creator or administrator can put all courses in the miscellaneous category.
Master Assignements
Master Assignments are where you can create “template” assignment at the course level.
If faculty assignment for the course doesn’t exist, system will automatically copy “template” assignment.
You can see it in action by going to: Academics->Setup->Courses
Select desired course and click on the Assignments button:
New screen will show where you can add/modify/delete assignments for a course:
Assignments can even be copyed from other templates. This is helpful where there are similar courses/assignments.
By clicking on “Copy From” system will show you the list of the courses with assignments already entered in the Campus Cloud and/or in the Moodle.
Start typing and the list will get filtered:
Click on the course from drop down and click on “Copy”.
To make it easier identify courses without Assignments, courses with assignments already displayed in “blue”: