
Appearance
Financial Aid Module
This module is your comprehensive guide to everything related to the financial aid department and its processes.
Table Of Content
Dashboard
Packaging
To prepare the student for packaging, several essential setups must be completed, including configuring:
- Lenders
- Fund Types
- Funds
- Academic Years
- Cost of Attendance (COA)
- Programs
- Packaging Limits
- Federal Limits.
Once these setups, which are located all under FA -> Setups, are finalized, the system will be fully equipped to commence the packaging process for the student.
To proceed, locate the student and navigate to the "Financial Aid" tab. From there, access the "Award Years" sub-tab. Select the desired years and click on the "Add Aid Year" button to initiate the packaging process.

After successfully adding the Award Year 2022-2023 and Award Year 2023-2024, the system will automatically refresh to display your updated aid years.

Next, navigate to the "Setup" subtab. Aid Years can be manually added using the "Add Academics Year" button at the bottom.

Additionally, you will notice the presence of the "Re-calc" buttons. These buttons serve the purpose of recalculating the aid years.
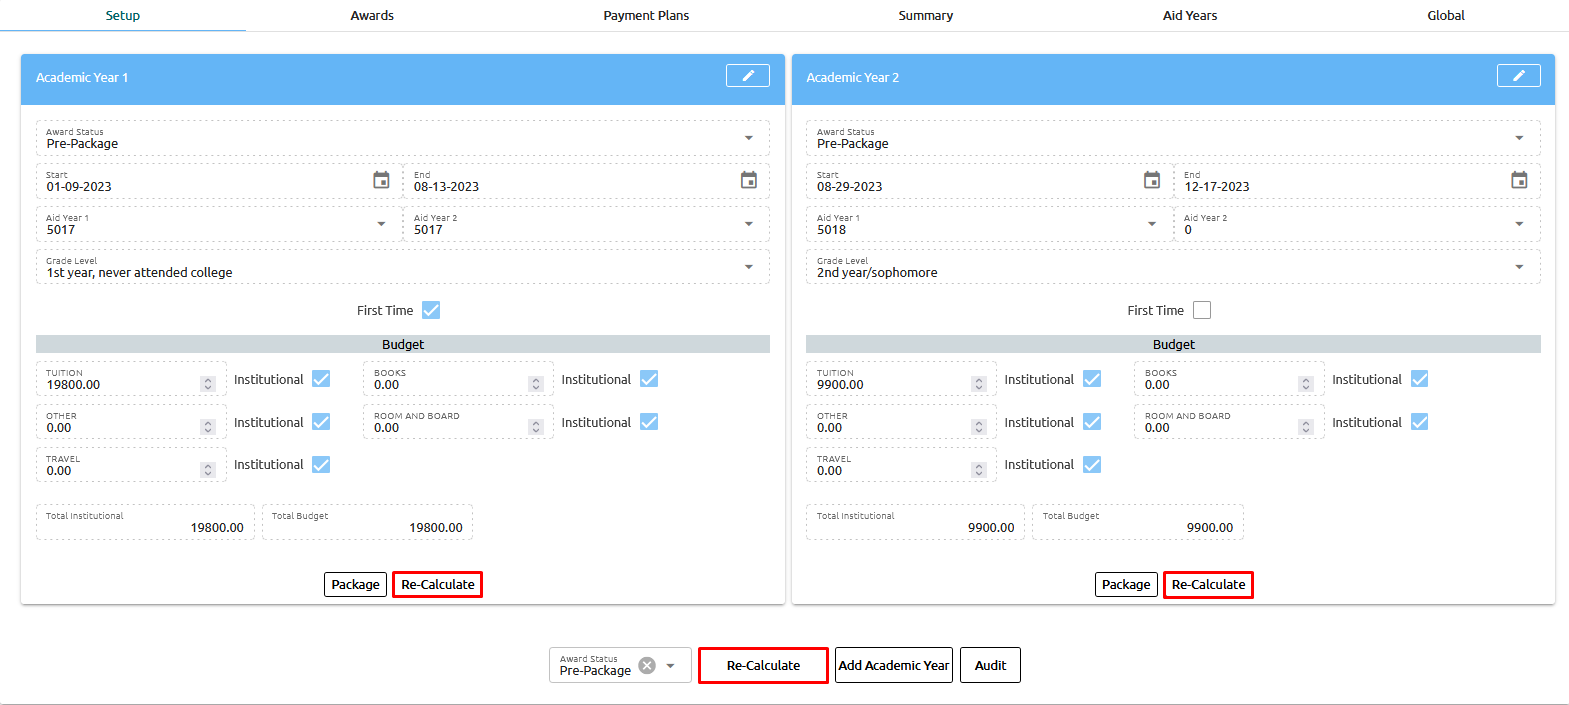
⚠️ Warning: The "ReCalc" button all the way at the bottom, delete's ALL previous Aid Years and recalculates them. The "ReCalc" button under each of the individual Aid Years ONLY delete's that specific Aid Year and recalculates ONLY that Aid Year.
To initiate the packaging process for the student, let's begin by reviewing the necessary information. You can make any desired changes by clicking on the pencil icon located in the top right corner of each aid year.

Once you have made the necessary modifications, remember to click "Save" to ensure that your changes are successfully updated and recorded.
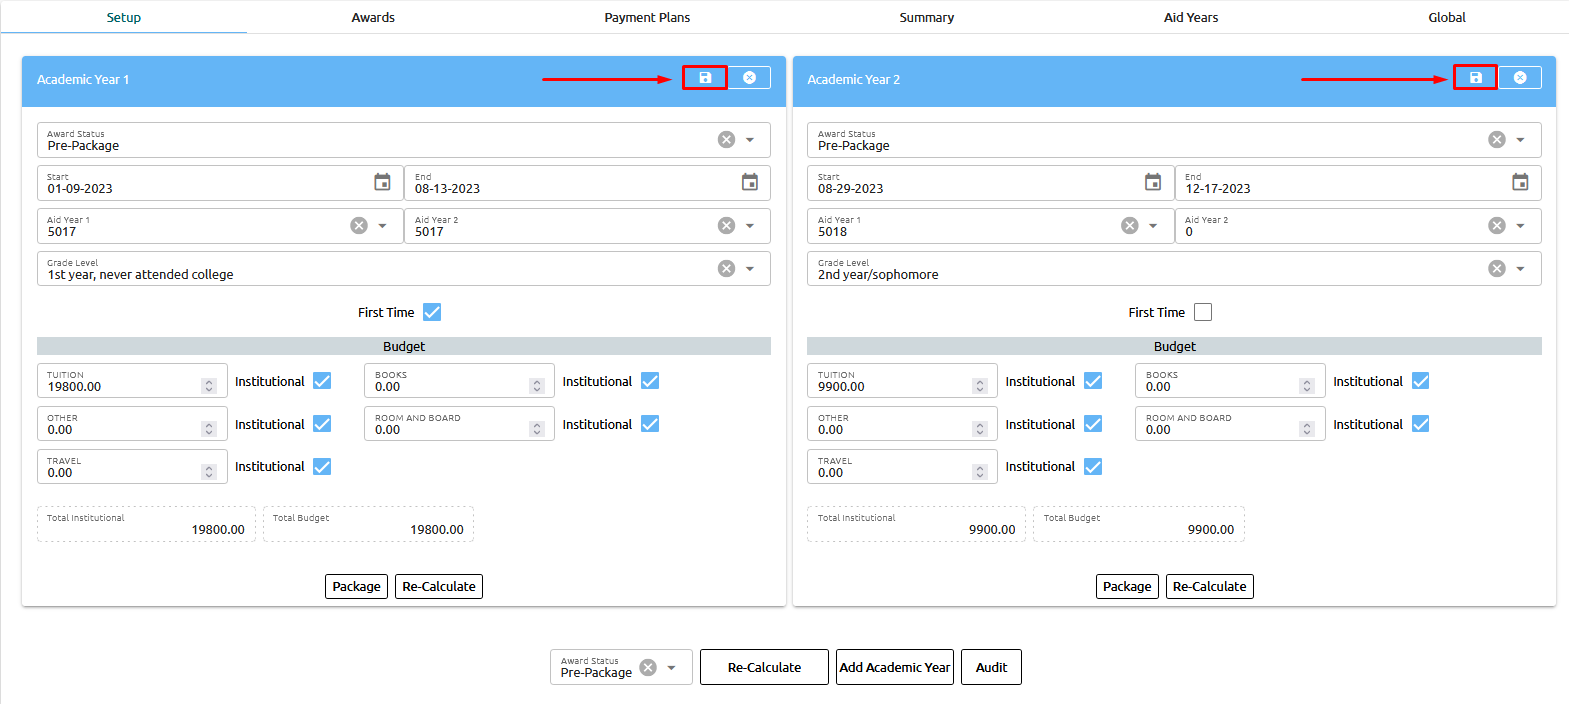
We have introduced Award Status (B) alongside the existing overall Award Status (A). This enables institutions to track the Financial Aid Status for each Award Year individually.

After reviewing and making any necessary changes to the information, you can proceed by clicking on the "Package" button.
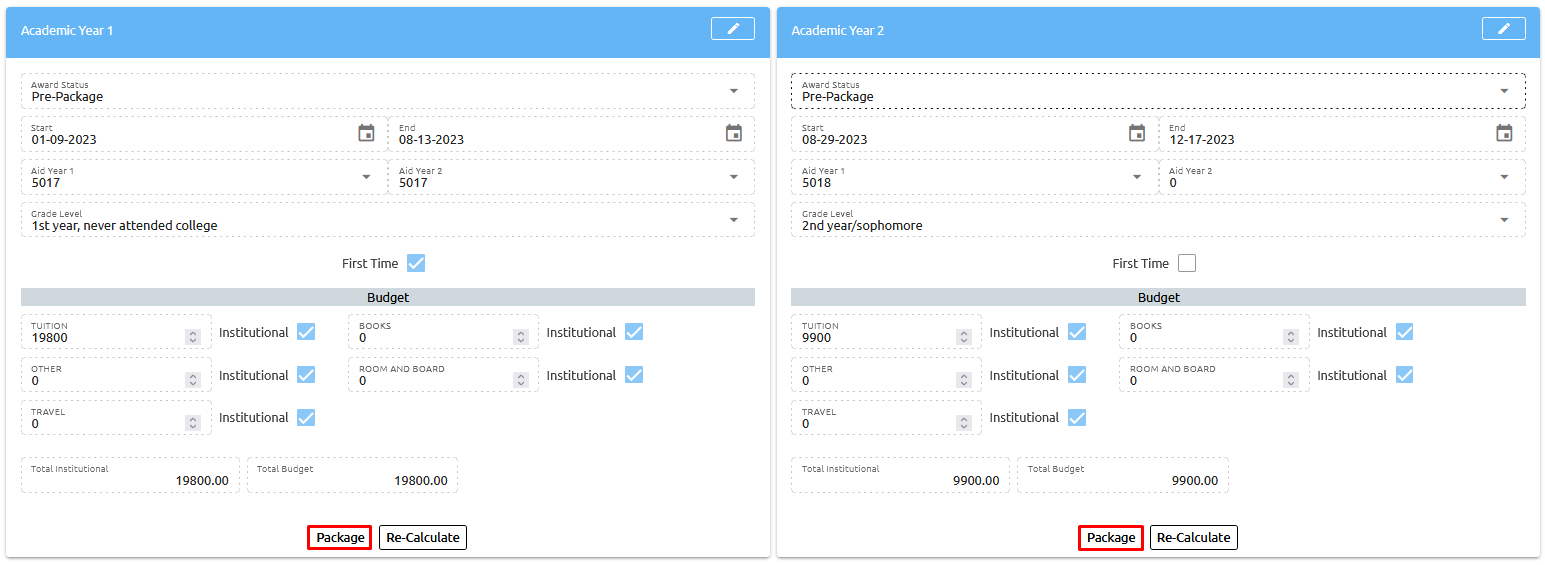
Upon clicking the "Package" button, a pop-up confirmation will appear. Please proceed by clicking "OK" to confirm and initiate the packaging process.

Once you click the "Package" button, the system will automatically refresh, and you will notice that the "Package" button will be grayed out. This indicates that the student has been successfully awarded, and the packaging process has been completed.
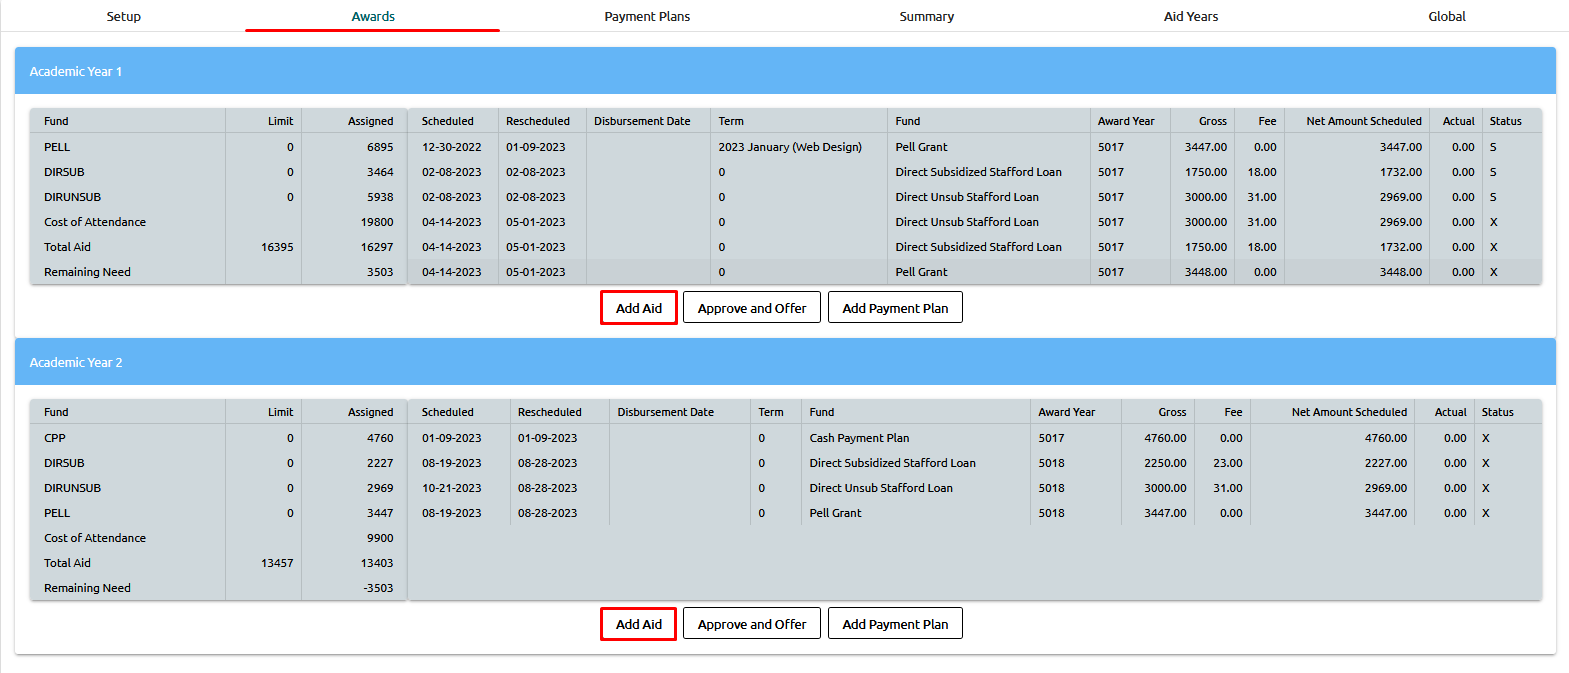
To access the details of the awarded package, navigate to the "Awards" tab. By selecting this tab, you will be able to view the comprehensive details of the student's award. Additionally, if necessary, you can add additional aid for each individual award year by clicking the "Add Aid" button. This allows you to make further adjustments or additions to the student's financial aid package as required.
On the awards window, you have the flexibility to make edits or additional changes simply by clicking on any of the awards or their corresponding details. This grants you the ability to modify specific aspects of the awards as needed. Once you have made the desired changes, remember to save your updates.
Once you have reviewed and made any necessary adjustments to the awards, you can proceed by clicking the "Approve and Offer" button. This action will finalize the award package and initiate the process of approving and offering the financial aid to the student.
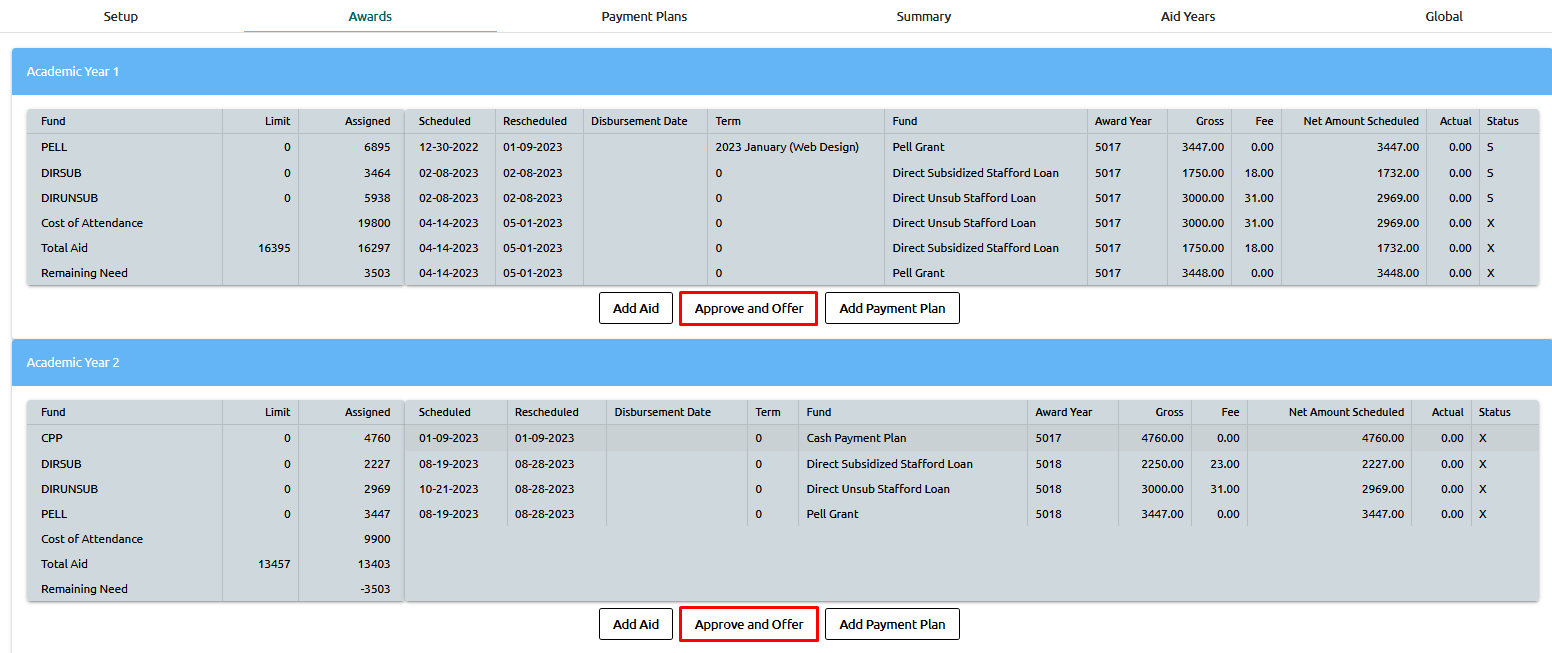
Lastly, to finalize the award process, click the "Approve and Offer" button. By doing so, the status of the award will be updated to "O" indicating that it has been offered to the student.
In the Student Portal, the student has the option to either "Accept" or "Decline" the award. Upon accepting the award, the status will change to "A" (Accepted).
However, it is also possible for you, as an administrator, to manually perform these actions on behalf of the student. You have the flexibility to schedule all the awards at once by clicking the "Schedule All" button. Alternatively, you can manually schedule each award individually by clicking on each respective award.
When an award is scheduled, its status will be updated to "S" (Scheduled). It's important to note that by clicking on the "S", awards can be unscheduled if needed, providing the flexibility to make adjustments as necessary.
Batches
Payment Plans
Adding Payment Plans
Once the student's financial aid package has been completed, you will have the option to create a payment plan for the remaining financial need. To do so, navigate to the specific Award Year and locate the "Add Payment Plan" button located at the bottom of the page.

When creating a payment plan, the system will automatically populate the Loan Amount field with the remaining financial need. However, users have the option to modify this amount if desired. The system will also autofill the start date.

To proceed, enter the number of terms or installments for the payment plan. Additionally, specify the period of payment (whether it is hourly, monthly, or annually). If you wish for the payment plan to be posted to disbursements, select the appropriate Fund from the drop-down menu. If any discounts apply, you can add them accordingly.

After entering all the required information, remember to click the "Save" button located in the top right corner to save the payment plan details. Once saved, you can navigate to the "Payment Plans" subtab to view the created payment plan.
From the "Payment Plans" subtab, users have the ability to manage individual transactions within the payment plan. You can delete a scheduled transaction by clicking on it and selecting the appropriate option to delete it from the payment plan.
Alternatively, if a transaction has been successfully paid, you can mark it as paid by simply clicking on the transaction. This action will update the status of the transaction accordingly, indicating that it has been paid.
📝 Note: If you intend for the transaction to be posted to the (AR), please ensure to check the "Post to AR" checkbox.
From the same screen in the "Payment Plans" subtab, you can generate a promissory note by clicking on the "Print Note" option. This action will initiate the generation of a PDF file, which will open in a new tab.
Under the Account Ledger section, users have the ability to view both the "Expected" and "Complete" Ledger Card.
🔴 Past Dues
⚫ Pending
🟢 Paid
Payment Plans Tab
In the "Payment Plans" tab the paymets can be assembled, if they are paid, or if you want to change the amount, just by clicking on one of them:
A screen will pop-up, fill in the Check no. and Ref no, then check off the "Post To AR" button, and press "Save":
The awards then becomes green and says "Paid":
Now, going to the "AR" tab:
On the left hand side is what you see on the "Awards" tab and when ever a payment is made it will show on the right hand side which is the Ledger Card (reminder - you MUST checkoff the "Post to AR" checkbox for it to show on the Ledger Card).
You can see Green is 'Paid', Red is 'Due', and Black is 'Pending'.
You can click on any of the payments for additional information. You can exclude from QB, see the History, Move it if needed, Edit the payment, or Delete it:
You can also manually add payments, fees/charges, and process credit card to the Ledger Card:
Your payments and fees/charges can be setup here:
FA Refunds
To use REFUND module, click on AWARD you want to refund, DIRUNSUB in example below:
Enter all the data you want on the following screen and click SAVE:
System will add it to disbursements:
It will also add it to the EXPECTED as PAID, as well as post it to the Ledger Card:
ISIR
Uploading an ISIR
Hover over the FA Icon and,
Hover Import and,
Select ISIR
Navigate to the Data folder on the H: drive, select the ISIR files to import and drag them over to the textbox in CCloud
Click Submit. A message for each file will appear to confirm it is successfully loaded. It usually only takes a few seconds to load them.
Reading an ISIR
The ISIR can be found under the 'Financial Aid' tab. Some packaging rules are based on what's in the student's ISIR file:
Regarding the header of the ISIR, you can see -
The 'CPS 01' comes from line 4 on the ISIR:
The Aid Year '2019-2020':
and the date of the ISIR:
By clicking on any of these tabs, you can choose the specific section that you would like to display:
Pressing the 'Comments' button will contemplate the ISIR's comments:
and C Flag Comments:
To read an ISIR, just hover over any of the 'fields' which will show you it's details:
In our example below for "Are you male or female?" it reads "1". When you hover over the field it shows you that 1=Male 2=Female:
A student can have multiple ISIRs on file:
If there were any changes from the previous ISIR it would show up in red:
Also, C Flag and Reject information you will see when packaging a student:
Verifications
Verifications serve multiple purposes, including verifying a student's eligibility for financial aid, validating their enrollment status, and confirming their academic progress. They involve a systematic process of reviewing and checking the accuracy and completeness of the information provided by specific students.
👉 Click here to learn how setup Verifications.
The 'Verifications' tab can be found under the 'Financial Aid' section of a student's profile. If any of the verification groups have a 'STOP' flag and are not completed, the group will appear in red. By selecting a group, the specific verifications required for that group will be displayed.
To clear a verification, the checkbox next to it must be checked and then submitted. Unresolved verifications will appear in either red or blue, depending on whether or not they have a 'STOP' flag. Once a verification is cleared, it will turn green.
FA Documents
On the financial aid tab click on the documents ribbon:
Select the appropriate document to add:
You can type the first letter to locate the document – A for authorization form. 1 for 1040…
Click the add button to save this document to their record:
The new document is added. Use the trashcan icon to remove any document added in error. Update the 'Required' and 'Status' fields:
Documents can be setup under FA>Setup>Documents.
👉 Click here to learn how to maintain a setup.
Import
FA Tool
Navigate to FA>Import>Import FA Tool. Upload your file and click import:
You must have the following columns:
STUDENTID
DATEDISB
TERMSCHEDCODE
FUNDCODE
DESCRIPTION
IDENTIFIER
DISBNUM
ACTUALDISBAMOUNT
NETAMOUNTSCHED
GROSSAMOUNTSCHED
DISBBANKFEE
AWARDYEAR
Otherwise, you will get an error response and the system will tell you what is missing:
If Student ID, Term Schedule Code, Payment Code = (Fund Code), etc. have an invalid value entered in, the system will return this error message:
Once all errors are resolved and the file is imported successfully, you will get a response with all the totals:
AR on our test student:
FA on our test student:
If you would like to run a report to see the imported files, you can use the Transaction Report (Reports>Student Accounts>Transaction Report) or the Report Builder with the following SQLs:
AR:
SELECT * FROM accountledger WHERE CHECKNO = 'import_fa_tool' AND DATE(DATEADDED) = '2022-07-13'
⚠️ Warning: DATEADDED Column is the date the file was imported. If you do not know the import date, you can always check the logs
FA:
SELECT * FROM disbursements WHERE DISBCHECKNUMBER = 'import_fa_tool' AND CREATED_AT = '2022-07-28'
These records will be imported in the student most current enrollment.
Export
Campus Ivy
The Campus Ivy integration works in two ways - Import / Export. We have the ability to generate a file for Campus Ivy and in turn the ability to import a file back into Campus Cloud.
Export - we export enrollment and transcript data which Campus Ivy uses to package students in their system. The Export generates a list of students in Campus Cloud that is ingestible to Campus Ivy.
Import - takes care of the entire FA & AR side in Campus Cloud by posting what ever data is in
Importfiles.