
Appearance
Campus Cloud Setups
This section provides a comprehensive overview of all the setups available within the Campus Cloud platform.
Table Of Content
General Setups
When modifying, adding, or deleting setups in Campus Cloud, it is important to navigate to the appropriate section.
- Admissions -> Setups
- Academics -> Setups
- Financial Aid -> Setups
- Student Accounts -> Setups
- Placement -> Setups
- Maintenance -> Maintenance
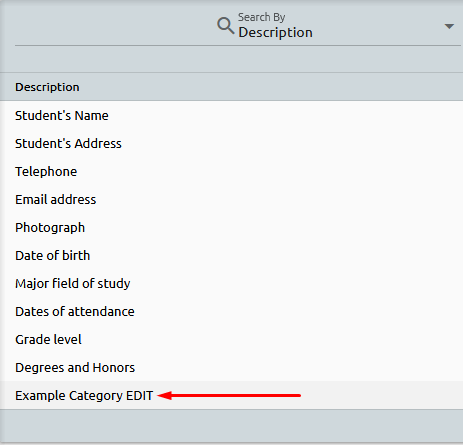
In this example, we will use FERPA Setup to demonstrate how each setup operates.
Our platform offers a user-friendly interface for managing FERPA directory information, empowering students to exercise control over their personal data.
By creating custom category groups and enabling students to selectively opt-in or opt-out of certain information fields, our platform ensures compliance with FERPA regulations while providing a seamless experience for both students and users.
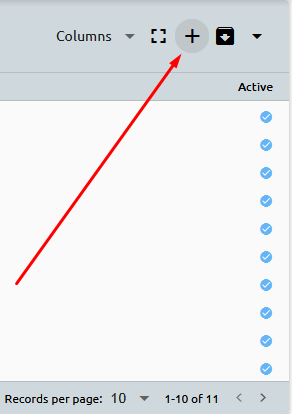
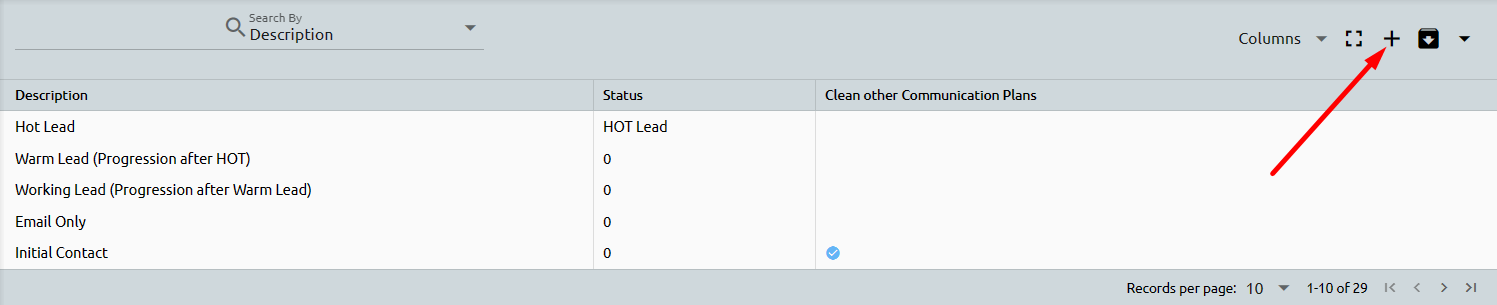
To add a new category to the setup, simply click on the plus sign in the top right corner of the screen.
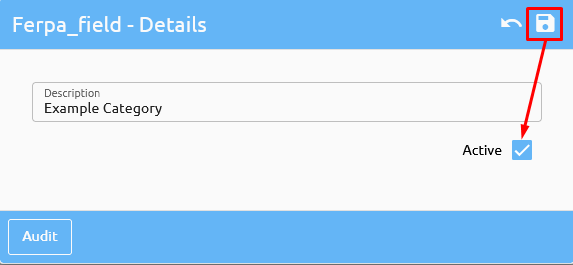
A new pop-up window will appear, where you can enter in the necessary information.

Be sure to mark the category as active and click the save icon to add it to the setup.
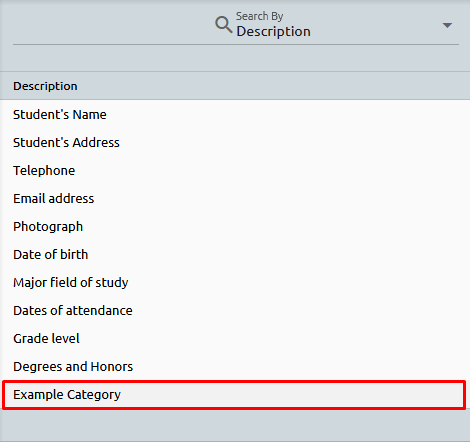
The system will add the new category.
To make changes to an existing category, click on the category you wish to edit and select the pencil icon.
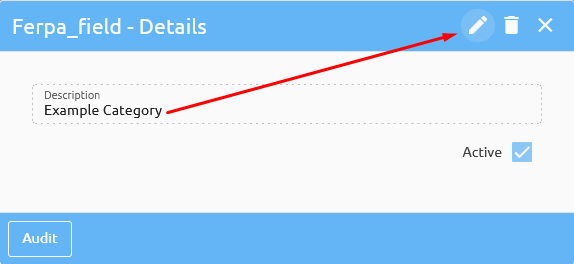
After making the necessary modifications, click save to update the category.
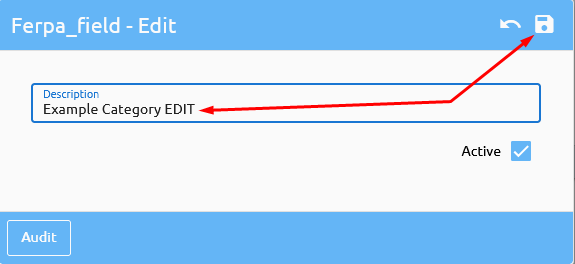
The system will save your changes.
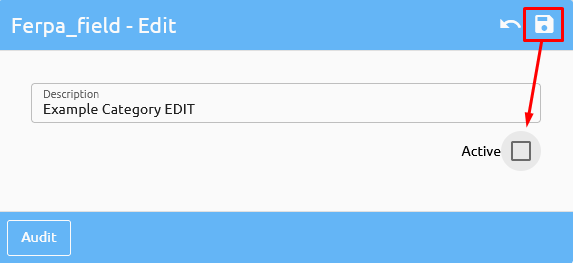
If you need to inactivate a setup, simply uncheck the active box and save.
Conversely, if you need to delete a category, click on the trashcan icon.
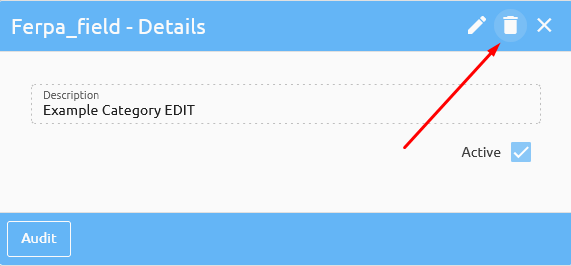
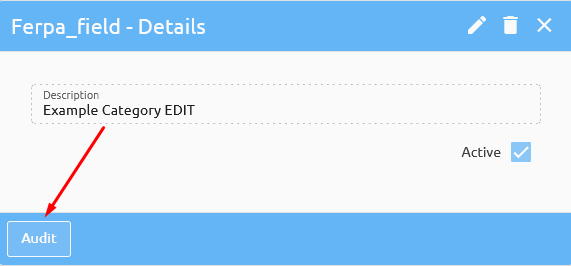
Each setup also includes an audit function, allowing you to view all changes made to a particular category.

Each setup comes equipped with a sophisticated and intuitive search functionality, providing you with the ability to easily locate the information you need.

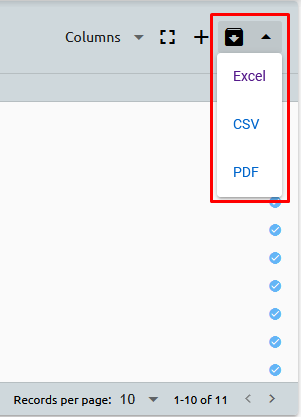
Each setup is exportable, affording you the flexibility to transfer your configurations to other devices or share them with others as needed.
Departmental Statuses
As a student progresses through their academic journey, they are assigned a main student status, which indicates their current position in the student life cycle. This status could be Lead, Current Student, Graduate, or any other designation that corresponds to their academic standing.
However, each department also has its own set of statuses that are used to track the progress of the student in that particular department's workflow. These statuses provide more detailed information about where the student stands in the process and what steps need to be taken to move them forward.
⚠️ Warning: It's important to note that there is a difference between student statuses and Admission/FA/Placement statuses. Student statuses are broader and more focused on academic progression, whereas Admission/FA/Placement statuses provide more specific information about the status of an application or financial aid, for example.
Each department tailors its set of statuses to its unique needs. For example, in the Admissions department, there may be various types of Leads, such as Web Leads, Referrals, Hot Leads, and Cold Leads. In the Applicant Student Status, designations like Interviewed, On Campus Visit, or Pending Application may be used. These customized department statuses facilitate more efficient workflow management.
Moreover, these statuses can be linked to communication plans. When a student's status changes, such as moving from a Lead to a Hot Lead Admissions Status, the system can automatically apply the relevant communication plan associated with the new status. This integration ensures that students receive appropriate communication and support based on their progress within the institution's various departments.
Communication Plans
Our platform provides the ability to crxeate and automate standard communication with your students, streamlining your workflow and ensuring that important messages are consistently delivered.
When creating Communication Plans within Campus Cloud, it is important to first determine which events, letters, emails, and SMS messages should be triggered. This can be done by reviewing and adding to the relevant setups, such as Events, Emails, SMS, and Letters under -> Setups.
Events 🖊️
Emails 📧
SMS 📱
Letters 📃
👉 Click here to learn how to maintain a setup.
In this example we will use the Admissions Communication Plan.
Once these prior setups have been reviewed and added if necessary, navigate to the relevant department's Setup -> Communication Plans to build the group(s) of communications that should occur with students.
To add a plan to the setup, click on the plus sign in the top right corner:
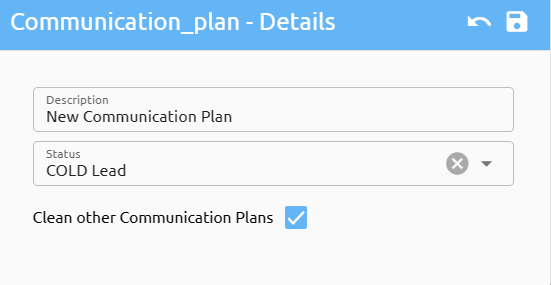
The system will open a new pop-up for you to enter in:
Name of the Communication Plan
Status
Clean Other Communication Plans - is to stop any communications that are schedule (but not sent) because, a new Communication plan or new status are now in effect.
Then, use the Actions button to build the communication plan steps, including the day the action should be scheduled (with 1 meaning today), the type of action (email or to-do), the specific action being assigned, and whether or not it should be automatically sent.
For example, a communication plan could be set up for Admissions reps to make a follow-up phone call to a student 1 day after the plan is added, between 9:00 and 9:10 AM, followed by a follow-up text 5 days later, an email in 10 days, and an enrollment email in 15 days.
Once the communication plan is completed, it can be assigned to a student by going to Admissions -> Dashboard and selecting Communication Plan at the bottom and selecting the relevant plan from the dropdown menu. The communication will then be scheduled for that student.
⚠️ Warning: Communication Plans for Academics, FA, AR, & Placement can only be added to students through the Group Builder.
Emails
In the following section, we will explore the Admission Email Setup within the system. It's worth noting that the Email setup for other departments may feature fewer filters and checkboxes compared to the explanation provided below.
Let's review all the fields within this setup:
- Program/Campus List: You can filter this email by specifying a particular Program or Campus to which it should be directed. Leave blank for all.
- Subject: Fill in the subject of the email.
- Description/Name: Provide a descriptive name for your email template.
- Bcc Recipients: If you wish to Bcc any users on this specific email, you can do so here.
- FROM Email: Specify the email address from which this email should appear to be sent, and provide a name associated with this email.
- REPLY TO Email: Determine the email address to which replies from students should be directed, along with the associated name.
- Body: This is where you'll compose the content of your email template. You can also incorporate system variables by clicking on "VAR" and utilizing the formatting tools in the menu bar. A quick reminder: avoid copying and pasting from Microsoft Word, as it may strip out Microsoft-specific formatting commands.
The checkboxes serve the following purposes:
| ☑️ | Explanation 💡 |
|---|---|
| CC Rep | Selecting this checkbox will CC the Admissions Representative to the email. |
| Lead Application Submitted | This email will automatically be sent when the Lead Application is submitted. |
| Online Application Created | An email will be triggered when an online application is created. |
| Online Application Approved | Once a student's application is approved, this email will be sent. |
| New Enrollment | This email will be sent each time a new enrollment is created. |
| Reset Password | Triggered when the "Reset Password" button is pressed. |
| Use To/From Email | When checked, the system will utilize the specified FROM email and REPLY TO email from the setup. If this checkbox remains unchecked, the system will use the student's assigned representative's email as both the FROM and REPLY TO email. |
Example for "Use To/From Email":
If the email is originating from the Admissions Department, the system will use the student's Admissions Representative's email for both the FROM and REPLY TO addresses.
If the email is sent on behalf of the Academics Department, the Students Services Representative's email will be used as both the FROM and REPLY TO addresses.
Once setup, there are multiple ways an email can go out to a student; cLick here to learn more.
Events
Events offer a versatile way to create and manage various tasks and activities within the system. These events can be tailored to meet your specific requirements and can be allocated to individual students or integrated into communication plans. Here's a list of sample events that you can configure in the system:
- Initial Appointment
- Enrollment Appointment
- Follow-up Interview
- Interview Scheduled
- Phone Call
- Follow-up Phone Call
- Mock Interview
Adding events can be accomplished through the system's intuitive dashboard interface. Alternatively, you can also add events directly under "Student Activities" to associate them with specific students. To add an event, follow these steps:
- Choose your desired event from the dropdown menu.
- Enter the date, time, and any relevant comments for the event.
- If the event has been completed, mark the "Completed" box; otherwise, leave it unchecked.
- Once you've filled in the details, click "Create Event."
- The system will then record the event in the activities section (indicated by the red arrow), and it will also be reflected in the student's calendar, which can be accessed under "Personal Info" > "Calendar."
These events play a crucial role in effectively monitoring and organizing student interactions and engagements within the system.
Letters
Within the system, you have the capability to establish letter templates tailored to each department's specific needs. These templates offer the flexibility to incorporate system variables seamlessly into your letters. To include these variables, simply click on the "VAR" option and utilize the formatting tools available in the menu bar.
When you're ready to print the letters, you have two convenient options:
Dashboard Printing: You can initiate the printing process directly from the system's dashboard.
Individual Student Printing: Alternatively, you can print letters on an individual student basis.
SMS
In Campus cloud you have the ability to create SMS templates that can be integrated into communication plans or sent through the Group Builder feature. These templates provide a convenient way to include system variables within your messages, ensuring personalized and dynamic content.
There are multiple ways to send SMS messages to students within the system:
- Communication Plans: SMS templates can be seamlessly integrated into communication plans, allowing you to automate and schedule SMS messages as part of your overall communication strategy.
- Group Builder: You can use the Group Builder feature to send SMS messages to specific groups of students. This feature simplifies the process of reaching out to targeted groups with tailored messages.
- Manual SMS Sending: If needed, you can send SMS messages from scratch to individual students through the dashboard. Simply click on the SMS box next to their phone number on their student record, and you can compose and send your message directly.
Holds
Hold can be applied to student within the system. Each department has their own set of holds as well as an overall hold section which then there can be assingned to a specific department under maintenance.
Additionally there are 2 checkboxes, which you can check if either a student is on that specific hold and do you want the hold to either stop the student from enrollment or stop the student from registering for classes.
Admissions
If you are looking to configure settings related to the Admissions department, all of the relevant setup options, including all of the information you will read in this section, can be found under Admissions -> Setup.
Duplicate Lead Rules
The Duplication Checking setup can be found under Admissions -> Setup -> Duplicate Lead Rules. Here, schools can set up their own rules for duplicate lead checking.
Lead Source and Source Type
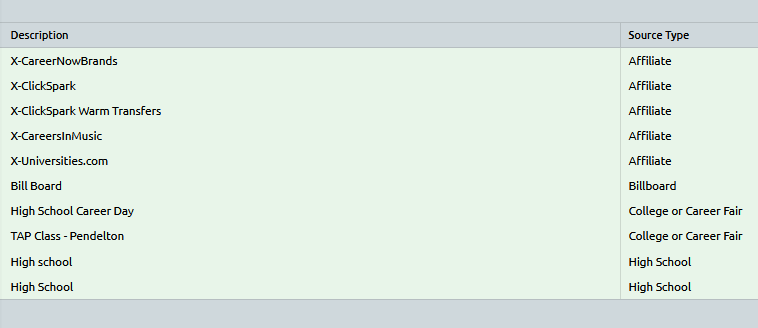
Lead Source and Source Type are used to track and categorize the origin of potential student leads. Lead Source represents the specific point of origin for a particular lead, such as a High School Career Day or TAP Class - Pendelton. Source Type is then used to group these lead sources into broader categories, such as College or Career Fairs or Internet/Social Media.
By utilizing Lead Source and Source Type, admissions departments can better track and analyze the effectiveness of their recruitment efforts, as well as identify areas for improvement. For example, by analyzing which Lead Sources and Source Types are generating the most qualified leads, admissions departments can make informed decisions about where to allocate their resources and focus their outreach efforts.
It is important to note that Source Type is not a mandatory setup, but can be a useful tool for organizing and categorizing leads. By grouping leads based on Source Type, admissions departments can easily compare and analyze lead sources across similar categories, providing valuable insights into which recruitment channels are most effective for their particular institution.
The Lead Form checkbox indicates whether a particular Lead Source should be included as an option in the drop-down on the Lead Application Form, which is located under Admissions -> Setup -> Lead Application.
On the other hand, the Active checkbox determines whether a Lead Source will be available for selection in the drop-down menu when creating a new Lead. By enabling the Active checkbox, the Lead Source will be visible and selectable in the drop-down on the New Lead form, which is located under Admissions -> New -> Lead.
Lead Application
Add Components to the Lead Application just by clicking 'Add Component'. In the example below, two Components have been created, and added a Description to each one. Remember there is not limitation to how many components are added.
Next, tie the Component Fields to each of our Components. Select the needed Component and click the 'Component Fields' button at the bottom:
On the left-hand side are the Available System Fields. Choose the fields just by clicking on them. On the right-hand side are the components that have been selected. Once done - press Save:
Repeat the previous step for all of your components.
By clicking on the 'Preview' button:
The Lead Application can be viewed. Down below are the two Components that were added and the Fields that were tied to those Components.
To change the order of the Fields for a specific Component, click 'Fields Order'.
Where the order can be adjusted for the Fields just by clicking on the green up and down arrows.
Once done, invent the Lead Application URL to your website (URL/welcome), where students can click on that link and fill out the application.
📝 Note: The application form is designed using cascading style sheets, which enables it to seamlessly integrate with your website's design and color scheme.
Online Application
Add Components to the Online Application by clicking 'Add Component' down at the bottom of the page.
In the example below, four Components have been created and a Description, Header, and Footer to each one of them. Remember there is not limitation to how many components are added.
Tie Available Program Categories to your Components. One the left-hand side are your Available Program Categories. Choose the Program Categories by clicking on them. On the right-hand side are the components that have been selected.
📝 Note: The Program Category setup is under Academics -> Setup -> Programs -> Program Category (e.g., Nursing, Photography, Design, etc. category)
Next, tie the Component Fields to each of our Components. Select the needed Component and click the 'Component Fields' button at the bottom.
On the left-hand side are the Available System Fields. Add the Available Fields by clicking and dragging them to the right-hand side. Once done - press Save.
Repeat the previous step for all of your components.
By clicking on the 'Preview' button.
The Online Application can be viewed. Down below are the four Components that were previously added.
Another example.
By clicking on the Components, the Fields tied to it can be viewed.
💡 Tip: We recommend adding an additional component perhaps called approval so, that the rep can send the application 'back' to the applicant if items need to be corrected in the last component.
When the student submits their components, they can be found in the dashboard.
Click on the component and then either Reject or Approve.
✔️ Green check mark - the component is complete.
🚫 Red cross sign - the component was rejected.
Community Outreach Institutions and Type
Budgets
Teams
Agency
Academics
If you are looking to configure settings related to the Academics department, all of the relevant setup options, including all of the information you will read in this section, can be found under Academics -> Setup.
Student Status
To maintain Student Statuses navigate to Academics -> Setup -> Student Statuses.
Restricted Grade Processing by Student Status
Courses
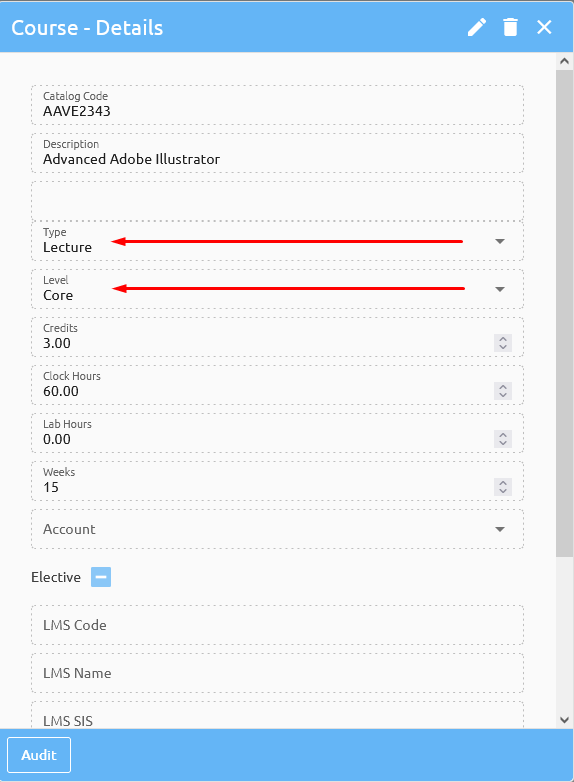
Course Types, Course Levels, Course List, and Course Accounts can be configured under Academics -> Setup -> Courses.
Once Course Type and Course Level have been setup, navigate to the Course List, where courses can be built and maintained.
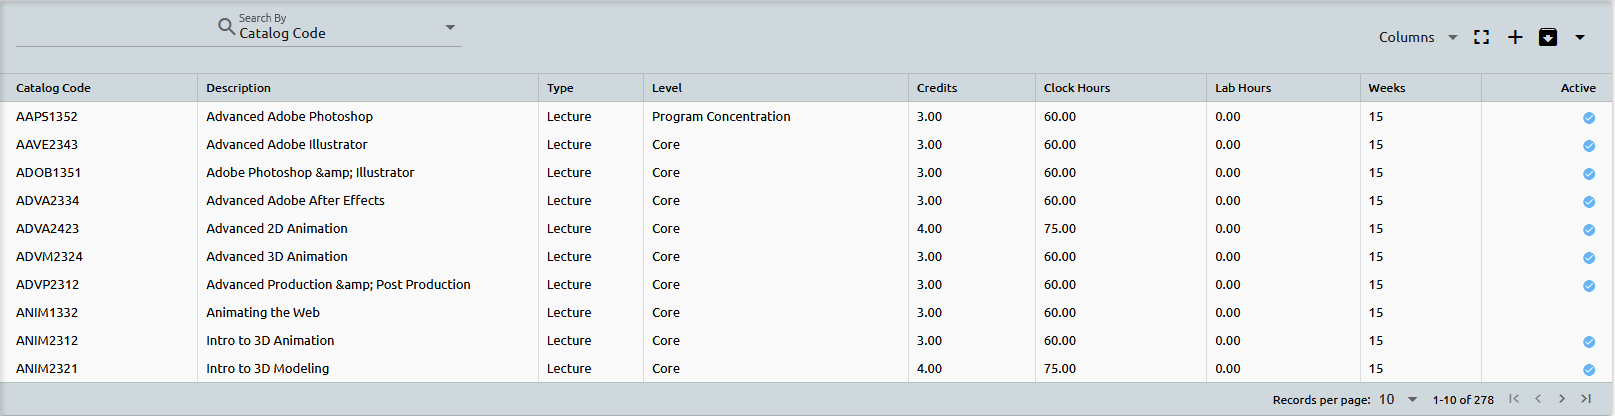
By simply clicking on one of the courses, or clicking the plus sign in the top right corner, you will see the Course Type and Course Level will be available.
Accounts dropdown can be setup also under Academics -> Setup -> Courses -> Course Accounts. Course Accounts is a feature in the system that is used for billing purposes when registering for courses.
This is particularly useful for clients who bill their students by course rather than by semester or other time period. The system allows for the setup of course accounts, which can be assigned to individual courses, and students can then be billed accordingly.

👉 Click here to learn how to maintain a setup.
After you have successfully configured your courses, you can proceed to set up your programs.
Master Assignments for Courses
To create your Assignments for your courses navigate to Academics > Setup > Courses > Course List, select the course you wish to create assignments for and then click the "Assignments Group" button at the bottom.
Creating and Updating Assignments
Creating and updating assignments, along with their weighting for grading, involves two essential components: Assignment Groups and Assignments. Here's a step-by-step guide on how to work with these components within the Campus Cloud system:
Assignment Groups:
Assignment Groups define common categories of assignments, such as tests, quizzes, lab work, and homework. These groups also specify the weight by percentage of the group relative to the entire course.
For example, you can create an Assignment Group called "Lab" and allocate it 50% of the total course grade. Within the "Lab" Assignment Group, you can add individual lab assignments, each worth a certain number of points.
Campus Cloud uses these Assignment Groups and their weights to calculate both in-progress and final grades based on the points students earn within each group.
Assignments:
Assignments define the specific tasks or assessments assigned to students and specify the number of points associated with each assignment.
For instance, within the "Lab" Assignment Group, you can have individual lab assignments worth a certain number of points each.
Creating and Updating Assignments:
To build Assignment Groups and Assignments, go to "Academic" -> "Faculty" -> "Assignments" in the Campus Cloud system.
The system will list all the courses that you, as the instructor, are assigned to teach. Select the course for which you want to create or update assignments.
In the course window, you'll see default assignments and assignment groups if they have been set up previously.
To add a new Assignment Group, click on the pencil icon next to an existing group (e.g., "Other"). Adjust the weight percentage to allocate space for the new group (e.g., "Final Exam"). Click "Save" to update the weights.
After updating the weights, click the "Add" button to create a new Assignment Group (e.g., "Final Exam"). Enter the group name and weight percentage. Click "Save" to add the group.
With the new Assignment Group in place, you can add individual assignments to it. Click on the "Add" button next to "Assignments." Fill out the assignment details, including the name, points, and due date if applicable. Click "Save" to add the assignment.
You can continue to add assignments to other groups in the same manner.
Note that you can delete Assignment Groups or Assignments by clicking on the trashcan icon.
To copy assignments or assignment groups from other courses, click "Copy From." Select a course from which you want to copy assignments, and then click "Copy."
Master Assignments for each course can be set up under "Academics" -> "Setup" -> "Course List" -> "Assignments."
Associating Instructors with Courses and controlling the term Schedule
You can control instructors who can be assigned to class at the term schedule level by accessing Academics>Setup>Courses>Course List:
Select your course:
For each course you can now associate instructors.
If you do so, when working in term schedule, system will offer only added instructors:
REMINDER - If instructor is not populating, navigate to their user settings, and make sure the Faculty Code is checked off:
Course Accounts
Course Group
- A setup option is available under Academics > Setup > Course Groups, allowing you to create custom groups of related courses (e.g., College of Business, Arts & Science Courses, etc.).
Example: You can group all business-related courses together to easily manage or report on them as a single unit.
- Once a course group is created, you can assign it to individual courses within the Course List, helping organize and categorize courses for easier access and reporting.
Program List
To initiate the creation of a new program, please follow these steps:
- Navigate to Academics -> Setup -> Programs -> Program List.
- Look for the plus sign located in the top-right corner and click on it to create a new program
- Proceed to fill out the relevant information pertaining to the program you are adding. This may include program name, description, duration, credits, prerequisites, and other relevant details.
- After entering the required information, ensure that you save your changes before exiting the page.
📝 Note: Additionally, it's worth noting that the options available in the Degree and Grade Scale drop-down menus are customizable, meaning you can tailor them to align with your institution's specific requirements and standards.
The Degree setup can be located under Academics -> Setup -> Degree Levels. We have pre-populated the list, but it is important to note that all entries must always be present. Schools can simply choose to inactivate the ones that are not in use or add new ones as needed.
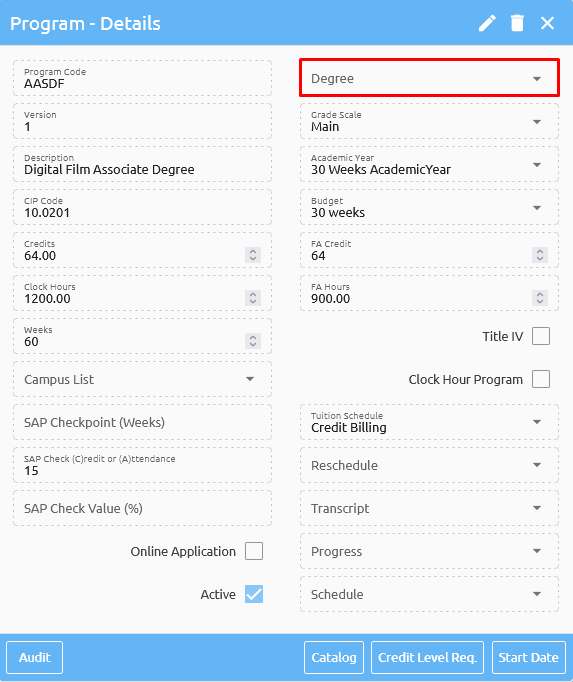
Within the Campus Cloud platform, you have the ability to assign varying Grade Scales to each of your programs and easily associate the Grade Scales for each program individually.
The "Title IV" checkbox serves as a crucial indicator to determine whether a particular program has been approved for Title IV funding. If left unchecked, the automatic packaging for students enrolled in these programs will not be eligible for Title IV funding.
To manage the visibility of a program on the Online Application, simply utilize the "Online App" checkbox. Enabling this checkbox will allow the program to be visible to students in the Online Application. Conversely, disabling it will make the program unavailable for selection.

This section is where you can add and modify Credit Level Requirements for each of your programs.
To add new Credit Level Requirements for a program, simply click on the plus sign located in the top right corner of the page. This will initiate a new Credit Level Requirements section, allowing you to customize and set up the necessary credit requirements for the program.

The Course Level drop down can be maintained under Academics -> Courses -> Course Levels.

⚠️ Warning: It is important to note that the Credit Level Requirements for each program are directly linked to the number of credits that program has been set up for. Therefore, if the configured credit requirements are not met, they will be highlighted in red as an alert, indicating that the minimum credit requirement has not been fulfilled. Conversely, if all requirements have been met, they will be displayed in green.
After you have completed and filled out the necessary fields for your program, the next step is to associate your Courses and Start Dates with the program. Start Dates can be setup under Academics -> Setup -> Start Dates.

In Campus Cloud, we link courses to their respective programs. Once a student is enrolled in a program, all courses that have been associated with the program will automatically be displayed on the student's transcript. This ensures that the student has access to a comprehensive overview of the curriculum associated with their chosen program of study.
Another important feature within Campus Cloud is the ability to link Start Dates to programs. By doing so, when enrolling a student in a program, only the Start Dates that have been linked to the program will be available for selection. This helps streamline the enrollment process and ensures the selection of appropriate start dates for the chosen program.

Adding Elective courses/ Prerequisites and Corequisites
Select the program where the electives should be added to and click on the Catalog at the bottom:
Click on ‘Manage Courses’:
From here each course can be edited. Next, select what level it is:
What is in the drop-down above, is what has been setup under Academics -> Setup -> Courses -> Course Levels:
PreRequisites and CoRequisites can also be added. To do so, first click on the course that you want to add PreRequisites or CoRequisites to. At the top of the page you can see ‘CURRENT SELECTION’, the system lets you know which course has been chosen:
Once, a course has been chosen, click on the ‘PreRequisites’ button:
Click ‘Add New Record’:
Type in the course and press ADD:
The system will refresh and add your PreRequisite:
Repeat the previous step for any additional courses. I have added ‘Intro to Computers’ and ‘CAD I’ in the example below:
Now, when you go back, you will see 'Interior Design Studio I’ has a green check mark under PreReq, and when you click on it, you can see which groups of PreReqs:
Program Category
Organize your programs effortlessly by creating categories. Whether you have Nursing programs, Business programs, or any other program type, simply group them under their respective categories. This allows you to quickly locate and filter programs according to their category, ensuring a more streamlined and efficient experience. For instance, when running a report, you can easily access all your Nursing programs by selecting the Nursing category, rather than sifting through an extensive list of all programs.

Program Interest
To assist students who are still exploring their program options, our lead application form features a 'Program Interest' section. This section is fully customizable, enabling you to highlight your institute's most popular and sought-after programs. By doing so, students can easily identify and indicate their areas of interest, facilitating the provision of personalized recommendations and guidance from your team on the programs that align with their goals and aspirations.
📝 Note: The 'Program Interest' can be setup under Academics -> Setup -> Programs -> Program Interest.
Data Collection
Here we have implemented a comprehensive data collection feature to monitor and evaluate our education programs. This feature enables you to track key metrics such as program enrollment, graduation rates, completion percentages, employment rates, and more. By collecting and analyzing this data, you can make data-driven decisions to improve the quality and effectiveness of your education programs.
CCP Application
Grades
Grade Scales
To establish and manage grade scales in your academic system, please follow the instructions below:
- Begin by navigating to Academics -> Setup -> Grades -> Grade Scales.
- Click on the plus sign located in the top-right corner of the screen to create a new grade scale.
- Input the relevant information, including the Scale ID, Scale Name, and be sure to select the "Active" box before pressing "Add."
- The system will automatically refresh the page, and your new grade scale will be listed. Click on it and press the "Scales" button to begin building your grade scale.
- To add a new grade, click on "Add Record," input the necessary information, and then press "Save." In the example below, we have created an "A" grade.
- Repeat this process as many times as necessary to create all grades that you require. Below, you can see an example of a finished grade scale.
It is possible to create an unlimited number of grades & grade scales. Below is an example of a completed grade scale that has been built using the steps outlined in the previous response.
📝 Note: -> 👉 Click here to learn how to associate grade scales for each program individually.
Below is a list of common abbreviations and their corresponding full names. Remember, hovering over any of these abbreviations in the system will display their corresponding full name, allowing for quick identification and understanding of their meaning.
| Abbreviations | Explanation |
|---|---|
| GPA | Include in GPA calculation |
| CE | Should count towards Credits Earned |
| MTF | Include in maximum time frame SAP calculation |
| PASS | Pass grade |
| FAIL | Fail Grade |
| TC | Transfer credit |
| MP | Extend Midpoint |
| GD | Extend Graduation date |
| DTO | Disable transcript grade override by Gradebook |
| DCT | Disable course transfer to new enrollment |
| Repeat Eligible | Allows students to retake a course; e.g., F or W grades could allow for a retake of the course |
Grade Levels
The grade levels have already been set up by us and they correspond to the different stages of education that a student may be in. The categories and their respective numerical ranges are as follows:
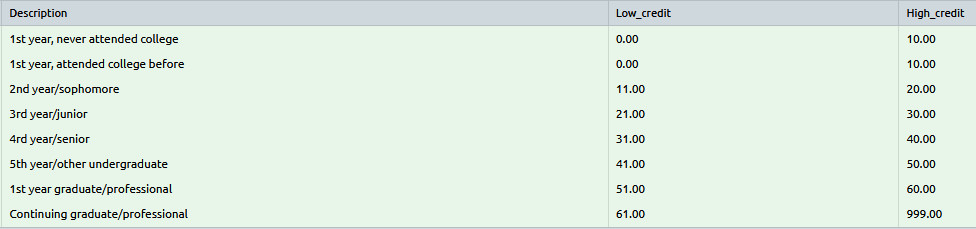
In essence, these grade levels are meant to help categorize and keep track of students based on their academic level, and they have been pre-populated for ease of use.
K-12
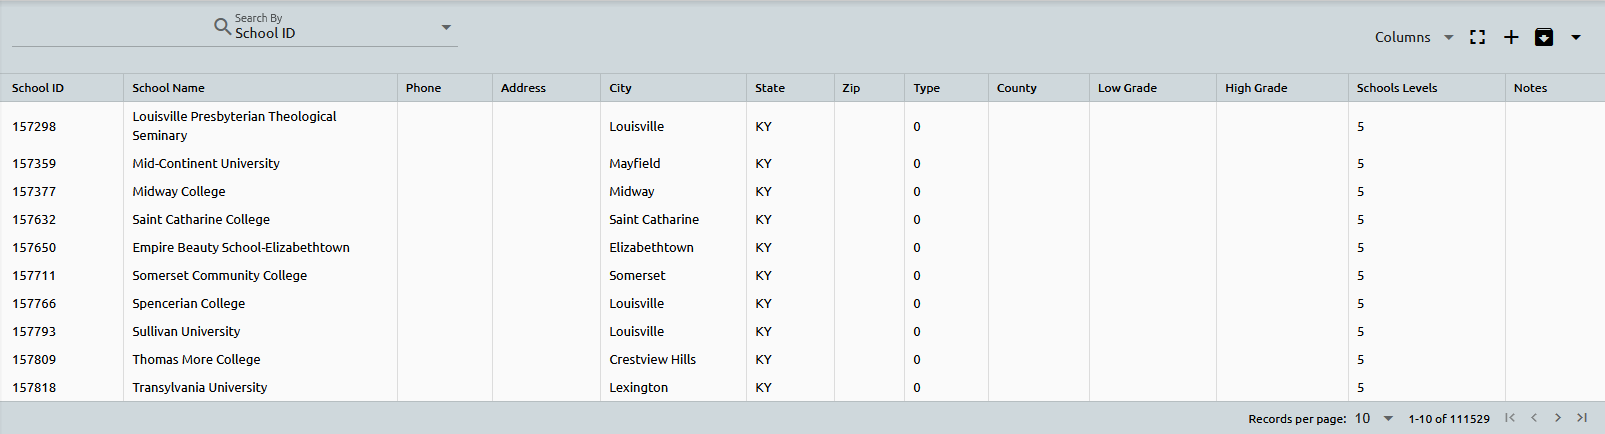
The administration panel for managing K-12 schools can be found under Academics -> Setup -> K-12. This is the place where you can customize the School Type and Level, as well as add and update schools according to your specific needs.
The K-12 Type setup is an essential characteristic that defines the structure and focus of a school. e.g., a school can be classified as public or private, vocational, religious or secular, among others. Within the administration panel, you can choose the appropriate type that best represents the school and make any necessary modifications or additions.

The K-12 Levels setup refers to the grade levels that it teaches. K-12 schools typically include elementary, middle, and high school levels, but some schools may only focus on specific grade ranges. Within the administration panel, you can specify the grade levels that the school teaches, update them as needed.

Maintaining and expanding your list of schools is a simple and straightforward process with K-12 Schools.
We understand the importance of having an accurate and up-to-date list of schools, which is why we have already populated the system with the current list from the College Board.
In addition to our pre-populated list, you can also add new schools to your database as needed.
📝 Note: -> 👉 Click here to learn how to maintain a setup.
Terms
Creating a New Term
Copying an Existing Term
Term Builder
The Term Builder is an efficient feature that offers a convenient solution for bulk assignment of courses to specific terms. Rather than manually adding courses one by one to the Terms List, users can build a group of courses using the 'Term Course Setup' function located under Academics -> Setup -> Terms -> Term Course Setup, and assign that group of courses to a desired term through the Term Builder.
This streamlined process enables users to efficiently manage multiple courses and ensures they are accurately assigned to the correct term. Once assigned, these courses will be readily visible in the Term List, saving users valuable time and effort.
Time Reschedule
The Time Reschedule feature allows users to adjust the schedule for a particular course(s) within a term.
Semester Template
Our platform offers an intuitive solution for bulk registering students in courses within a specific term.
The Semester Template, which can be accessed through Academics -> Setup -> Terms -> Semester Template, enables you to conveniently create a group of courses and register students in these courses within a specific term using the Registrar -> Semester Template Registration function.
From here, you can enter a name for your template and select the relevant course and campus from the drop-down menus. Once you have made your selections, click on "Add" to create your template.
Course Maintenance within a Term
Adding and maintaining scheduled courses within a term
In Campus Cloud, we build Terms and then we add schedules to each term.
Each semester for every start will have its own term.
For example, for 01/04/16 start we have:
Q1 – 1/4/16 Start –Winter
Q2 – 1/4/16 Start – Summer
Q3 – 1/4/16 Start – Fall
To see Terms already in the system go to: Academics -> Setup -> Terms.
To see each Term schedule, click on desired Term and then on Schedules the button.
On the top you’ll find a dropdown for Campus and Session selection. Select Campus and Session you wish and click on submit. System will bring term schedules for selected campus/session.
From here, you can make all kind of changes including Instructors.
Select course with incorrect instructor, AVE101A in this example and system will bring this course for editing.
Click on the instructor field and simple start typing instructor name (or select instructor from drop-down).
Once proper instructor is selected, click SAVE and all FUTURE registrations for this term will have proper instructor listed.
You can update the other information as well. For example, if you have course that Days Of a Week are incorrect, you can change that in the same fashion.
Institutions can now also track class load for Adjunct instructors (in schedules).
Reminder - Students cannot be registered into a course if the students start date is after the courses start date.
Adding Multiple Instructors
First a group of instructors will need to be created under Instructors Groups..
Once the group of instructors is created, navigate to Academics -> Setup -> Terms -> Term List, select a term and click on 'Schedules'.
Select the course to which multiple instructors should be added. Add the group of instructors that was created previously.
Controlling Instructors
Term Schedules - Delivery Method (review - might add to setting up schedules)
Moving Registered Students
Transfer Credits
To place transfer credit on a students transcript first establish the relationship with the other Institution. Go to Academics -> Setup -> Transfer Credit.
Search for your institution in the upper right hand corner and select then when you find the correct institution in this example we will use Southern Careers Institute in San Antonio.
Click on Courses.
The system will display any existing course relationships, if there are none you will have to add them.
First we enter the course information from the sending institutions and click add.
Once you have added the institutions course create the relationship with our course by clicking on.
Enter the course code and the credits and click add.
The system creates the relationship for you and you can add additional course to create a one to many.
If you are done with this course click back.
From here you can create additional relationships by clicking add or if you are complete click on back.
👉 Click here to learn how to apply transfer credits to a student.
Sessions
Sessions refer to the specific time periods during which classes are held at a school or institution. These periods are typically divided into various sessions, such as day, morning, night, and online.
Sessions are important because they allow for easy organization and reporting of information related to student schedules, instructor availability, and classroom usage. They provide a framework for scheduling courses without conflicts and ensure that students have access to the classes they need at a time that works for them.
In essence, sessions act as "buckets of time" that allow you to efficiently manage schedules, avoid conflicts, and ensure a smooth and streamlined process for all involved parties. Without sessions, scheduling and logistical tasks would become much more difficult, potentially leading to confusion and inefficiency.
Periods
When creating schedules for courses within a term, there is an option to select a period. This can be done manually, but it can also be simplified through the use of a template.
By creating a template for periods, you can prepopulate fields such as start and end times, length, session, and days, making the scheduling process much easier and more efficient.
This eliminates the need to manually enter these details for each course, and saves time for staff members responsible for creating schedules. The period template can be easily set up under the "Periods" section in the setup menu.
Start Dates
Start date refers to the specific date when a student begins their academic program. When enrolling a student, the start date is typically selected based on the session and program they will be attending and the start dates available for that session and program.
The Start Dates setup allows you to create and manage all the start dates available for your academic programs. You can filter these start dates by specific sessions if applicable, or leave them blank to apply to all sessions.
This setup is essential for tying your start dates to your programs, which can be done in two ways. Firstly, you can assign start dates to specific programs through the Start Dates setup. Secondly, you can assign start dates to programs via the Program List setup.
Instructor Groups
If there are multiple instructors who need to teach a specific course, creating a group of instructors and assigning them to the course is necessary.
In such cases, you can create a group of instructors here, that can be assigned to that specific course. Enter the necessary information, such as the code, description, and the list of instructors who will be part of the group.
Once the instructor group has been created, you can then assign it to the relevant course.
👉 Click here to learn how to apply your group of instructors to a specific course.
Attendance Status Translate (review - might not need this setup)
Degree Plan
Blocks and Elements
Editing Courses within a Block
Editing Courses withing a Program
Drop Reasons
Our platform offers a versatile drop reasons setup that allows for customizable management of student withdrawals. Along with this, the License and Accreditation Exclusion feature enables the exclusion of specific types of drops from reports related to licensing and accreditation. This functionality ensures accurate and insightful reporting on student outcomes and program effectiveness.

Accessibility
Institutions can track and manage information related to student accessibility and disabilities. This information is important for ensuring that appropriate accommodations and support are provided to students with disabilities, enabling them to fully participate in academic programs and activities.
Staff members can add and update information about a student's accessibility needs and accommodations, such as visual or hearing impairments, mobility limitations, or learning disabilities, which can all be setup here.
👉 Click here to learn where these accessibilities can be applied to a student's record.
Honors
Our platform provides an honors setup feature, allowing for easy management and tracking of student honors and awards. With this feature, you can create and customize honor categories and criteria, track student eligibility, and generate reports on student achievements.

- 👉 Click here to learn more about the Term and Graduation Honors process.
- 👉 Click here to read about the Honors Report.
Other Education Type
To enhance your flexibility in managing the "Type" field under the "Other Education" button, located on a student's record, we have enabled you to set it up to your preferred specifications. You may add any type of education by simply entering the appropriate ID and Description, and then selecting the "Type" from the following options:
- HS/GED
- College
- Certificate
- License
- Other
⚠️ Warning: Please keep in mind that the "Type" field is mandatory and crucial for various reporting purposes, including IPEDS. Therefore, it is essential to ensure accurate and consistent completion of this field.
Test Scores
Navigate to Academics -> Setup -> Test Scores to create the test(s):
Click on the tree graph to add the test:
The order is if there are multiple sections of this test.
Now your test is ready to add to a student:
Financial Aid
If you are looking to configure settings related to the Financial Aid department, all of the relevant setup options, including all of the information you will read in this section, can be found under Financial Aid -> Setup.
Lenders
The lenders’ setup is a crucial part of the system as it helps manage and organize the various entities involved in providing and managing student loans. To set up lenders in the system, you need to gather information from the actual financial institutions that will be involved in providing and managing student loans for your institution's students. Some common lenders could be federal student loan programs like PLUS loans (Parent Loan for Undergraduate Students) and Subsidized/Unsubsidized loans. Other lenders could be private financial institutions that offer student loans.
Let's go through each field and its purpose:
- Lender Name: The name of the financial institution or organization providing the loans.
- Address, City, State, Zip: These fields allow you to input the physical address details of the lender, which is essential for communication and documentation purposes.
- Phone 1, Phone 2, Fax, Email: These fields capture contact information for the lender, making it easy for financial aid administrators to get in touch when needed.
- Lender, Servicer, and/or Guarantor: These checkboxes help you specify the role of the entity in the student loan process. A lender is the institution providing the loan, the servicer is responsible for collecting loan repayments, and the guarantor may act as a backup to cover the loan if the borrower defaults.
- Guarantor ID or Servicer ID: If applicable, you can enter the unique identification numbers for the guarantor or servicer. This helps streamline the loan management process and ensures accurate tracking of loan-related activities.
- Amount for Fee 1 and Fee 2 (Flat rate or percentage rate): Some lenders may charge fees for processing student loans. The "Amount for Fee 1" and "Amount for Fee 2" fields allow you to specify these fees. They can be either a flat rate (a fixed amount) or a percentage rate (a percentage of the loan amount).
- Description: Any additional information or notes relevant to the lender or their loan offerings.
- Interest Rate: The interest rate determines the cost of borrowing the loan amount. It is expressed as a percentage and is an essential factor in calculating the total loan repayment.
- Number of Installments: This field allows you to specify the number of installment payments required to repay the loan fully. Each installment will include a portion of the principal amount and interest.

Fund Types
The Fund Type setup is where you define the different types of financial aid funds available for disbursement to students. Each fund type represents a specific category of financial aid. Let’s go through the fields and their explanations:
- Description: This field allows you to give a name or description to the fund type, such as "Pell Grant," "Perkins Loan," "SEOG Grant," etc.
- Category (drop-down): This field categorizes the fund type into different groups. The available options are predefined and include "PELL," "GRANTS," "LOAN," "PERKINS," "SEOG," "PROMS," and "OTHER". For example, "PELL" represents the Pell Grant category, "GRANTS" includes various grants, "LOAN" for different types of loans, and so on.
- TITLEIV (checkbox): This checkbox indicates whether the fund type is associated with Title IV federal financial aid programs. Title IV programs include various federal grants, loans, and work-study options. Title IV funds are federal financial aid programs, including grants and loans, available to eligible students pursuing higher education.
- SEOG (checkbox): This checkbox indicates whether the fund type is associated with the Federal Supplemental Educational Opportunity Grant. SEOG is a federal grant program for undergraduate students with exceptional financial need.
The Fund Type setup is essential for organizing and classifying different types of financial aid funds available at your institution.
Funds
The Funds setup is where you define individual funds that are available for disbursement to students. Each fund is associated with a particular Fund Type, Lender, and Payment method. Here are the fields and their explanations:
- Description: Similar to the Fund Type setup, this field allows you to provide a description or name for each specific fund. For example, a "Pell Grant" fund will be associated with the "PELL" fund type.
- Type Drop-down: Here, you'll choose the fund type that you previously set up in the Fund Type setup. This field helps link the specific fund to its corresponding fund type category.
- Lender Drop-down: This drop-down allows you to associate the fund with a specific lender from the Lenders setup. This is relevant when dealing with private loans or external financing sources.
- Payment Drop-down: This drop-down lets you choose a payment method from the options set up under the Accounts Receivable side in the Payments setup. It specifies how the funds will be disbursed to the student (e.g., direct deposit, check, electronic transfer).
- TITLE IV Checkbox: Indicates whether the specific fund is funded through Title IV sources.
- SEOG Checkbox: Indicates whether the specific fund is funded through the Federal Supplemental Educational Opportunity Grant (FSEOG) program.
- "Hold Disbursements until students attend (blank) days and additional (blank) days” – These fields allow you to set up disbursement rules, specifying a waiting period before funds are disbursed to students. For instance, you might choose to hold disbursements until the student attends a certain number of days of classes and then set an additional number of days as a buffer.
Academic Years
The Academic Years setup allows you to define the parameters and disbursement schedules for various financial aid programs during specific academic years. The Academics Years setup helps you manage the disbursement of different types of financial aid (such as Pell Grants, loans, and other grants) based on predefined academic periods.
📝 Note: The academic years are then tied to the programs in Campus Cloud, meaning that different programs may have different academic years with unique disbursement schedules, percentages, and aid types.
Let's go through each field and its purpose:
- Description: This field allows you to provide a descriptive name or label for the academic year. For example, you might use "30 Weeks Academic Year" as the description for an academic period that spans 30 weeks.
- Weeks: Here, you specify the duration of the academic year in terms of weeks. This helps determine the length of the academic period for which financial aid will be awarded and disbursed.
- Number of disbursements (for PELL, GRANT, LOAN, PERKINS, OTHER, SEOG): This field allows you to define how many disbursements will occur during the specified academic year for each type of financial aid. Let's say you have a 30-week academic year, and for the "PELL" type, you set the number of disbursements to 2. It means that the Pell Grant will be disbursed twice during that 30-week period.
- Percentages (for PELL, GRANT, LOAN, PERKINS, OTHER, SEOG): In this field, you can specify the percentage of financial aid that will be disbursed during each of the defined disbursements. For example, for a 30-week academic year, if you set the "PELL" type to have two disbursements, you might allocate 50% of the total Pell Grant amount for each disbursement.
COA
The Cost of Attendance (COA) setup is used to define the estimated total cost that a student may incur during their academic year. The COA helps determine the maximum amount of financial aid that a student is eligible to receive, considering both direct educational expenses and indirect living expenses.
📝 Note: After the Cost of Attendance (COA) setup is completed, it is then tied to the programs.
Let's go through the fields:
- Description: This field allows you to provide a label or name for the specific Cost of Attendance entry. For example, you might use "COA 9 Month" to represent the cost of attendance for a standard 9-month academic year or "COA 3 Month" for a 3-month summer term. Or you might have a “2022-2023/Spring, Summer, Fall” COA.
- With Parents: This field represents the estimated cost of attendance for students who live with their parents or guardians while attending school. The With Parents COA typically considers expenses such as tuition, fees, books, transportation, personal expenses, and a contribution for room and board while living with parents.
- Off Campus: The "Off Campus" COA represents the estimated cost of attendance for students who will be living off-campus, such as in an apartment or rental house. This COA includes all the same components as the "With Parents" COA, but with adjusted living expenses to reflect the higher costs of living independently.
- On Campus: The "On Campus" COA represents the estimated cost of attendance for students who will be living in on-campus housing provided by the educational institution. The "On Campus" COA includes tuition, fees, books, transportation, and the cost of housing and meals on campus.
Programs
The Programs setup is where you tie the Academic Years and Cost of Attendance to each specific program. This setup allows you to define the program's cost and associate it with the appropriate academic year and cost of attendance.
Let's clarify the fields and their implications:
- Academic Year: For each program, you will associate it with the relevant Academic Year setup that you defined earlier. This helps determine the timeframe for which financial aid will be awarded to students enrolled in this program.
- Cost of Attendance (COA): This dropdown allows you to link the program with the corresponding Cost of Attendance (COA) setup that defines the estimated cost of attending the program. Now, there are two ways to set up the program's cost:
a. Option 1: You can use the "COA With Parents, Off Campus, On Campus" from the COA setup, where you define the estimated costs for living with parents, off-campus, and on-campus separately. Then, you can link the program to the appropriate COA based on the typical living arrangement of students in that program.
b. Option 2: Alternatively, you can directly enter the "Program Cost" here. This means you can input a specific cost amount that is unique to the program. This option is useful if the program has a fixed cost, regardless of the student's housing situation.
📝 Note: Please choose one of the following methods, not both!
Packaging Limits
The Packaging Limits setup in the Financial Aid department is a process that determines the maximum amount of financial aid that a student can receive during a specific academic year based on various factors such as the student's dependency status, academic level, and financial need.
For example, the Packaging Limits for the 2022/2023 award year indicate that a first-year student who has never attended college can receive up to $6,895 in Pell Grant funding if they are a dependent student, or up to $6,895 in Pell Grant funding if they are an independent student. Additionally, dependent students can receive up to $3,500 in Direct Subsidized Loans, $2,000 in Direct Unsubsidized Loans, while independent students can receive up to $3,500 in Direct Subsidized Loans and up to $6,000 in Direct Unsubsidized Loans.
By setting up Packaging Limits, the Financial Aid department can ensure that students receive the appropriate amount of financial aid that they are eligible for, while also managing the overall amount of aid that is distributed during a specific academic year.
Federal Limits
The federal limits setup is preconfigured by Campus Cloud that sets the maximum amount of federal financial aid a student can receive in a given award year based on their dependency status, academic level, and other criteria. It includes limits for various types of aid, such as Pell Grants, Direct Subsidized Loans, and Direct Unsubsidized Loans.
These limits are set by the federal government and are adjusted annually. By having this setup in place, the FA department can ensure that they are disbursing federal financial aid to students within the limits set by the federal government.
AR Collection Goals
The purpose of this setup is to define a specific target or goal for a given month in the AR Summary Report, which can be accessed through the Reports menu under Accounts Receivable (AR) and Promissory Notes. By setting a Month Goal, the report will provide a summary of how much progress has been made towards meeting that goal. This can be a useful tool for tracking progress and identifying areas that may require additional attention or resources.
Online Application
Payment Plan Templates
Verifications
Verifications are a process used to confirm or check the accuracy and completeness of information provided by selected students. This process involves creating different groups of verifications, each with specific information that needs to be verified.These groups can be created and managed in the Financial Aid setup menu.
- Create your Group
- Add Verifications (Verifications button) to the Group
Once the verification groups are set up, the relevant information can be added to each group, and a "STOP" flag can be added to prevent packaging or disbursement until the verification process is completed.
Verifications can be created for various purposes, such as confirming a student's eligibility for financial aid, verifying enrollment status, or validating academic progress.
👉 Click here to read about Verifications on a student record.
Documents
Student Accounts
If you are looking to configure settings related to the Student Accounts department, all of the relevant setup options, including all of the information you will read in this section, can be found under Student Accounts -> Setup.
Chart of Accounts
Our platform offers a convenient Chart of Accounts setup, which allows for easy management and tracking of financial transactions. Within this feature, GL account numbers are assigned, which can be associated with charges and payments, ultimately being posted to the General Ledger.
When setting up a new account, you will input the account number, name, and description, with the account type being selected from categories such as:
- Assets
- Liabilities
- Income, or
- Expenses
These categories enable easy grouping of accounts when viewed in other windows, providing a clear and organized view of financial data. Additionally, you can choose to mark accounts as active or inactive, allowing for flexibility and efficient management of accounts over time.
The GL account numbers established in the chart of accounts setup are crucial for the Fees/Charges and Payments setup in CC. When setting up fees and charges, you can associate them with specific GL account numbers, enabling accurate tracking and reporting of financial data. Similarly, when processing payments, GL account numbers are used to identify the appropriate account for recording the transaction.
Fees and Charges
In the fees and charges setup, each transaction can be added to a student's bill either manually or automatically based on certain rules. The description, type (flat rate, per credit, per hour, per course), and rule for each fee or charge must be entered, and the account number associated with the transaction is also specified.
Categories are optional but can be helpful for 90/10 reporting purposes.
Check boxes are available for designating:
| ☑️ | Explanation 💡 |
|---|---|
| Refundable | Used to indicate whether a charge is eligible for a refund. |
| Title VI | Is this transaction Title VI. |
| 1098-T | Check if the 1098T is refundable. It is used to indicate whether the charge should be included in the student's Form 1098-T. |
| Tuition | Should be checked if it is 1098T and if it is Tuition. |
The filters are used to apply charges or fees to specific groups of students based on certain criteria. For example, if there is a group of classes that have a set fee, you can use the filters to apply that fee to any student who enrolls in those classes. The filters can be based on various criteria such as program, campus, degree, course, session, or source. This allows for more targeted and efficient billing and charging of fees.
You can also use multiple filters if needed and easily remove them by clicking the "X" button. Overall, these filters help to automate the billing process and ensure that charges are applied accurately and efficiently.
Payments
The Payments setup section is where you can configure your payment options. Within this section, you will find several checkboxes, which can be reviewed down below for detail.
| ☑️ | Explanation 💡 |
|---|---|
| Post to QB | Should this Payment be Posted to Quickbooks. |
| Refund Title IV | A refund of Title IV funds refers to the process of returning unearned federal financial aid back to the appropriate federal aid. |
| Title IV | Is this Payment transaction Title IV. |
| 90/10 | For instance, you can select whether a particular payment code should be included in the 90/10 report and specify the category under which it should appear. The categories can be customized under AR > Setup > 90/10. |
| 1098-T & 1098-T GRANT | The difference between the 1098T checkbox and the 1098T Grant checkbox is in how the payment is categorized on the 1098T tax form. The 1098T checkbox indicates that the payment code should be included on the 1098T tax form, while the 1098T Grant checkbox indicates that the payment should be categorized as a grant on the 1098T form. |
| PN AUTO | Pertains to promissory notes, which certain schools offer discounts on for their students. |
| PN CAMPUS | This refers to promissory notes that are manually handled by campus staff. |
| PN CASH | This refers to promissory notes that are paid in cash. |
| PN SERVICING | This refers to promissory notes that involve a servicing agency, which handles tasks such as collecting payments and managing repayment plans. The PN Servicing checkbox is used to identify which payment codes are applicable to the promissory notes set up with a servicing agency. |
| AUTHORIZENET | Used to indicate which payment code is associated with the authorized net payment processor. |
Tuition Schedules
The Tuition Schedules setup which can be located under AR -> Setup -> Tuition Schedules is a crucial tool that enables you to establish the appropriate billing method for your students and is used for the Auto-Billing module within Campus Cloud.
The Frequency option within the Tuition Schedules setup allows you to specify when you would like to bill your students and when the Tuition Schedule should trigger automatic billing. You have various options to choose from, including:
- Manually: This option indicates that you will manually bill your students.
- Program: When you opt for program-based billing, please ensure that the student has at least one registered course and their start date is either today or after today's date for them to appear in the auto-billing process.
- Term: If you choose to bill students based on the term, the system will automatically follow the term dates.
- Sub Term: You can also bill students by sub-term.
- Mid Point: The system can bill students based on their midpoint.
- Payment Periods: To setup payment periods, navigate to AR -> Setup -> Payment Periods. This option enables you to determine when you want to bill, for example, every 32 weeks.
To determine the type of tuition rate, you need to decide whether it is a flat rate, credit-based, or a combination of both.
- A flat rate is a fixed amount that is charged to all students regardless of the number of credits/hours they are taking.
- If you are charging tuition based on credits or hours, then you need to determine how much you want to charge per credit or hour.
- Additionally, you can also setup a combination of credits/hours and a flat rate, where the student is charged a flat rate plus a certain amount for each credit or hour they take.
Furthermore, it is essential to determine whether the Tuition Schedule is refundable. If it is, the refund policy can be established by navigating to the AR -> Setup -> Refunds section.
After configuring the Tuition Schedule's Frequency, Type, and refund policy, the next step is to set up the rates for the schedule. In the Rates section, you can set the tuition cost for different groups of students. You can create multiple rates for the same Tuition Schedule and apply them to specific student groups.
Once you have setup your rates, the system will then use this information to automatically bill the students based on the criteria you have setup.
💡 Tip: Campus Cloud's recommendation is to only apply the tuition fees that you are charging to the Tuition Schedule. Any additional costs should be set up under the Fees/Charges. There, you can setup any extra fees you may charge and configure the rule to follow the Tuition Schedule. This means that every time the Tuition Schedule is activated, all the Fees/Charges associated with the Tuition Schedule rule will be applied as well.
Click here to read about the Campus Cloud Auto-billing module next.
Refunds
The refund policy that outlines the criteria for receiving a refund based on specific circumstances can be built under AR -> Setup -> Refunds.
To build the refund policy, you can start by adding the Refund Due days, which would determine when a refund can be requested. Then, you can decide whether the refund due days are after the student's Drop Date or Last Day of Attendance. Alternatively, you can create a Refund Calculation that takes into account various factors.
After determining the refund due days and the criteria for refund eligibility, you would move on to building the actual refund policy in the rates section. Here, you would define the amount and timing of the refunds based on the criteria you established earlier.
Click here to read about the refund processes.
Payment Periods
Payment Periods represent a specific period of time, usually in weeks, during which students are billed for their tuition and fees.
👉 Click here to read more about auto-billing by payment period.
When creating a Tuition Schedule, a Payment Period needs to be attached to it. This can be done by navigating to the Accounts Receivable -> Setup -> Tuition Schedules > Rates.
Payment Periods are also used in Revenue Recognition to allocate earnings over the correct time frame. This ensures that revenue is recognized in the correct period.
Month Lock and the Reversal Process
The Month Lock functionality allows administrators or designated personnel to close a specific accounting period or month in the system. Once a specific month is locked, the system restricts further modifications or changes to financial transactions related to Student Accounts for the locked month.
90/10
This setup is closely associated with the 90/10 working report and plays a crucial role in managing and categorizing payments and fees/charges.
When configuring payments or fees/charges, you are provided with the option to specify the category under which these items should be reflected on the 90/10 report. This is precisely where the 90/10 setup comes into play.
The 90/10 setup is intricately linked to the configuration of Payments and Fees/Charges. During the setup process for Payments and/or Fees/Charges, you will encounter a dropdown menu labeled "Categories." This dropdown includes the setup information or whatever criteria you have established in the 90/10 setup. The categories you define here will subsequently appear on your 90/10 working report.
For instance, when utilizing this setup, you must determine whether you want a particular code to be included on the 90/10 report and, if so, designate the specific category under which it should be displayed on the 90/10 report. This ensures that your financial information is accurately organized and reported in accordance with your institution's needs.
Sponsors
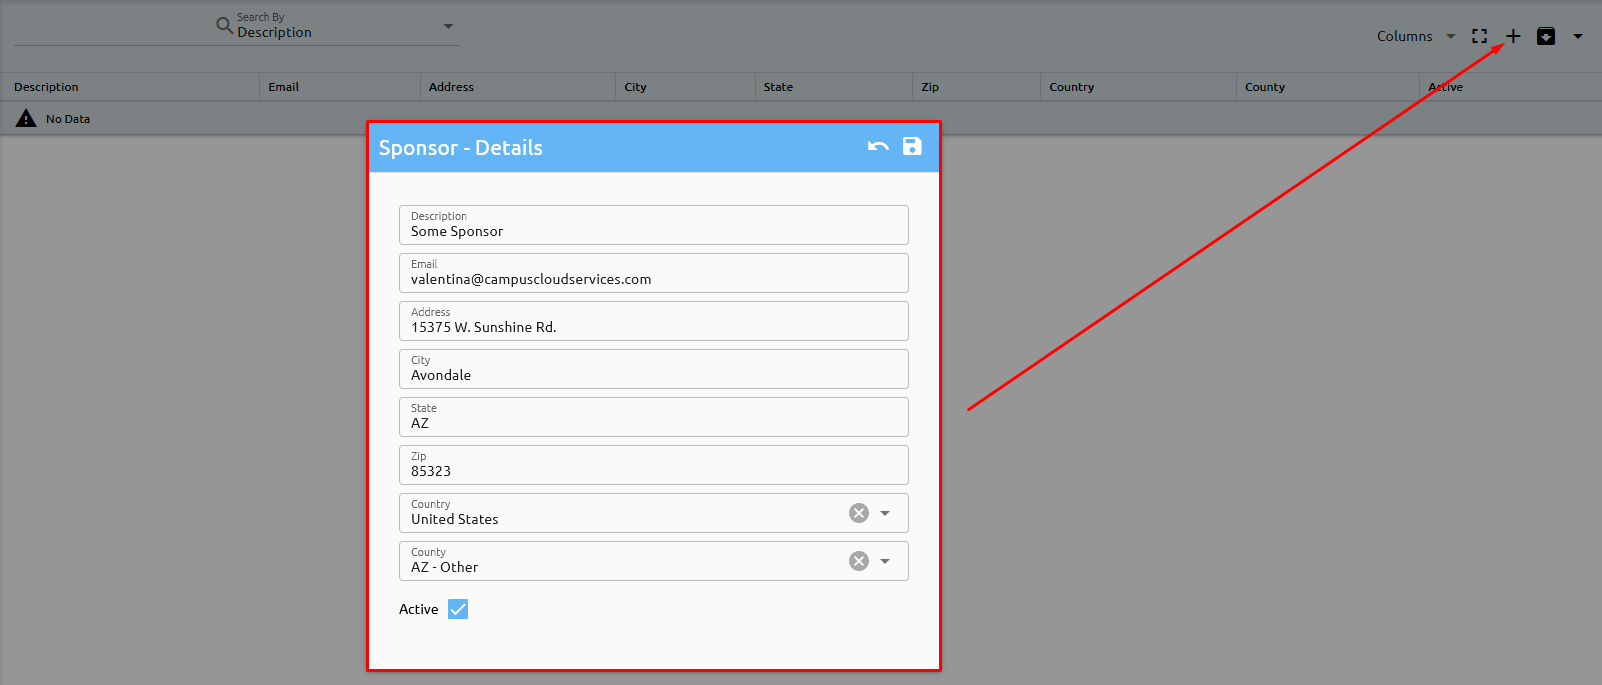
Under AR -> Setup -> Sponsor is the ability for an organization or another person to take over a student's bill.
Click the plus + sign in the top right corner to add a new sponsor, of course anyone on the list can be updated, too:
Once a Sponsor is setup, Agreements must be assigned to their record - click the Agreements button:
Transactions identified in the Fee List box, that fall in the Start/End Date range will be identified as Third Party transactions - for the students assigned to this Sponsor:
Identify the students associated with this Sponsor and the specific agreements here:
When adding associated fees and charges within the date range - Sponsor checkbox appears:
Transactions not identified in the agreement or outside the date range do not have the agreement checkbox:
Review the Ledger button to see all of the transactions moved to this Sponsor:
Please keep in mind the month lock process:
Payments and/or Fees can be made from the agreement or directly on the student record:
Placement
If you are looking to configure settings related to the Placement department, all of the relevant setup options, including all of the information you will read in this section, can be found under Placement -> Setup.
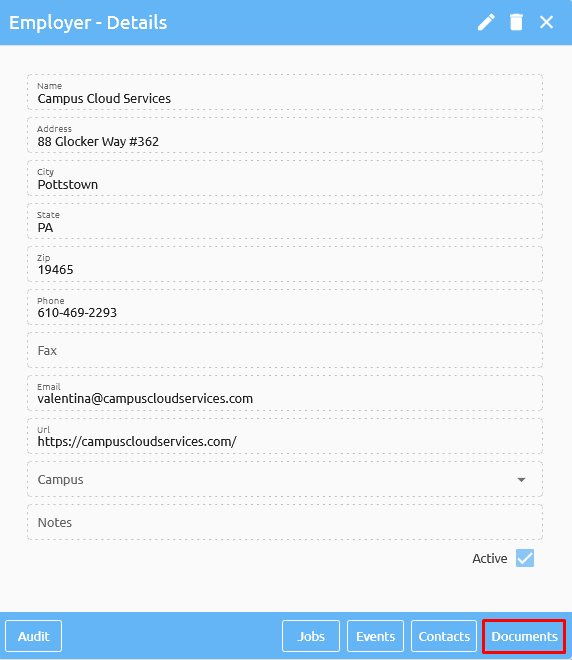
Employers
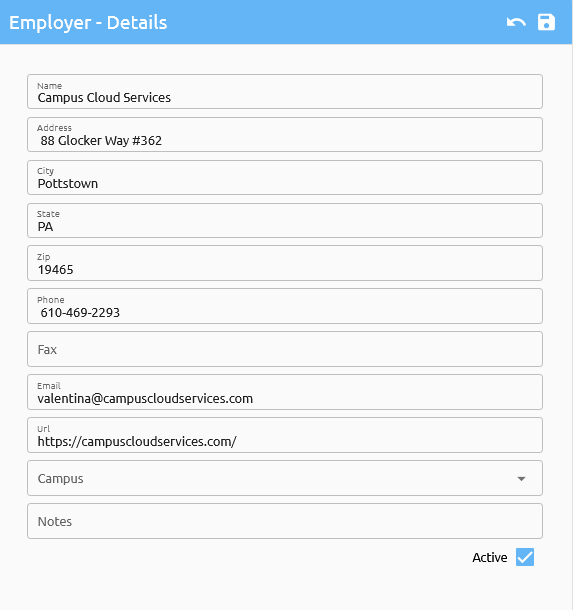
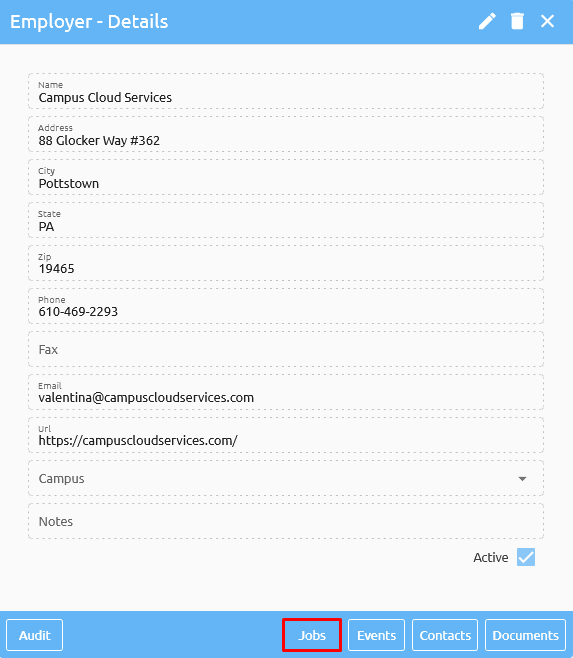
To add a new employer, simply click on the plus sign located in the top-right corner of the page. Alternatively, if you need to make changes to an existing employer, simply click on the employer's name to edit their details.
In my example, I am adding Campus Cloud Services as an employer.
To access the details of already existing or newly added employers, you can simply click on their name in the Employers list.

In the section dedicated to each employer's information, you have the opportunity to enhance the level of detail by including additional items such as:
If you want to view the list of Jobs associated with a particular employer or add new job openings to their profile, you can do so by clicking on the "Jobs" button at the bottom of their employer profile page.
To add a new job opening for your employer, simply click on the plus sign in the top-right corner of the Jobs tab. This will bring up a form where you can input all of the relevant details for the job opening.
When filling out the form, you will also need to select various options from drop-down menus. These options may include the Employer Job Type, Employer Job Benefits, and Employer Contact, among others. It's important to note that these options are customized and set up by you and your institute, so you can tailor them to your specific needs and preferences.
💡 Tip: When adding a new job opening for an employer, it's important to consider whether you want the job to be visible to students on the Job Board in their student portal. If you want the job to be visible, you should check the Job Board checkbox before saving the job opening.
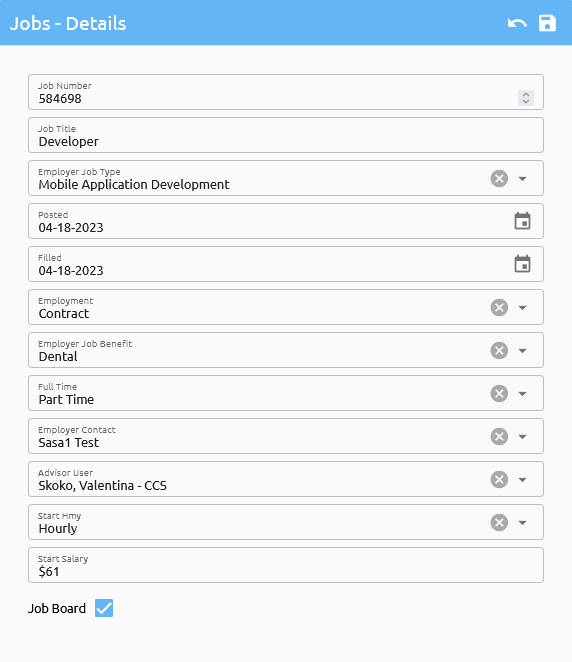
Once you have filled out all of the relevant details for a new job opening and selected the appropriate options, you can save the job by clicking on the Save button in the top-right corner. This will add the job to the list of available jobs for the selected employer.

If you want to view the list of Events associated with a particular employer or add new events to their profile, you can do so by clicking on the "Events" button at the bottom of their employer profile page.
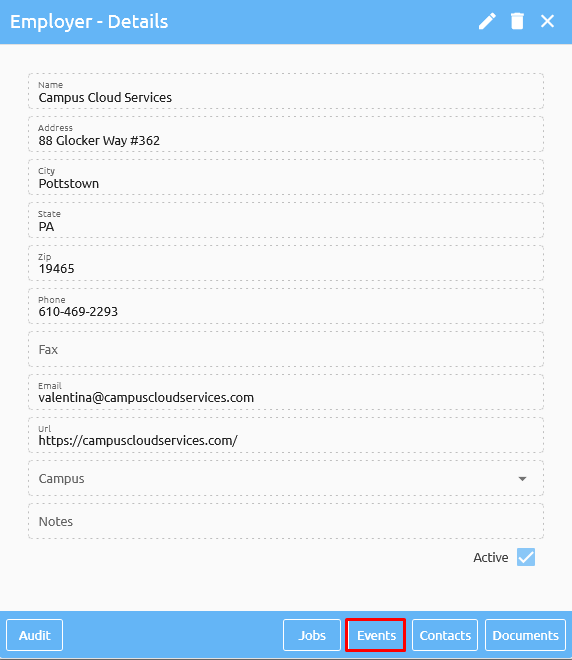
To add a new event for your employer, simply click on the plus sign in the top-right corner. This will bring up a form where you can input all of the relevant details regarding the event. Keep in mind the Event drop-down is customized and set up by you and your institute.
If you want to view the list of Contacts associated with a particular employer or add a new contact to their profile, you can do so by clicking on the "Contacts" button at the bottom of their employer profile page.
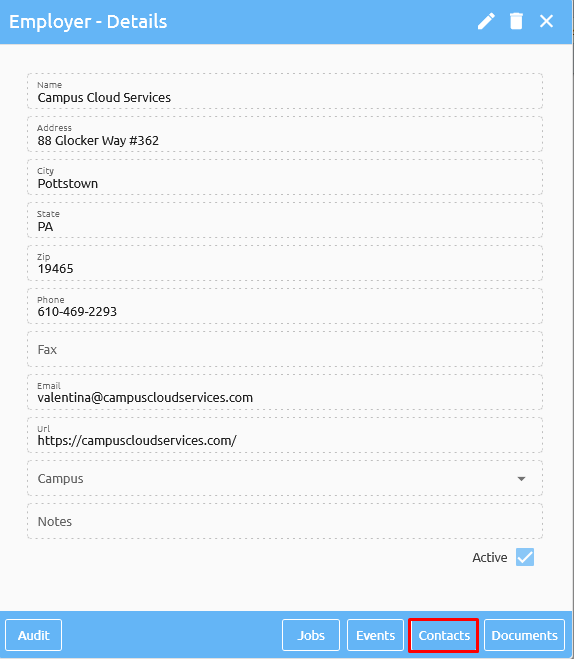
To add a new Contact for your employer, simply click on the plus sign in the top-right corner. This will bring up a form where you can input all of the relevant details regarding the contact.
Once done, you can save the contact by clicking on the Save button in the top-right corner. This will add the contact to the list.

If you want to view the list of Documents associated with a particular employer or add Document(s) to their profile, you can do so by clicking on the "Documents" button at the bottom of their employer profile page.
To add Documents for your employer, simply click on the plus sign in the top-right corner.
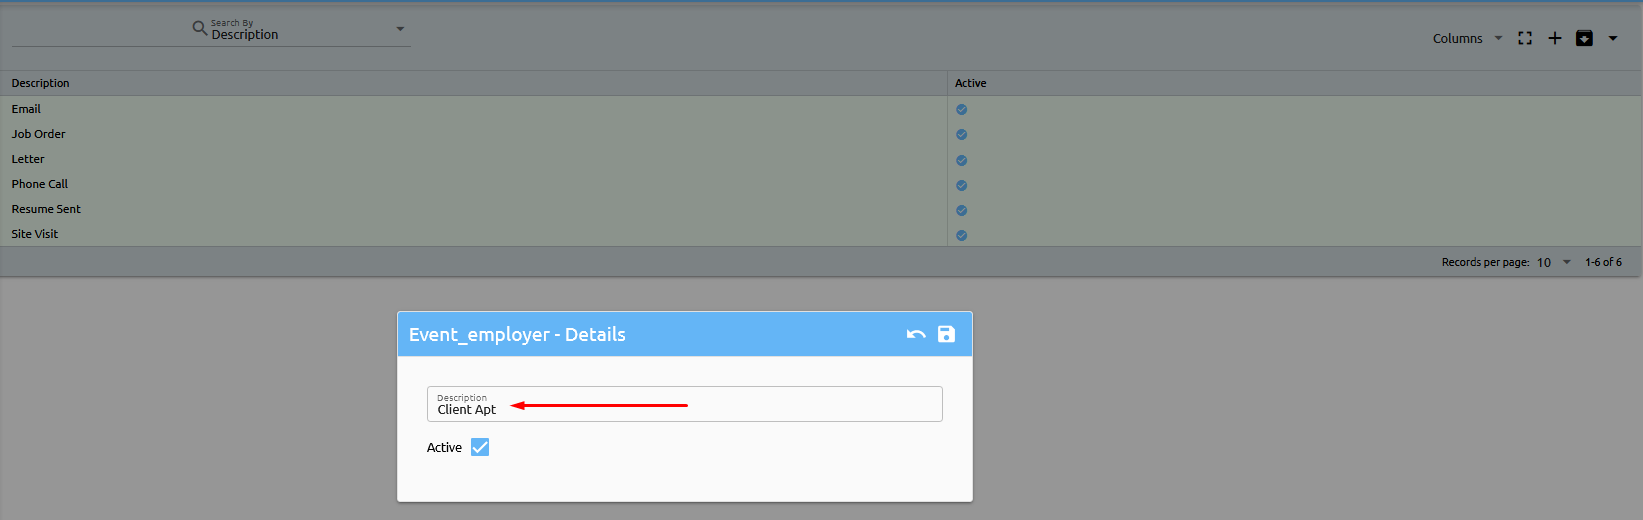
Employers Events
Before you can add events to an employer profile, you will need to set up your employer events. To set up your employer events, you can navigate to the "Employer Events" section in your Placement department, and add new events as needed. Once you have your events set up, you can begin adding them to employer profiles.
In my example below, I will be adding "Client Apt" to my list of Employer Events..

Benefits
Job benefits are additional perks and advantages offered by an employer to its employees beyond their regular pay and compensation package. These benefits can include things like health insurance, retirement plans, paid time off, stock options, flexible work arrangements, bonuses, and more.

Job Types
Job types refer to different categories or fields of work that require specific skills, knowledge, and qualifications. Some common job types include sales, web design, engineering, healthcare, finance, education, and many others.
Maintenance
System Settings
System Settings
Under the Maintenance > System > System Settings section, you can maintain various settings for your system. In the first tab, labeled "System settings," you will find the following explanation for each value:
Minimum Password Strength - This value sets the minimum strength requirement for passwords created by students or users. A higher number indicates a stronger password requirement (more complexity). For example, a value of 3, being medium strength, might require a combination of uppercase and lowercase letters and at least one digit.
Domain Name - This is the URL or web address for your instance of Campus Cloud.
College Name - Enter the full name of your institution.
Automatic Lead to Applicant - If set to 1 (YES), incoming leads will be automatically converted to applicants.
Admissions - Default Rep (username) - If a lead does not have an assigned Admissions Representative, this setting designates the default Admissions Rep to be used.
Inbox Interval (seconds) - The interval at which the system refreshes your inbox. Recommended minimum is 300 seconds (5 minutes).
Dashboard Interval (seconds) - The interval at which the system refreshes your dashboard, where you view new leads, online applications, etc.
Twilio Response Message - The automated response message from Twilio for SMS and voice communications. e.g., if somebody sent something to your number, our server would respond through Twilio services saying "Thank you for contacting...".
Your general information, such as your: Fill in your institution's details such as logo, IPEDS ID, OPE ID, address, city, state, zip, website, and phone number.
Show AY/AW/PP on Statements - If set to 1 (YES), student statements will display Academic Years, Award Years, and Payment Periods.
Admissions Reps for [C]ampus or [A]ll - This tells the system (on your admissions dashboard and any other places where you can assign admissions reps) should it filter only reps associated with the reps home campus or all campuses.
Push to student tunnel (in minutes) - Establishes a time window during which students can use a secure tunnel to enter their SSN and DOB for login and document signing.
Packaging Snapshots Interval (weeks) - Defines how often snapshots of packaging are taken (cron job).
DOD [O]pen or [C]losed for edit - Determines whether the date of determination can be edited by authorized users.
Badge Template (1, 2, or 3) - Selects a badge template for student printing.
Student Portal Res Life - setting controls whether the "Res Life" tab is visible or hidden in the student portal. If turned on (1 or YES), students can access housing-related information. If turned off (0 or NO), the tab is not shown.
Student Self Registration - If set to 1 (YES), students can self-register for courses through the student portal. 0 (NO) if you do not allow self-registration.
Student Portal FERPA - If set to 1 (YES), students can see their own FERPA (privacy) information in the student portal.
Student Portal Attendance & Gradebook - If set to 1 (YES), students can view their attendance and grades in the student portal.
Default Twilio SID/TOKEN - For Twilio account users, this is where you enter your Twilio SID and TOKEN.
Dashboard - Leads age (days) - Specifies the maximum number of days a lead can remain in the admissions dashboard without scheduled actions.
Quickbooks [O]nline or [D]esktop - This setting is used to indicate whether you are using QuickBooks Online or QuickBooks Desktop for your financial management. It helps the system understand the version you are using to facilitate data integration and communication.
Communication Plans - Skip weekends and holidays - This setting determines whether communication plans should skip sending messages and emails on weekends and holidays. If set to 1 (YES), the system will avoid sending communications on weekends and holidays.
Packaging Loans [G]ross / [N]et - This setting defines how financial aid loans should be packaged. If set to "Gross," the system will package students for the full loan amount before calculating the net amount. If set to "Net," the system will package students for the net amount after deducting any fees or interest.
TimeZone - This setting allows you to select the time zone your institution is located in. This ensures that all date and time-related functions within the system are aligned with your local time zone.
Allow Student Portal Name Change - If set to 1 (YES), this setting allows students to change their name in their student portal.
Twilio Application SID - This refers to a unique identifier for your Twilio application, which is a communication platform. Twilio is used for sending SMS (text) messages and phone calls through Campus Cloud.
Import DNC Exclude (days) - For the "Do Not Call" (DNC) process in Campus Cloud's Admissions section, this setting lets you specify the number of days from the lead date during which the DNC flag should not be set. In other words, the system won't mark leads as "Do Not Call" within this exclusion period.
Student Portal - Show Inbox - If set to 1 (YES), this setting enables students to view and use the inbox feature in their student portal. The inbox could be a place where students receive messages or notifications from the institution.
Student Portal - Exclude Awards - If your institution does not offer Financial Aid and you want to exclude the awards tab from the student portal, setting this option to 1 (YES) will hide the awards tab.
Emails
The "Emails" tab is where you set up your institution's email server details for communication purposes. You'll need to provide information such as the incoming and outgoing mail server addresses, server username, password, and outgoing port.
New Password on New Enrollment:
Setting to 0: The system will not generate a new password when a new enrollment is created. The password will remain unchanged.
Setting to 1: The system will generate a new password every time a new enrollment is created.
SMS Email Notification:
Setting to 0: SMS email notifications are turned off.
Setting to 1: SMS email notifications are turned on. The system will send you an email notification whenever a student responds to their text message in the system.
LMS
The "LMS" tab in the system settings is where you establish a connection to your Learning Management System (LMS), which is the platform used for managing and delivering educational courses and content. In this tab, you can input the necessary details to integrate your LMS with Campus Cloud:
LMS URL: This is the web address (URL) of your Learning Management System. LMS Token: A token is a piece of information used to authenticate and authorize access between different systems. You provide the LMS token to enable secure communication between Campus Cloud and your LMS.
Note that if you're using specific LMS platforms like Canvas or Moodle, it's recommended to coordinate with Campus Cloud staff before making changes in this section. Additionally, for Canvas/Moodle integration, an admin user account needs to be set up in Campus Cloud.
Academics
Under the 'Academics' tab you will see these following values:
FA Credit - This calculates Financial Aid (FA) Credits by dividing Academic Credits by a specified value that is entered in here.
SAP Checkpoint (Weeks) - Determines the interval for running Satisfactory Academic Progress (SAP) evaluations.
SAP Check (C)redit or (A)ttendance – Specify whether SAP should be checked against (C)redits or (A)ttendance.
SAP Check Value (%) - Typically set to 66.6% for SAP calculations.
Re-Entry days - Defines the timeframe for considering a returning student as a re-entry.
Licensure/Accreditation Re-Entry From/To - It’s accreditation that runs from August 1st to July 31st. Licensure runs from July 1st to June 30th. If your accreditation/licensure is different you can change that here.
Full AY in Clock Hours - Establishes what constitutes a full academic year in clock hours.
Default Attendance to Absent - Controls automatic attendance marking when not entered. For example, you have 7 students on the roster, you enter 5 and hit save, the other 2 will be automatically made absent. If you make this to 0, the system will not automatically make them absent.
Show Degree Plan - Determines how the system treats transcript/pathways display. Almost 100 percent of trade schools do not use the degree plan. The degree plan is more for traditional schools.
Registration Time Conflict - If set to 1 (YES), prevents scheduling overlapping classes.
Self Registration - Maximum Credits - Sets the maximum credits students can self-register for.
Override Max Students Registration - This setting controls whether you can exceed a classroom's maximum occupancy when scheduling classes:
Set to 1 (YES): Allows you to schedule more students than the maximum occupancy.
Set to 0 (NO): Prevents scheduling more students once the maximum occupancy is reached.
Registration Repeat - Allows students to retake courses (e.g., F or W grades).
Quickbooks
QuickBooks integration is used for your accounting system. This setting configures the connection between Campus Cloud and QuickBooks, allowing seamless data exchange for financial management purposes.
LDAP
LDAP integration links Campus Cloud with your LDAP system or Microsoft Active Directory. This connection enables account creation for students at different stages of the application process.
Campus Cloud mirrors your chosen process. It can create accounts in LDAP/Active Directory, and even move them between different Organizational Units (OU) or Common Names (CN) as needed. This offers flexibility in when and where student accounts are established.
CRM
CRM integration connects Campus Cloud with your Customer Relationship Management (CRM) system, such as Salesforce or Leads 360. This integration is achieved through APIs, allowing seamless data exchange.
Incoming leads from your CRM can be instantly posted in Campus Cloud, and updates in Campus Cloud can be sent back to your CRM.
This synchronization keeps both systems aligned. Campus Cloud also provides its own CRM, but for those with existing CRMs, an integration has been developed and the setup for it is located here.
Global
Global integration links Campus Cloud with a financial aid servicer and processor, providing streamlined financial aid processing. This integration encompasses both Campus Ivy and Global services.
Authorizenet
AuthorizeNet integration enables Campus Cloud to connect with a credit card processor. Specifically, it connects with AuthorizeNet. This integration allows secure credit card transactions to be conducted over the portal, offering convenient payment options for users.
Frequently asked questions about AuthorizeNet:
Do I set this up right away?
Once set up, payments can start flowing. It's recommended to setup after the conversion process is complete.
Is Merchant ID the same as Current API Login ID?
The Merchant ID should match the ID assigned by Authorize.net to your institute.
Do I keep this on Sandbox until go-live? And would I have to make changes to the Authorize.net side? I ask because there is a LIVE and TEST mode in Authorize.net.
Yes, if your institute is testing transactions, keep it in Sandbox mode. After go-live, use both Live and Sandbox in Campus Cloud for testing.
What is Publish for?
This setting determines if Authorize.net is available in the student portal for payments.
In the payment code, Authorize.net is listed. Do I make any changes to this data?
Your institute can choose to use the listed Authorize.net payment code or create a custom one, like EX WEBPAY.
QBO
ATC
Setting up SMS
You can find your own Twilio number under Maintenance -> Setup -> Account Settings:
Every time a new SMS is received, the system will show it in the Inbox.
From here either reply to SMS, or create a new one by clicking on the New SMS button.
Create a new SMS by going to the Personal Info and clicking on the telephone drop down:?