
Appearance
📘 Student Record Overview
An overview of each section within a student’s record in the SIS interface.
📂 Table of Contents
👤 Personal
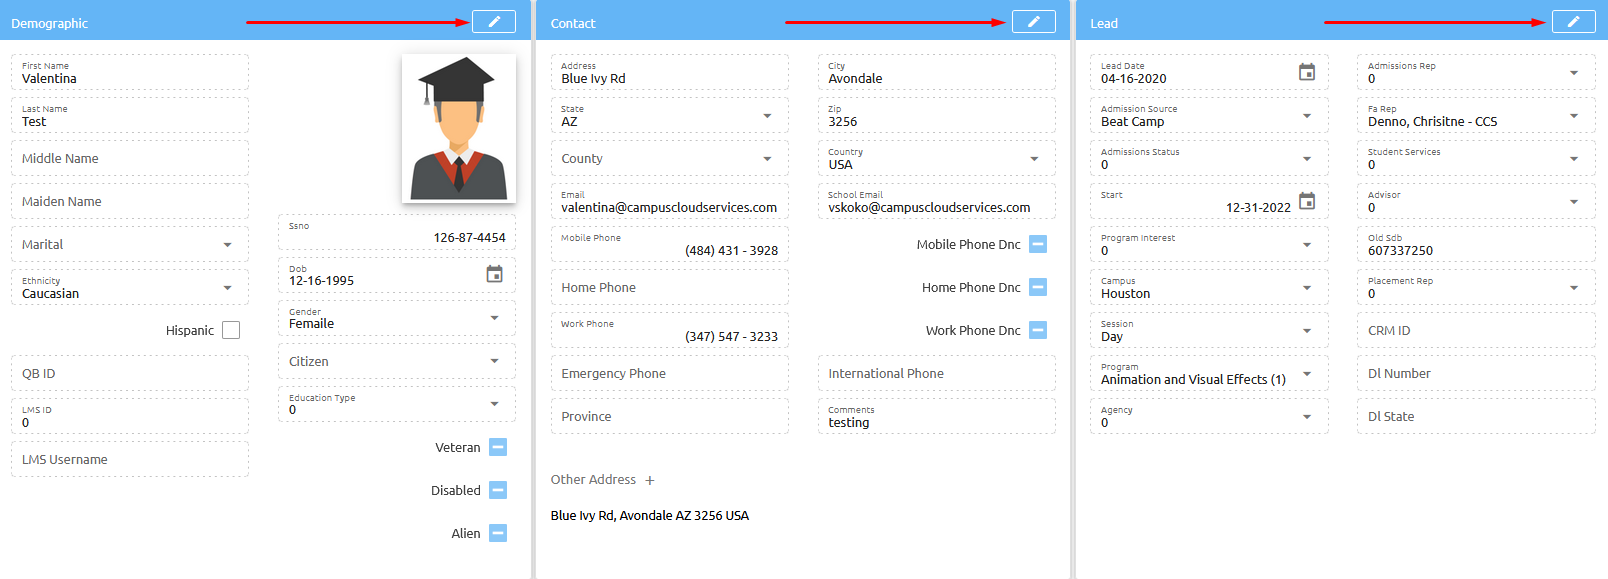
The Personal tab displays the student’s core information.
It is divided into three main sections:
| 🌍 Demographic | ☎️ Contact | ✏️ Lead |
|---|
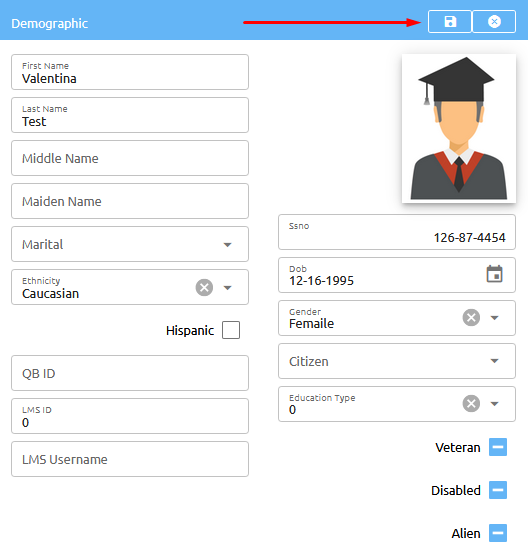
To edit any section, click the ✏️ pencil icon:
Once you're done editing, click the 💾 save icon:
Additional Buttons & Actions
At the bottom of the Personal Info tab, you’ll find the following buttons. Click any of them to expand and see more details:
🔓 Grant Portal Access
When clicking this button - you are giving the student access to their student portal.👥 References
People assigned to the student can be added here.📜 FERPA
Choose what directory info the student allows to be shared.♿ Accessibility
Track and manage student accessibility & disabilities here.Setup found at Academics → Setups → Accessibility.
🎓 Other Education
Track previous education, tests, exams, etc.Setup the TYPE dropdown under Academics → Setup → Education Type.
🔑 Reset Password
Send a new password if the student forgets theirs.📅 Calendar
View the student’s scheduled classes and events.🚪 In / Out
Check in/out records for prox card users.🗑️ Delete
Delete the student’s record!❗ADMIN ONLY❗ - Deleting removes all historical data.
🕵️ Audit
View audit trails for this tab.Additional Info
Every institution is unique — so are their data needs. That’s why the system supports custom fields, letting you track exactly what matters most. Whether it’s visa details, scholarship types, or advisor notes — just add it as a field!
At the bottom of every tab — including Enrollments — you’ll find the Additional Info section. Here, you can create your own fields with:
- ✅ Checkboxes
- 🔘 Radio buttons
- 📦 Drop-down menus
- 📝 Text fields or text areas
This gives you total flexibility to track everything from scholarship tiers to housing preferences.
👉 Learn how to set up custom fields here.
📆 Activities
The Activities tab provides a full audit trail of actions taken on a student's record — including what was done, by whom, and when.
This feature allows staff to:
- Monitor all changes for transparency
- Maintain record integrity
- Quickly resolve discrepancies
Export Options
You can export activity logs in the following formats:
- 📊 Excel
- 📄 CSV
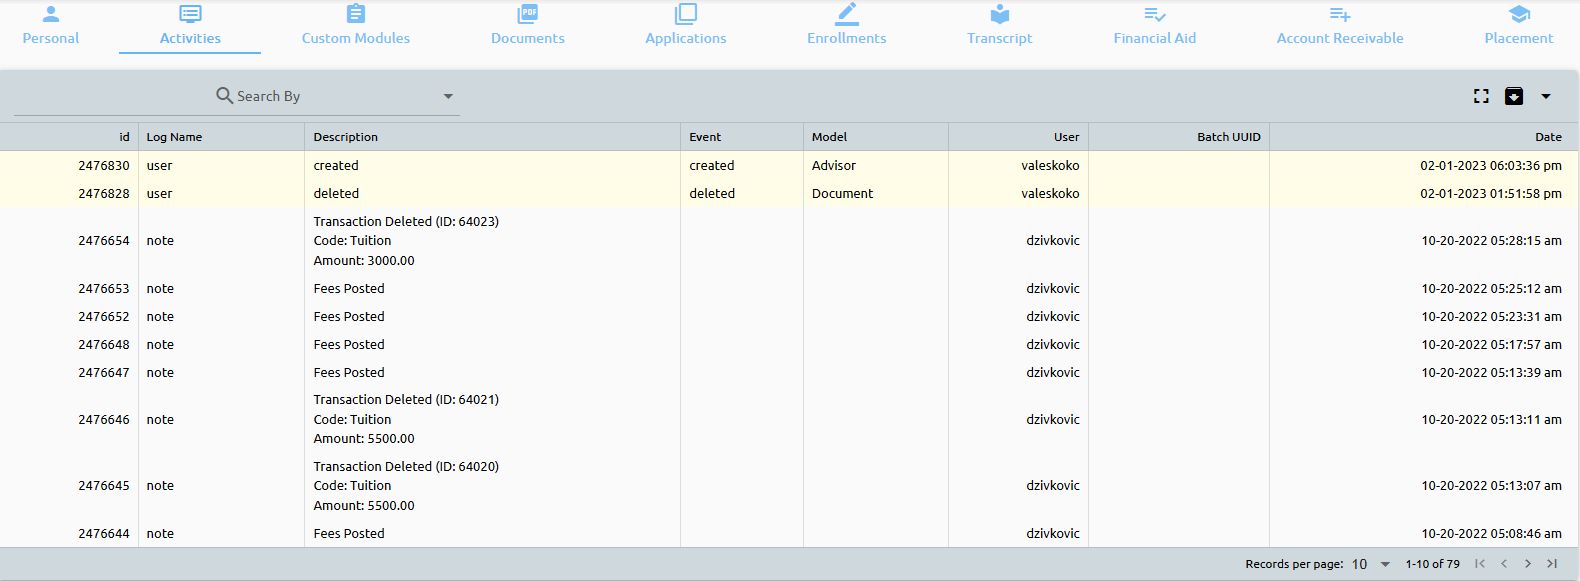
Color-Coded Activity Types
Activities are visually differentiated by color for quick identification:
🔴 Status Changes Significant updates to a student’s status are marked in red for visibility.
🟡 User Activities Actions by system users (e.g. admin, faculty) appear in yellow.
🟢 Emails Email communications (sent/received) are highlighted in green.
🔵 Events Events related to the student’s record are shown in blue for quick tracking.
📁 Documents
Seamlessly Upload, Manage, and Secure Student Documents
The system offers unlimited document storage, making it easy to upload, categorize, and retrieve important files — all in one place.
Uploading a Document
To get started, click ADD DOCUMENT:
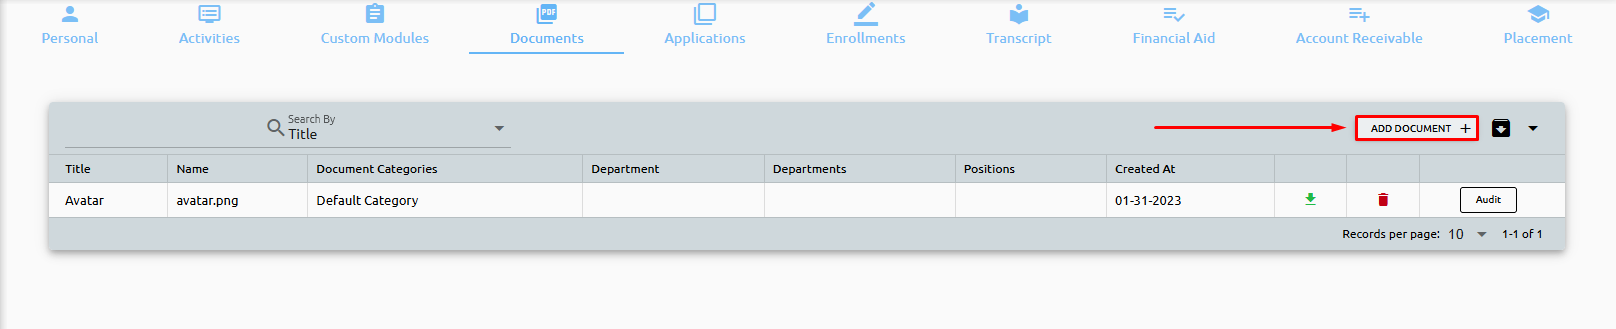
Then, upload the file, enter a Title, and click Save:

You can also assign:
- Category
- Module
- Security Settings
Custom Categories & Permissions
- Create your own categories — like "Accreditation", "Financial Aid", or "Advising Notes" — to keep documents organized by context.
- When uploading, simply assign the document to a category.
- Later, you can instantly filter and retrieve all documents in that category — ideal for audits or accreditation visits.
🔐 Smart Permissions
Each category can use a custom permission template, defining exactly which departments or roles can view its contents — ensuring security, clarity, and compliance.
📨 Applications
Quickly assess where a student is in the admissions process.
This is a quick view of where the student stands. The evaluation of a student and how they progressed can be seen here. New Application in the top right corner is where you can enroll your student.

👉 View the full enrollment process
Additional Info
Every institution is unique — so are their data needs. That’s why the system supports custom fields, letting you track exactly what matters most. Whether it’s visa details, scholarship types, or advisor notes — just add it as a field!
At the bottom of every tab — including Enrollments — you’ll find the Additional Info section. Here, you can create your own fields with:
- ✅ Checkboxes
- 🔘 Radio buttons
- 📦 Drop-down menus
- 📝 Text fields or text areas
This gives you total flexibility to track everything from scholarship tiers to housing preferences.
👉 Learn how to set up custom fields here.
🔄 WorkFlow
Use WorkFlows to streamline student interactions, collect documents, and track department-specific tasks.
Departments can build customized checklists and forms to manage what needs to happen during the student lifecycle — all in one place.
Additional Info
Every institution is unique — so are their data needs. That’s why the system supports custom fields, letting you track exactly what matters most. Whether it’s visa details, scholarship types, or advisor notes — just add it as a field!
At the bottom of every tab — including Enrollments — you’ll find the Additional Info section. Here, you can create your own fields with:
- ✅ Checkboxes
- 🔘 Radio buttons
- 📦 Drop-down menus
- 📝 Text fields or text areas
This gives you total flexibility to track everything from scholarship tiers to housing preferences.
👉 Learn how to set up custom fields here.
What Can You Do with WorkFlows?
🗒️ Create Task Checklists Track outstanding items like forms to complete, meetings to schedule, or next steps.
📤 Send Documents to Students Upload documents that students need to review or sign.
📥 Receive Documents from Students Set required uploads like ID, transcripts, or proof of residency.
📝 Create Custom Fields Collect any additional information specific to your process. Example: Need to collect a student’s eye color? Just create a custom field.
❓ Ask Extra Questions Add questions directly to the workflow — anything from emergency contact details to preferences.
👉 Click here to learn more about building WorkFlows
This flexibility lets departments automate, personalize, and track processes — without relying on email threads or spreadsheets.
🎓 Enrollments
Track key program details, dates, and personalized enrollment data.
The Enrollments tab provides a comprehensive view of a student's program information — including start dates, expected graduation, and enrollment-specific actions.
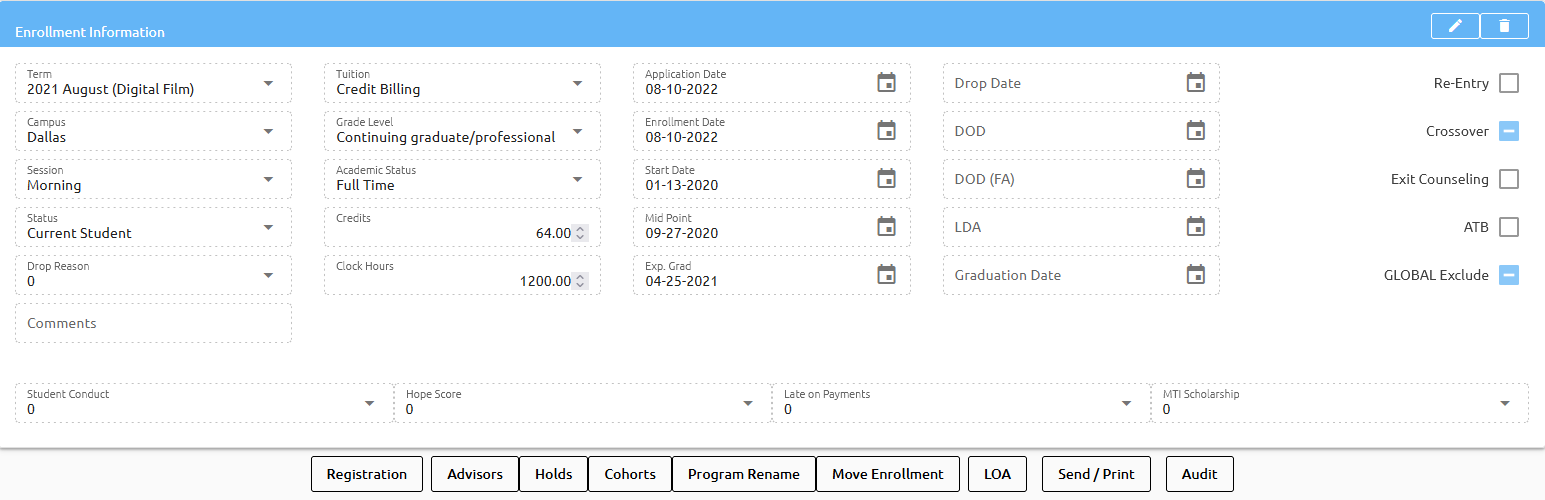
Expected Graduation Date / Mid-Point + Common Abbreviations
Calculation Formula:Start Date + Program Length + Holidays = Expected Graduation Date / Mid-Point
Common Enrollment Abbreviations:
| Abbreviation | Meaning |
|---|---|
| DOD | Date of Determination |
| LDA | Last Day of Attendance |
| ATB | Ability to Benefit |
Enrollment Tools & Actions
Each enrollment record includes powerful tools at the bottom of the tab:
📝 Registration
To register students for classes, click this button. This works just like the Registration button found on the Transcript tab.
👥 Advisors
Track and assign advisors for each student enrollment.
⛔ Holds
Apply and manage Holds tied to this enrollment. Setup under Setups → Holds.
When a student is placed on hold, a color-coded alert bar appears on their record — for example, a red bar signals an unresolved hold.
How to Use:
- Select a hold type and click Add Hold
- Once resolved, click Off Hold to remove it
- The system automatically tracks:
- On/Off Hold dates
- User and department who applied or removed the hold
- Any notes entered for reference
🧑🤝🧑 Cohorts
Group students into Cohorts — assign one or multiple. Setup found under Maintenance → System → Cohorts.
✏️ Program Rename
Rename the student’s program without affecting their transcript.
⚠️ Warning
This is not a Program Transfer! To transfer a student into a different program, click here to learn how.
🔀 Move Enrollment
This button allows for the moving of one enrollment record to another enrollment record. It will move the transcript data and AR to the new enrollment. Once all is moved, old transcript, AR and enrollment will be deleted.
💤 LOA
Leave of Absence - is where the students number of days in LOA are tracked.
📤 Send / 🖨️ Print
Send email templates to the student or print official letters and ID cards.
Additional Info
Every institution is unique — so are their data needs. That’s why the system supports custom fields, letting you track exactly what matters most. Whether it’s visa details, scholarship types, or advisor notes — just add it as a field!
At the bottom of every tab — including Enrollments — you’ll find the Additional Info section. Here, you can create your own fields with:
- ✅ Checkboxes
- 🔘 Radio buttons
- 📦 Drop-down menus
- 📝 Text fields or text areas
👉 Learn how to set up custom fields here.
📜 Transcript
The Transcript tab provides a comprehensive inventory of the courses a student has taken or needs to take towards their degree. Additionally, it captures the grades they have received and attendance records for each course.
![]()
You'll also find key performance metrics like:
- Grade
- Credits Earned
- Clock Hours
- Hours Attended
- Quality Points
If the student has been auto-billed, a ✅ green checkmark will appear in the Billed column.
In addition detailed information can be viewed, about the student's academic performance, including their Grade, Credits Earned, Clock Hours, Attended, and Quality Points.
💡 Tip: If you notice unusual totals or discrepancies, check your Grade Scale setup to ensure all relevant checkboxes are selected (e.g., “Counts Toward GPA,” “Counts Toward MTF”).
👉 Learn more about the Transcript tab here
Transcript Tools & Actions
At the bottom of the Transcript tab, you will find several useful buttons that provide additional functionality:
Show Course Details: This button enables users to access detailed information about specific courses. By checking off the boxes next to the courses of interest and clicking this button, the system will display the relevant details.
Move Courses: This button allows users to move courses from one enrollment to another. By checking off the boxes next to the courses they want to move and clicking this button, users can easily transfer courses to a new enrollment.
Change Course: This button enables users to replace a course with another. By selecting the course they wish to change and choosing a replacement course, users can make quick and easy updates to a student's transcript.
Unschedule: This button allows users to remove courses from a student's schedule. By checking off the boxes next to the courses they wish to unschedule and clicking the button, users can quickly update a student's schedule.
Add Course: Add a course to a student's transcript; the course will be automatically scheduled upon addition.
Print Transcript: Print a student’s transcript using one of the three pre-built transcript options — Standard, Standard Letterhead 1, or Standard Letterhead 2. Institutions can also create custom transcripts.
Print Overall Transcript: Print all transcripts associated with a student’s account, useful if multiple enrollments exist.
Print Progress Card: Print a student’s progress card, providing an overview of their academic progress.
Print Granted Hours: Print credit granted hours for completed courses.
Print Schedule: Print a student’s schedule for all terms or a selected term.
Additional buttons include:
Registration: The Registration offers the ability to register students into their classes. This button works in the same manner as the Registration button found under the enrollments tab.
Re-add Courses: Automatically adds all catalog courses not already on the student’s transcript.
Honors: Apply term or graduation honors to students. Click here to learn more.
Attendance Calendar: View the student’s attendance records on a calendar.
20% Calculation: A policy allowing students to miss up to 20% of scheduled course hours without penalty.
💰 Financial Aid
The Financial Aid tab contains everything related to a student's aid — from packaging to payment plans.

Here’s a quick overview of what you’ll find on this tab:
- Setup – Begin by packaging the student’s financial aid.
- Awards – View and schedule awards after packaging.
- Payment Plans – Access the student’s payment plan details here.
- Summary – Shows a snapshot of the packaging summary.
- Aid Years – Add the correct aid year before packaging the student.
- Global – If you're integrated with Global, packaging details will display here.
👉 Click here to learn how to package a student for financial aid.
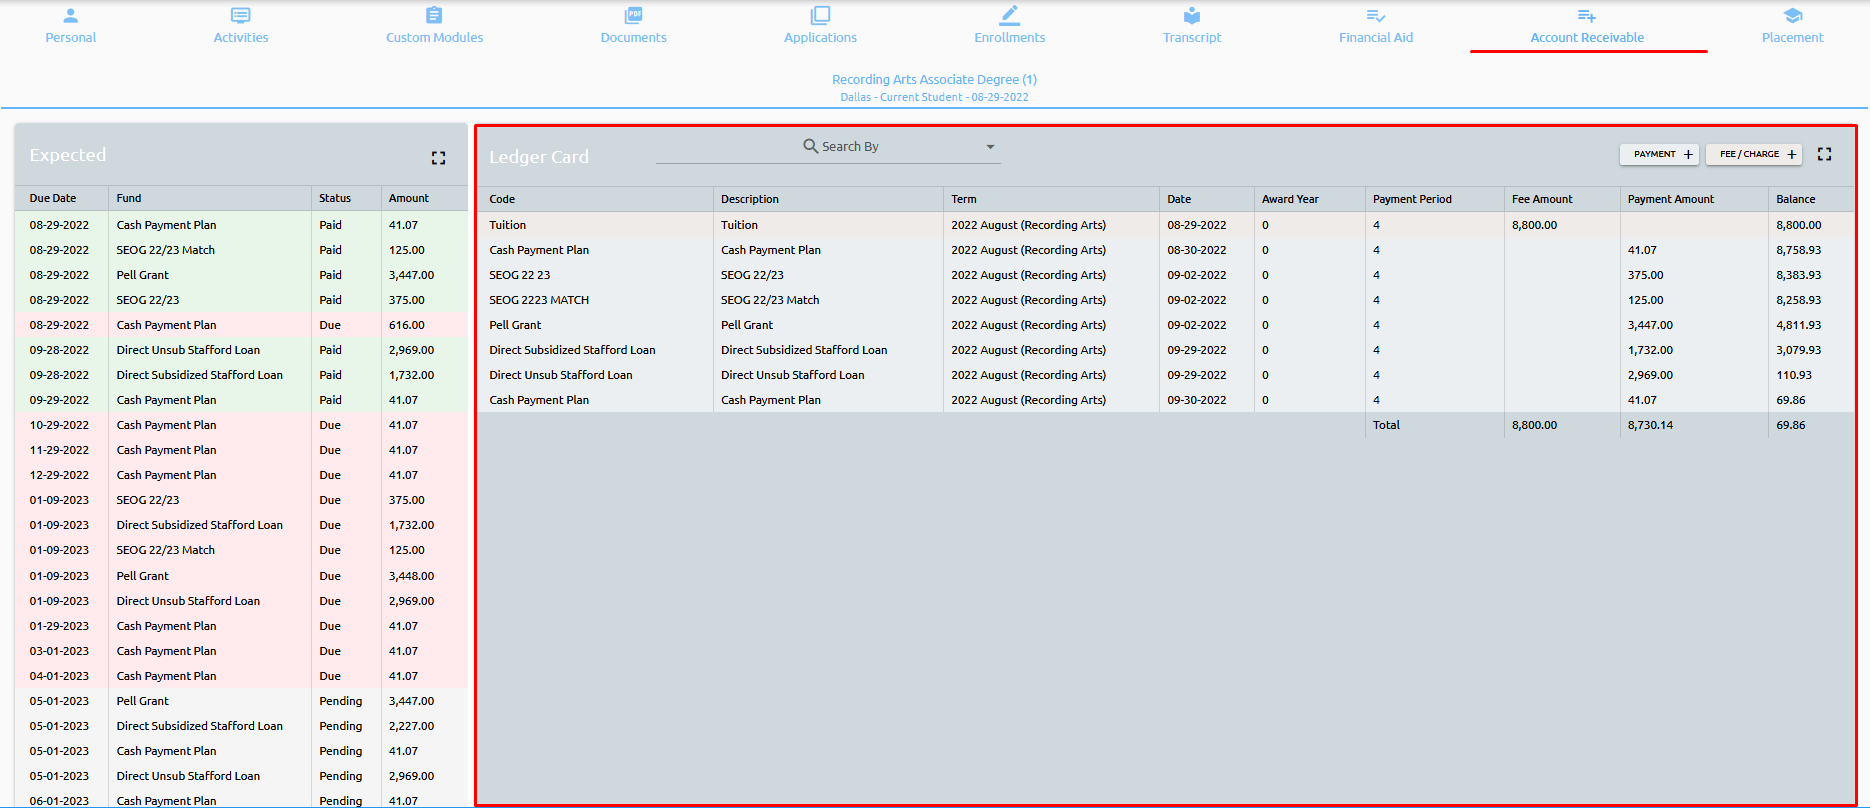
🧾 Account Receivable
The Account Receivable tab provides a clear, real-time view of each student’s financial standing — including financial aid, payment plans, and direct charges.
Financial Aid & Payment Plans (Left Panel)
This panel displays a summary of the student’s financial aid and payment plans, with clear status indicators:
- Green = Paid
- Red = Due
You’ll see:
- All financial aid items, marked as Pending, Due, or Paid
- All active payment plans, with their current status (Pending / Due / Paid)
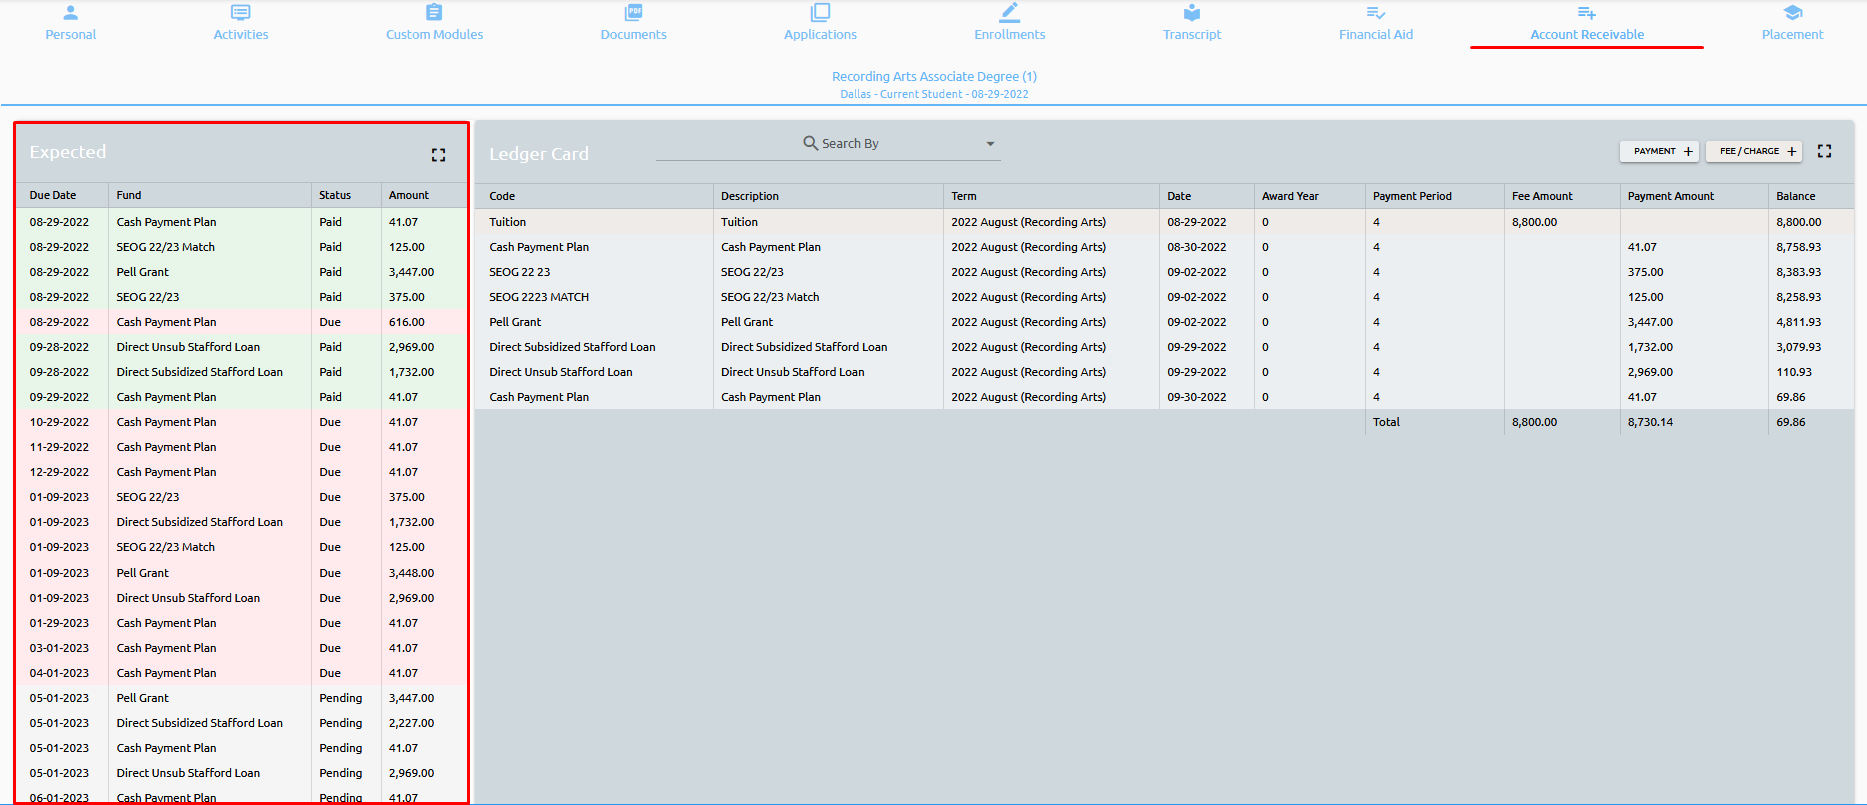
AR Ledger (Right Panel)
The right-hand panel shows the full Accounts Receivable (AR) ledger, including:
- Charges, credits, and payment history
- Running balance for the student’s account
- A date-stamped list of financial transactions
If the student does not have financial aid, only this AR panel will be shown.
👉 Click here to read more about the Accounts Receivable tab and its functionalities.
📌 Placement
This is where job placements and events can be added to students.
👉 Click here to read more about the placement module.